
|
|
|
 在 GitHub 上檢視原始碼 在 GitHub 上檢視原始碼
|
|
import tensorflow as tf
import numpy as np
2023-10-28 01:21:58.219231: E external/local_xla/xla/stream_executor/cuda/cuda_dnn.cc:9261] Unable to register cuDNN factory: Attempting to register factory for plugin cuDNN when one has already been registered
2023-10-28 01:21:58.219277: E external/local_xla/xla/stream_executor/cuda/cuda_fft.cc:607] Unable to register cuFFT factory: Attempting to register factory for plugin cuFFT when one has already been registered
2023-10-28 01:21:58.220822: E external/local_xla/xla/stream_executor/cuda/cuda_blas.cc:1515] Unable to register cuBLAS factory: Attempting to register factory for plugin cuBLAS when one has already been registered
張量是具有一致類型 (稱為 dtype) 的多維陣列。您可以在 tf.dtypes 查看所有支援的 dtypes。
如果您熟悉 NumPy,則張量 (有點) 像 np.arrays。
所有張量都像 Python 數字和字串一樣是不可變的:您永遠無法更新張量的內容,只能建立新的張量。
基本概念
首先,建立一些基本張量。
以下是「純量」或「階數 0」張量。純量包含單一值,且沒有「軸」。
# This will be an int32 tensor by default; see "dtypes" below.
rank_0_tensor = tf.constant(4)
print(rank_0_tensor)
tf.Tensor(4, shape=(), dtype=int32)
「向量」或「階數 1」張量類似於值清單。向量有一個軸
# Let's make this a float tensor.
rank_1_tensor = tf.constant([2.0, 3.0, 4.0])
print(rank_1_tensor)
tf.Tensor([2. 3. 4.], shape=(3,), dtype=float32)
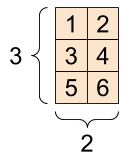
「矩陣」或「階數 2」張量有兩個軸
# If you want to be specific, you can set the dtype (see below) at creation time
rank_2_tensor = tf.constant([[1, 2],
                             [3, 4],
                             [5, 6]], dtype=tf.float16)
print(rank_2_tensor)
tf.Tensor(
[[1. 2.]
 [3. 4.]
 [5. 6.]], shape=(3, 2), dtype=float16)
純量,形狀:[] |
向量,形狀:[3] |
矩陣,形狀:[3, 2] |
|---|---|---|

|

|
|
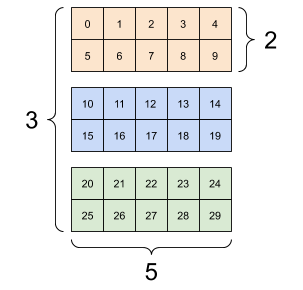
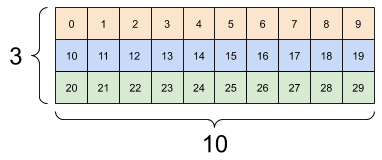
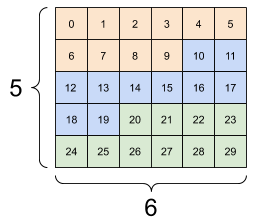
張量可以有更多軸;以下是具有三個軸的張量
# There can be an arbitrary number of
# axes (sometimes called "dimensions")
rank_3_tensor = tf.constant([
  [[0, 1, 2, 3, 4],
   [5, 6, 7, 8, 9]],
  [[10, 11, 12, 13, 14],
   [15, 16, 17, 18, 19]],
  [[20, 21, 22, 23, 24],
   [25, 26, 27, 28, 29]],])

print(rank_3_tensor)
tf.Tensor(
[[[ 0  1  2  3  4]
  [ 5  6  7  8  9]]

 [[10 11 12 13 14]
  [15 16 17 18 19]]

 [[20 21 22 23 24]
  [25 26 27 28 29]]], shape=(3, 2, 5), dtype=int32)
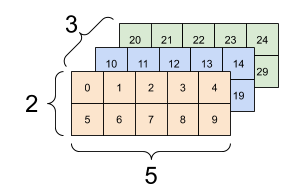
您可以使用多種方式視覺化具有兩個以上軸的張量。
3 軸張量,形狀:[3, 2, 5] |
||
|---|---|---|
|

|

|
您可以使用 np.array 或 tensor.numpy 方法將張量轉換為 NumPy 陣列
np.array(rank_2_tensor)
array([[1., 2.],
       [3., 4.],
       [5., 6.]], dtype=float16)
rank_2_tensor.numpy()
array([[1., 2.],
       [3., 4.],
       [5., 6.]], dtype=float16)
張量通常包含浮點數和整數,但也具有許多其他類型,包括
- 複數
- 字串
基礎 tf.Tensor 類別要求張量必須是「矩形」,也就是說,沿著每個軸,每個元素的大小都相同。但是,有些特殊類型的張量可以處理不同的形狀
您可以對張量執行基本數學運算,包括加法、元素級乘法和矩陣乘法。
a = tf.constant([[1, 2],
                 [3, 4]])
b = tf.constant([[1, 1],
                 [1, 1]]) # Could have also said `tf.ones([2,2], dtype=tf.int32)`

print(tf.add(a, b), "\n")
print(tf.multiply(a, b), "\n")
print(tf.matmul(a, b), "\n")
tf.Tensor(
[[2 3]
 [4 5]], shape=(2, 2), dtype=int32)

tf.Tensor(
[[1 2]
 [3 4]], shape=(2, 2), dtype=int32)

tf.Tensor(
[[3 3]
 [7 7]], shape=(2, 2), dtype=int32)
print(a + b, "\n") # element-wise addition
print(a * b, "\n") # element-wise multiplication
print(a @ b, "\n") # matrix multiplication
tf.Tensor(
[[2 3]
 [4 5]], shape=(2, 2), dtype=int32)

tf.Tensor(
[[1 2]
 [3 4]], shape=(2, 2), dtype=int32)

tf.Tensor(
[[3 3]
 [7 7]], shape=(2, 2), dtype=int32)
張量用於各種運算 (或「Ops」)。
c = tf.constant([[4.0, 5.0], [10.0, 1.0]])

# Find the largest value
print(tf.reduce_max(c))
# Find the index of the largest value
print(tf.math.argmax(c))
# Compute the softmax
print(tf.nn.softmax(c))
tf.Tensor(10.0, shape=(), dtype=float32)
tf.Tensor([1 0], shape=(2,), dtype=int64)
tf.Tensor(
[[2.6894143e-01 7.3105854e-01]
 [9.9987662e-01 1.2339458e-04]], shape=(2, 2), dtype=float32)
tf.convert_to_tensor([1,2,3])
<tf.Tensor: shape=(3,), dtype=int32, numpy=array([1, 2, 3], dtype=int32)>
tf.reduce_max([1,2,3])
<tf.Tensor: shape=(), dtype=int32, numpy=3>
tf.reduce_max(np.array([1,2,3]))
<tf.Tensor: shape=(), dtype=int64, numpy=3>
關於形狀
張量具有形狀。一些詞彙
- 形狀:張量每個軸的長度 (元素數量)。
- 階數:張量軸的數量。純量的階數為 0,向量的階數為 1,矩陣的階數為 2。
- 軸或維度:張量的特定維度。
- 大小:張量中的項目總數,即形狀向量元素的乘積。
張量和 tf.TensorShape 物件具有方便的屬性可存取這些資訊
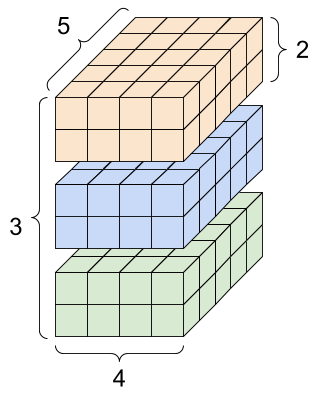
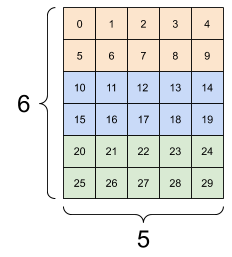
rank_4_tensor = tf.zeros([3, 2, 4, 5])
階數 4 張量,形狀:[3, 2, 4, 5] |
|
|---|---|

|
|
print("Type of every element:", rank_4_tensor.dtype)
print("Number of axes:", rank_4_tensor.ndim)
print("Shape of tensor:", rank_4_tensor.shape)
print("Elements along axis 0 of tensor:", rank_4_tensor.shape[0])
print("Elements along the last axis of tensor:", rank_4_tensor.shape[-1])
print("Total number of elements (3*2*4*5): ", tf.size(rank_4_tensor).numpy())
Type of every element: <dtype: 'float32'>
Number of axes: 4
Shape of tensor: (3, 2, 4, 5)
Elements along axis 0 of tensor: 3
Elements along the last axis of tensor: 5
Total number of elements (3*2*4*5):  120
但請注意,Tensor.ndim 和 Tensor.shape 屬性不會傳回 Tensor 物件。如果您需要 Tensor,請使用 tf.rank 或 tf.shape 函式。這種差異很細微,但在建構圖時 (稍後會說明) 可能很重要。
tf.rank(rank_4_tensor)
<tf.Tensor: shape=(), dtype=int32, numpy=4>
tf.shape(rank_4_tensor)
<tf.Tensor: shape=(4,), dtype=int32, numpy=array([3, 2, 4, 5], dtype=int32)>
雖然軸通常以索引表示,但您應始終追蹤每個軸的含義。軸通常從全域到本機排序:批次軸優先,接著是空間維度,最後是每個位置的特徵。這樣一來,特徵向量就會是連續的記憶體區域。
| 典型軸順序 |
|---|

|
索引
單軸索引
TensorFlow 遵循標準 Python 索引規則,類似於 在 Python 中為清單或字串建立索引,以及 NumPy 索引的基本規則。
- 索引從
0開始 - 負索引從結尾倒數
- 冒號
:用於切片:start:stop:step
rank_1_tensor = tf.constant([0, 1, 1, 2, 3, 5, 8, 13, 21, 34])
print(rank_1_tensor.numpy())
[ 0 1 1 2 3 5 8 13 21 34]
使用純量建立索引會移除軸
print("First:", rank_1_tensor[0].numpy())
print("Second:", rank_1_tensor[1].numpy())
print("Last:", rank_1_tensor[-1].numpy())
First: 0
Second: 1
Last: 34
使用 : 切片建立索引會保留軸
print("Everything:", rank_1_tensor[:].numpy())
print("Before 4:", rank_1_tensor[:4].numpy())
print("From 4 to the end:", rank_1_tensor[4:].numpy())
print("From 2, before 7:", rank_1_tensor[2:7].numpy())
print("Every other item:", rank_1_tensor[::2].numpy())
print("Reversed:", rank_1_tensor[::-1].numpy())
Everything: [ 0  1  1  2  3  5  8 13 21 34]
Before 4: [0 1 1 2]
From 4 to the end: [ 3  5  8 13 21 34]
From 2, before 7: [1 2 3 5 8]
Every other item: [ 0  1  3  8 21]
Reversed: [34 21 13  8  5  3  2  1  1  0]
多軸索引
較高階的張量會透過傳遞多個索引來建立索引。
單軸案例中的完全相同規則獨立適用於每個軸。
print(rank_2_tensor.numpy())
[[1. 2.]
 [3. 4.]
 [5. 6.]]
為每個索引傳遞整數,結果會是純量。
# Pull out a single value from a 2-rank tensor
print(rank_2_tensor[1, 1].numpy())
4.0
您可以使用整數和切片的任意組合建立索引
# Get row and column tensors
print("Second row:", rank_2_tensor[1, :].numpy())
print("Second column:", rank_2_tensor[:, 1].numpy())
print("Last row:", rank_2_tensor[-1, :].numpy())
print("First item in last column:", rank_2_tensor[0, -1].numpy())
print("Skip the first row:")
print(rank_2_tensor[1:, :].numpy(), "\n")
Second row: [3. 4.]
Second column: [2. 4. 6.]
Last row: [5. 6.]
First item in last column: 2.0
Skip the first row:
[[3. 4.]
 [5. 6.]]
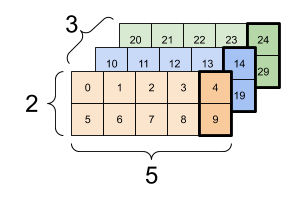
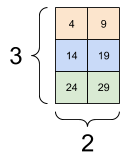
以下是 3 軸張量的範例
print(rank_3_tensor[:, :, 4])
tf.Tensor(
[[ 4  9]
 [14 19]
 [24 29]], shape=(3, 2), dtype=int32)
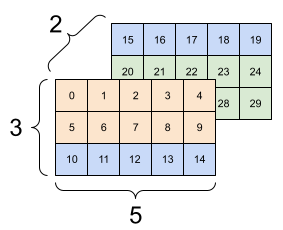
| 選取批次中每個範例所有位置的最後一個特徵 | |
|---|---|
|
|
閱讀張量切片指南,瞭解如何套用索引來操作張量中的個別元素。
操作形狀
重新調整張量的形狀非常實用。
# Shape returns a `TensorShape` object that shows the size along each axis
x = tf.constant([[1], [2], [3]])
print(x.shape)
(3, 1)
# You can convert this object into a Python list, too
print(x.shape.as_list())
[3, 1]
您可以將張量重新調整為新的形狀。tf.reshape 運算快速且經濟實惠,因為不需要複製基礎資料。
# You can reshape a tensor to a new shape.
# Note that you're passing in a list
reshaped = tf.reshape(x, [1, 3])
print(x.shape)
print(reshaped.shape)
(3, 1)
(1, 3)
資料會保持其在記憶體中的版面配置,並建立新的張量,其中具有要求的形狀,指向相同的資料。TensorFlow 使用 C 樣式「列優先」記憶體排序,其中遞增最右邊的索引對應於記憶體中的單一步驟。
print(rank_3_tensor)
tf.Tensor(
[[[ 0  1  2  3  4]
  [ 5  6  7  8  9]]

 [[10 11 12 13 14]
  [15 16 17 18 19]]

 [[20 21 22 23 24]
  [25 26 27 28 29]]], shape=(3, 2, 5), dtype=int32)
如果您展平張量,就可以看到其在記憶體中的版面配置順序。
# A `-1` passed in the `shape` argument says "Whatever fits".
print(tf.reshape(rank_3_tensor, [-1]))
tf.Tensor(
[ 0  1  2  3  4  5  6  7  8  9 10 11 12 13 14 15 16 17 18 19 20 21 22 23
 24 25 26 27 28 29], shape=(30,), dtype=int32)
一般來說,tf.reshape 的唯一合理用途是合併或分割相鄰軸 (或新增/移除 1)。
對於這個 3x2x5 張量,重新調整形狀為 (3x2)x5 或 3x(2x5) 都是合理的做法,因為切片不會混合
print(tf.reshape(rank_3_tensor, [3*2, 5]), "\n")
print(tf.reshape(rank_3_tensor, [3, -1]))
tf.Tensor(
[[ 0  1  2  3  4]
 [ 5  6  7  8  9]
 [10 11 12 13 14]
 [15 16 17 18 19]
 [20 21 22 23 24]
 [25 26 27 28 29]], shape=(6, 5), dtype=int32)

tf.Tensor(
[[ 0  1  2  3  4  5  6  7  8  9]
 [10 11 12 13 14 15 16 17 18 19]
 [20 21 22 23 24 25 26 27 28 29]], shape=(3, 10), dtype=int32)
| 一些良好的重新調整形狀。 | ||
|---|---|---|
|
|
|
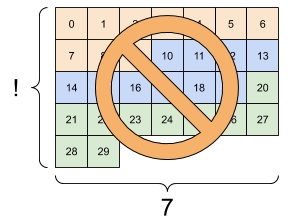
重新調整形狀「適用於」任何具有相同元素總數的新形狀,但如果您不遵守軸的順序,則不會產生任何有用的結果。
在 tf.reshape 中交換軸無法運作;您需要使用 tf.transpose 才能達成目的。
# Bad examples: don't do this

# You can't reorder axes with reshape.
print(tf.reshape(rank_3_tensor, [2, 3, 5]), "\n")

# This is a mess
print(tf.reshape(rank_3_tensor, [5, 6]), "\n")

# This doesn't work at all
try:
  tf.reshape(rank_3_tensor, [7, -1])
except Exception as e:
  print(f"{type(e).__name__}: {e}")
tf.Tensor(
[[[ 0  1  2  3  4]
  [ 5  6  7  8  9]
  [10 11 12 13 14]]

 [[15 16 17 18 19]
  [20 21 22 23 24]
  [25 26 27 28 29]]], shape=(2, 3, 5), dtype=int32)

tf.Tensor(
[[ 0  1  2  3  4  5]
 [ 6  7  8  9 10 11]
 [12 13 14 15 16 17]
 [18 19 20 21 22 23]
 [24 25 26 27 28 29]], shape=(5, 6), dtype=int32)

InvalidArgumentError: { {function_node __wrapped__Reshape_device_/job:localhost/replica:0/task:0/device:GPU:0} } Input to reshape is a tensor with 30 values, but the requested shape requires a multiple of 7 [Op:Reshape]
| 一些不良的重新調整形狀。 | ||
|---|---|---|
|
|
|
您可能會遇到未完全指定的形狀。形狀包含 None (軸長度不明) 或整個形狀為 None (張量的階數不明)。
除了 tf.RaggedTensor 之外,這類形狀只會出現在 TensorFlow 的符號、圖建構 API 的環境中
更多關於 DType 的資訊
若要檢查 tf.Tensor 的資料類型,請使用 Tensor.dtype 屬性。
從 Python 物件建立 tf.Tensor 時,您可以選擇性地指定資料類型。
如果您未指定,TensorFlow 會選擇可用於表示資料的資料類型。TensorFlow 會將 Python 整數轉換為 tf.int32,並將 Python 浮點數轉換為 tf.float32。否則,TensorFlow 會使用 NumPy 在轉換為陣列時使用的相同規則。
您可以從一種類型轉換為另一種類型。
the_f64_tensor = tf.constant([2.2, 3.3, 4.4], dtype=tf.float64)
the_f16_tensor = tf.cast(the_f64_tensor, dtype=tf.float16)
# Now, cast to an uint8 and lose the decimal precision
the_u8_tensor = tf.cast(the_f16_tensor, dtype=tf.uint8)
print(the_u8_tensor)
tf.Tensor([2 3 4], shape=(3,), dtype=uint8)
廣播
廣播是從 NumPy 中的對等功能借鑒的概念。簡而言之,在特定條件下,當對較小的張量執行組合運算時,較小的張量會自動「延展」以符合較大的張量。
最簡單且最常見的情況是,當您嘗試將張量乘以或加到純量時。在這種情況下,純量會廣播為與另一個引數相同的形狀。
x = tf.constant([1, 2, 3])

y = tf.constant(2)
z = tf.constant([2, 2, 2])
# All of these are the same computation
print(tf.multiply(x, 2))
print(x * y)
print(x * z)
tf.Tensor([2 4 6], shape=(3,), dtype=int32)
tf.Tensor([2 4 6], shape=(3,), dtype=int32)
tf.Tensor([2 4 6], shape=(3,), dtype=int32)
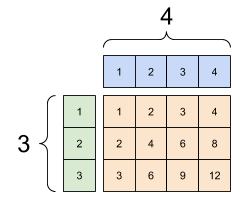
同樣地,長度為 1 的軸可以延展開來與其他引數相符。兩個引數都可以在相同的運算中延展。
在此案例中,3x1 矩陣會與 1x4 矩陣進行元素級乘法,以產生 3x4 矩陣。請注意,前導 1 是選用的:y 的形狀為 [4]。
# These are the same computations
x = tf.reshape(x,[3,1])
y = tf.range(1, 5)
print(x, "\n")
print(y, "\n")
print(tf.multiply(x, y))
tf.Tensor(
[[1]
 [2]
 [3]], shape=(3, 1), dtype=int32)

tf.Tensor([1 2 3 4], shape=(4,), dtype=int32)

tf.Tensor(
[[ 1  2  3  4]
 [ 2  4  6  8]
 [ 3  6  9 12]], shape=(3, 4), dtype=int32)
廣播加法:[3, 1] 乘以 [1, 4] 會產生 [3,4] |
|---|
|
以下是沒有廣播的相同運算
x_stretch = tf.constant([[1, 1, 1, 1],
                         [2, 2, 2, 2],
                         [3, 3, 3, 3]])

y_stretch = tf.constant([[1, 2, 3, 4],
                         [1, 2, 3, 4],
                         [1, 2, 3, 4]])

print(x_stretch * y_stretch)  # Again, operator overloading
tf.Tensor(
[[ 1  2  3  4]
 [ 2  4  6  8]
 [ 3  6  9 12]], shape=(3, 4), dtype=int32)
在大多數情況下,廣播既省時又節省空間,因為廣播運算永遠不會在記憶體中具體化展開的張量。
您可以使用 tf.broadcast_to 查看廣播的外觀。
print(tf.broadcast_to(tf.constant([1, 2, 3]), [3, 3]))
tf.Tensor(
[[1 2 3]
 [1 2 3]
 [1 2 3]], shape=(3, 3), dtype=int32)
與數學運算不同,例如,broadcast_to 不會執行任何特殊操作來節省記憶體。在這裡,您正在具體化張量。
情況可能會變得更複雜。Jake VanderPlas 的著作《Python Data Science Handbook》的這節顯示了更多廣播技巧 (同樣在 NumPy 中)。
tf.convert_to_tensor
大多數運算 (例如 tf.matmul 和 tf.reshape) 採用類別 tf.Tensor 的引數。但是,您會注意到在上述案例中,接受形狀像張量的 Python 物件。
大多數 (但並非所有) 運算會在非張量引數上呼叫 convert_to_tensor。有一個轉換登錄檔,而且大多數物件類別 (例如 NumPy 的 ndarray、TensorShape、Python 清單和 tf.Variable) 都會自動轉換。
如需更多詳細資料,以及如果您有自己的類型想要自動轉換為張量,請參閱 tf.register_tensor_conversion_function。
參差不齊張量
沿著某些軸具有可變元素數量的張量稱為「參差不齊」。針對參差不齊的資料使用 tf.ragged.RaggedTensor。
例如,這無法表示為一般張量
tf.RaggedTensor,形狀:[4, None] |
|---|

|
ragged_list = [
    [0, 1, 2, 3],
    [4, 5],
    [6, 7, 8],
    [9]]
try:
  tensor = tf.constant(ragged_list)
except Exception as e:
  print(f"{type(e).__name__}: {e}")
ValueError: Can't convert non-rectangular Python sequence to Tensor.
請改用 tf.ragged.constant 建立 tf.RaggedTensor
ragged_tensor = tf.ragged.constant(ragged_list)
print(ragged_tensor)
<tf.RaggedTensor [[0, 1, 2, 3], [4, 5], [6, 7, 8], [9]]>
tf.RaggedTensor 的形狀將包含一些長度未知的軸
print(ragged_tensor.shape)
(4, None)
字串張量
tf.string 是一種 dtype,也就是說,您可以在張量中將資料表示為字串 (可變長度位元組陣列)。
字串是不可分割的,且無法像 Python 字串一樣建立索引。字串的長度不是張量的軸之一。請參閱 tf.strings,瞭解操作字串的函式。
以下是純量字串張量
# Tensors can be strings, too here is a scalar string.
scalar_string_tensor = tf.constant("Gray wolf")
print(scalar_string_tensor)
tf.Tensor(b'Gray wolf', shape=(), dtype=string)
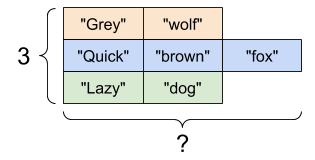
以及字串向量
字串向量,形狀:[3,] |
|---|

|
# If you have three string tensors of different lengths, this is OK.
tensor_of_strings = tf.constant(["Gray wolf",
                                 "Quick brown fox",
                                 "Lazy dog"])
# Note that the shape is (3,). The string length is not included.
print(tensor_of_strings)
tf.Tensor([b'Gray wolf' b'Quick brown fox' b'Lazy dog'], shape=(3,), dtype=string)
在上述列印輸出中,b 字首表示 tf.string dtype 不是 Unicode 字串,而是位元組字串。如需更多關於在 TensorFlow 中使用 Unicode 文字的資訊,請參閱Unicode 教學課程。
如果您傳遞 Unicode 字元,則這些字元會以 utf-8 編碼。
tf.constant("🥳👍")
<tf.Tensor: shape=(), dtype=string, numpy=b'\xf0\x9f\xa5\xb3\xf0\x9f\x91\x8d'>
您可以在 tf.strings 中找到一些字串基本函式,包括 tf.strings.split。
# You can use split to split a string into a set of tensors
print(tf.strings.split(scalar_string_tensor, sep=" "))
tf.Tensor([b'Gray' b'wolf'], shape=(2,), dtype=string)
# ...but it turns into a `RaggedTensor` if you split up a tensor of strings,
# as each string might be split into a different number of parts.
print(tf.strings.split(tensor_of_strings))
<tf.RaggedTensor [[b'Gray', b'wolf'], [b'Quick', b'brown', b'fox'], [b'Lazy', b'dog']]>
三個字串分割,形狀:[3, None] |
|---|
|
text = tf.constant("1 10 100")
print(tf.strings.to_number(tf.strings.split(text, " ")))
tf.Tensor([ 1. 10. 100.], shape=(3,), dtype=float32)
雖然您無法使用 tf.cast 將字串張量轉換為數字,但您可以將其轉換為位元組,然後再轉換為數字。
byte_strings = tf.strings.bytes_split(tf.constant("Duck"))
byte_ints = tf.io.decode_raw(tf.constant("Duck"), tf.uint8)
print("Byte strings:", byte_strings)
print("Bytes:", byte_ints)
Byte strings: tf.Tensor([b'D' b'u' b'c' b'k'], shape=(4,), dtype=string)
Bytes: tf.Tensor([ 68 117  99 107], shape=(4,), dtype=uint8)
# Or split it up as unicode and then decode it
unicode_bytes = tf.constant("アヒル 🦆")
unicode_char_bytes = tf.strings.unicode_split(unicode_bytes, "UTF-8")
unicode_values = tf.strings.unicode_decode(unicode_bytes, "UTF-8")

print("\nUnicode bytes:", unicode_bytes)
print("\nUnicode chars:", unicode_char_bytes)
print("\nUnicode values:", unicode_values)
Unicode bytes: tf.Tensor(b'\xe3\x82\xa2\xe3\x83\x92\xe3\x83\xab \xf0\x9f\xa6\x86', shape=(), dtype=string)

Unicode chars: tf.Tensor([b'\xe3\x82\xa2' b'\xe3\x83\x92' b'\xe3\x83\xab' b' ' b'\xf0\x9f\xa6\x86'], shape=(5,), dtype=string)

Unicode values: tf.Tensor([ 12450  12498  12523     32 129414], shape=(5,), dtype=int32)
tf.string dtype 用於 TensorFlow 中的所有原始位元組資料。tf.io 模組包含用於將資料轉換為位元組和從位元組轉換資料的函式,包括解碼圖片和剖析 csv。
稀疏張量
有時,您的資料是稀疏的,例如非常寬廣的嵌入空間。TensorFlow 支援 tf.sparse.SparseTensor 和相關運算,以有效率地儲存稀疏資料。
tf.SparseTensor,形狀:[3, 4] |
|---|
|
# Sparse tensors store values by index in a memory-efficient manner
sparse_tensor = tf.sparse.SparseTensor(indices=[[0, 0], [1, 2]],
                                       values=[1, 2],
                                       dense_shape=[3, 4])
print(sparse_tensor, "\n")

# You can convert sparse tensors to dense
print(tf.sparse.to_dense(sparse_tensor))
SparseTensor(indices=tf.Tensor(
[[0 0]
 [1 2]], shape=(2, 2), dtype=int64), values=tf.Tensor([1 2], shape=(2,), dtype=int32), dense_shape=tf.Tensor([3 4], shape=(2,), dtype=int64))

tf.Tensor(
[[1 0 0 0]
 [0 0 2 0]
 [0 0 0 0]], shape=(3, 4), dtype=int32)