
|
|
|
 在 GitHub 上檢視原始碼 在 GitHub 上檢視原始碼
|
|
總覽
這個 Colab 介紹了 DTensor,這是 TensorFlow 的擴充功能,可用於同步分散式運算。
DTensor 提供全域程式設計模型,讓開發人員能夠編寫應用程式,以全域方式處理張量,同時在內部管理跨裝置的分散情形。DTensor 會透過稱為單一程式、多重資料 (SPMD) 擴充的程序,根據分shard 指示分散程式和張量。
透過將應用程式與分shard 指示分離,DTensor 能夠在單一裝置、多個裝置,甚至是多個用戶端上執行相同的應用程式,同時保留其全域語意。
本指南介紹分散式運算的 DTensor 概念,以及 DTensor 如何與 TensorFlow 整合。如需瞭解如何在模型訓練中使用 DTensor 的示範,請參閱「使用 DTensor 進行分散式訓練」教學課程。
設定
DTensor ( tf.experimental.dtensor ) 自 2.9.0 版本起已成為 TensorFlow 的一部分。
首先匯入 TensorFlow、 dtensor,並將 TensorFlow 設定為使用 6 個虛擬 CPU。即使這個範例使用虛擬 CPU,DTensor 在 CPU、GPU 或 TPU 裝置上的運作方式也相同。
import tensorflow as tf
from tensorflow.experimental import dtensor

print('TensorFlow version:', tf.__version__)

def configure_virtual_cpus(ncpu):
  phy_devices = tf.config.list_physical_devices('CPU')
  tf.config.set_logical_device_configuration(phy_devices[0], [
        tf.config.LogicalDeviceConfiguration(),
    ] * ncpu)

configure_virtual_cpus(6)
DEVICES = [f'CPU:{i}' for i in range(6)]

tf.config.list_logical_devices('CPU')
2024-01-17 02:31:17.231274: E external/local_xla/xla/stream_executor/cuda/cuda_dnn.cc:9261] Unable to register cuDNN factory: Attempting to register factory for plugin cuDNN when one has already been registered
2024-01-17 02:31:17.231320: E external/local_xla/xla/stream_executor/cuda/cuda_fft.cc:607] Unable to register cuFFT factory: Attempting to register factory for plugin cuFFT when one has already been registered
2024-01-17 02:31:17.232805: E external/local_xla/xla/stream_executor/cuda/cuda_blas.cc:1515] Unable to register cuBLAS factory: Attempting to register factory for plugin cuBLAS when one has already been registered
TensorFlow version: 2.15.0
[LogicalDevice(name='/device:CPU:0', device_type='CPU'),
 LogicalDevice(name='/device:CPU:1', device_type='CPU'),
 LogicalDevice(name='/device:CPU:2', device_type='CPU'),
 LogicalDevice(name='/device:CPU:3', device_type='CPU'),
 LogicalDevice(name='/device:CPU:4', device_type='CPU'),
 LogicalDevice(name='/device:CPU:5', device_type='CPU')]
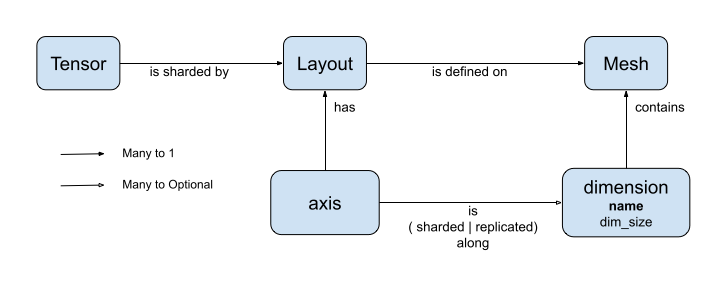
DTensor 的分散式張量模型
DTensor 導入了兩個概念: dtensor.Mesh 和 dtensor.Layout。它們是抽象概念,用於為跨拓撲相關裝置的張量分shard 作業建立模型。
Mesh定義用於運算的裝置清單。Layout定義如何在Mesh上分shard 張量維度。
Mesh
Mesh 代表一組裝置的邏輯卡氏拓撲。卡氏網格的每個維度都稱為「Mesh 維度」,並以名稱指稱。同一個 Mesh 內的 mesh 維度名稱必須是唯一的。
Mesh 維度的名稱會由 Layout 參照,以說明 tf.Tensor 沿著其每個軸的分shard 行為。稍後在 Layout 一節中會更詳細地說明。
Mesh 可以視為裝置的多維陣列。
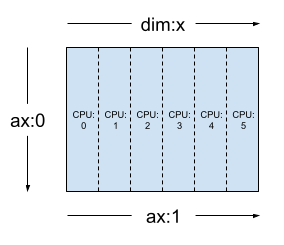
在 1 維 Mesh 中,所有裝置都會在單一 mesh 維度中形成一個清單。下列範例使用 dtensor.create_mesh,沿著 mesh 維度 'x',從 6 個 CPU 裝置建立大小為 6 個裝置的 mesh

mesh_1d = dtensor.create_mesh([('x', 6)], devices=DEVICES)
print(mesh_1d)
Mesh.from_string(|x=6|0,1,2,3,4,5|0,1,2,3,4,5|/job:localhost/replica:0/task:0/device:CPU:0,/job:localhost/replica:0/task:0/device:CPU:1,/job:localhost/replica:0/task:0/device:CPU:2,/job:localhost/replica:0/task:0/device:CPU:3,/job:localhost/replica:0/task:0/device:CPU:4,/job:localhost/replica:0/task:0/device:CPU:5)
Mesh 也可以是多維的。在下列範例中,6 個 CPU 裝置形成一個 3x2 mesh,其中 'x' mesh 維度的大小為 3 個裝置,而 'y' mesh 維度的大小為 2 個裝置
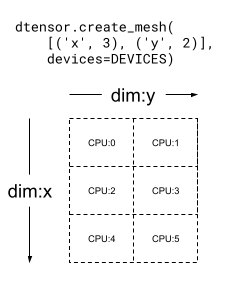
mesh_2d = dtensor.create_mesh([('x', 3), ('y', 2)], devices=DEVICES)
print(mesh_2d)
Mesh.from_string(|x=3,y=2|0,1,2,3,4,5|0,1,2,3,4,5|/job:localhost/replica:0/task:0/device:CPU:0,/job:localhost/replica:0/task:0/device:CPU:1,/job:localhost/replica:0/task:0/device:CPU:2,/job:localhost/replica:0/task:0/device:CPU:3,/job:localhost/replica:0/task:0/device:CPU:4,/job:localhost/replica:0/task:0/device:CPU:5)
Layout
Layout 指定張量在 Mesh 上的分散或分shard 方式。
Layout 的等級應與套用 Layout 的 Tensor 等級相同。對於 Tensor 的每個軸,Layout 可以指定 mesh 維度以跨維度分shard 張量,或將軸指定為「未分shard」。張量會在未跨維度分shard 的任何 mesh 維度中複製。
Layout 的等級和 Mesh 的維度數量不需相符。Layout 的 unsharded 軸不需與 mesh 維度相關聯,而 unsharded mesh 維度也不需與 layout 軸相關聯。
讓我們分析先前章節中建立的 Mesh 的幾個 Layout 範例。
在 1 維 mesh (例如 [("x", 6)]) (mesh_1d,位於先前章節中) 上,Layout(["unsharded", "unsharded"], mesh_1d) 是等級 2 張量的 layout,會在 6 個裝置之間複製。 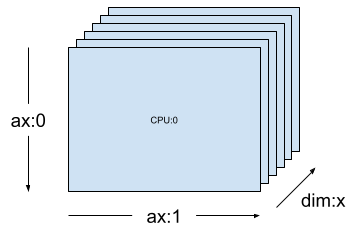
layout = dtensor.Layout([dtensor.UNSHARDED, dtensor.UNSHARDED], mesh_1d)
使用相同的張量和 mesh,layout Layout(['unsharded', 'x']) 會跨 6 個裝置分shard 張量的第二個軸。
layout = dtensor.Layout([dtensor.UNSHARDED, 'x'], mesh_1d)
假設 2 維 3x2 mesh (例如 [("x", 3), ("y", 2)]) (mesh_2d,來自先前章節),Layout(["y", "x"], mesh_2d) 是等級 2 Tensor 的 layout,其第一個軸會跨 mesh 維度 "y" 分shard,而第二個軸會跨 mesh 維度 "x" 分shard。
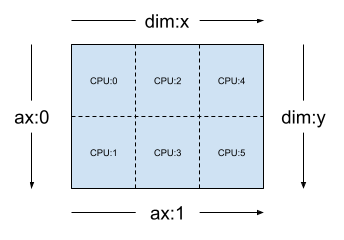
layout = dtensor.Layout(['y', 'x'], mesh_2d)
對於相同的 mesh_2d,layout Layout(["x", dtensor.UNSHARDED], mesh_2d) 是等級 2 Tensor 的 layout,該張量會在 "y" 之間複製,而第一個軸則會在 mesh 維度 x 上分shard。

layout = dtensor.Layout(["x", dtensor.UNSHARDED], mesh_2d)
單一用戶端和多用戶端應用程式
DTensor 支援單一用戶端和多用戶端應用程式。Colab Python 核心是單一用戶端 DTensor 應用程式的範例,其中只有一個 Python 程序。
在多用戶端 DTensor 應用程式中,多個 Python 程序會共同作為一致的應用程式執行。多用戶端 DTensor 應用程式中 Mesh 的卡氏網格可以跨裝置延伸,無論這些裝置是本機連接到目前的用戶端,還是遠端連接到另一個用戶端。 Mesh 使用的所有裝置集合都稱為全域裝置清單。
在多用戶端 DTensor 應用程式中建立 Mesh 是一種集體作業,其中全域裝置清單對於所有參與的用戶端而言都相同,而 Mesh 的建立則可作為全域屏障。
在 Mesh 建立期間,每個用戶端都會提供其本機裝置清單以及預期的全域裝置清單。DTensor 會驗證這兩個清單是否一致。如需多用戶端 mesh 建立和全域裝置清單的詳細資訊,請參閱 dtensor.create_mesh 和 dtensor.create_distributed_mesh 的 API 文件。
單一用戶端可以視為多用戶端的特殊情況,只有 1 個用戶端。在單一用戶端應用程式中,全域裝置清單與本機裝置清單相同。
作為分shard 張量的 DTensor
現在開始使用 DTensor 進行編碼。輔助函式 dtensor_from_array 示範如何從看起來像 tf.Tensor 的項目建立 DTensor。此函式會執行兩個步驟
- 將張量複製到 mesh 上的每個裝置。
- 根據其引數中要求的 layout 分shard 副本。
def dtensor_from_array(arr, layout, shape=None, dtype=None):
  """Convert a DTensor from something that looks like an array or Tensor.

  This function is convenient for quick doodling DTensors from a known,
  unsharded data object in a single-client environment. This is not the
  most efficient way of creating a DTensor, but it will do for this
  tutorial.
  """
  if shape is not None or dtype is not None:
    arr = tf.constant(arr, shape=shape, dtype=dtype)

  # replicate the input to the mesh
  a = dtensor.copy_to_mesh(arr,
          layout=dtensor.Layout.replicated(layout.mesh, rank=layout.rank))
  # shard the copy to the desirable layout
  return dtensor.relayout(a, layout=layout)
DTensor 的結構
DTensor 是 tf.Tensor 物件,但透過 Layout 註解進行擴充,以定義其分shard 行為。DTensor 包含下列項目
- 全域張量中繼資料,包括張量的全域形狀和 dtype。
Layout,其定義Tensor所屬的Mesh,以及Tensor如何分shard 到Mesh上。- 元件張量的清單,每個項目對應於
Mesh中的一個本機裝置。
透過 dtensor_from_array,您可以建立您的第一個 DTensor: my_first_dtensor,並檢查其內容
mesh = dtensor.create_mesh([("x", 6)], devices=DEVICES)
layout = dtensor.Layout([dtensor.UNSHARDED], mesh)

my_first_dtensor = dtensor_from_array([0, 1], layout)

# Examine the DTensor content
print(my_first_dtensor)
print("global shape:", my_first_dtensor.shape)
print("dtype:", my_first_dtensor.dtype)
tf.Tensor([0 1], layout="sharding_specs:unsharded, mesh:|x=6|0,1,2,3,4,5|0,1,2,3,4,5|/job:localhost/replica:0/task:0/device:CPU:0,/job:localhost/replica:0/task:0/device:CPU:1,/job:localhost/replica:0/task:0/device:CPU:2,/job:localhost/replica:0/task:0/device:CPU:3,/job:localhost/replica:0/task:0/device:CPU:4,/job:localhost/replica:0/task:0/device:CPU:5", shape=(2,), dtype=int32)
global shape: (2,)
dtype: <dtype: 'int32'>
Layout 和 fetch_layout
DTensor 的 layout 不是 tf.Tensor 的一般屬性。而是由 DTensor 提供函式 dtensor.fetch_layout,以存取 DTensor 的 layout
print(dtensor.fetch_layout(my_first_dtensor))
assert layout == dtensor.fetch_layout(my_first_dtensor)
Layout.from_string(sharding_specs:unsharded, mesh:|x=6|0,1,2,3,4,5|0,1,2,3,4,5|/job:localhost/replica:0/task:0/device:CPU:0,/job:localhost/replica:0/task:0/device:CPU:1,/job:localhost/replica:0/task:0/device:CPU:2,/job:localhost/replica:0/task:0/device:CPU:3,/job:localhost/replica:0/task:0/device:CPU:4,/job:localhost/replica:0/task:0/device:CPU:5)
元件張量、 pack 和 unpack
DTensor 包含元件張量的清單。Mesh 中裝置的元件張量是 Tensor 物件,代表儲存在此裝置上的全域 DTensor 片段。
DTensor 可以透過 dtensor.unpack 解壓縮為元件張量。您可以利用 dtensor.unpack 檢查 DTensor 的元件,並確認它們位於 Mesh 的所有裝置上。
請注意,元件張量在全域檢視中的位置可能會彼此重疊。例如,在完全複製的 layout 情況下,所有元件都是全域張量的相同複本。
for component_tensor in dtensor.unpack(my_first_dtensor):
  print("Device:", component_tensor.device, ",", component_tensor)
Device: /job:localhost/replica:0/task:0/device:CPU:0 , tf.Tensor([0 1], shape=(2,), dtype=int32)
Device: /job:localhost/replica:0/task:0/device:CPU:1 , tf.Tensor([0 1], shape=(2,), dtype=int32)
Device: /job:localhost/replica:0/task:0/device:CPU:2 , tf.Tensor([0 1], shape=(2,), dtype=int32)
Device: /job:localhost/replica:0/task:0/device:CPU:3 , tf.Tensor([0 1], shape=(2,), dtype=int32)
Device: /job:localhost/replica:0/task:0/device:CPU:4 , tf.Tensor([0 1], shape=(2,), dtype=int32)
Device: /job:localhost/replica:0/task:0/device:CPU:5 , tf.Tensor([0 1], shape=(2,), dtype=int32)
如圖所示, my_first_dtensor 是 [0, 1] 的張量,已複製到所有 6 個裝置。
dtensor.unpack 的反向運算是 dtensor.pack。元件張量可以封裝回 DTensor 中。
元件必須具有相同的等級和 dtype,這會是傳回的 DTensor 的等級和 dtype。不過,對於元件張量作為 dtensor.unpack 輸入的裝置放置,沒有嚴格的要求:函式會自動將元件張量複製到各自的對應裝置。
packed_dtensor = dtensor.pack(
    [[0, 1], [0, 1], [0, 1],
     [0, 1], [0, 1], [0, 1]],
     layout=layout
)
print(packed_dtensor)
tf.Tensor([0 1], layout="sharding_specs:unsharded, mesh:|x=6|0,1,2,3,4,5|0,1,2,3,4,5|/job:localhost/replica:0/task:0/device:CPU:0,/job:localhost/replica:0/task:0/device:CPU:1,/job:localhost/replica:0/task:0/device:CPU:2,/job:localhost/replica:0/task:0/device:CPU:3,/job:localhost/replica:0/task:0/device:CPU:4,/job:localhost/replica:0/task:0/device:CPU:5", shape=(2,), dtype=int32)
將 DTensor 分shard 到 Mesh
到目前為止,您已使用 my_first_dtensor,這是等級 1 DTensor,已在維度 1 Mesh 之間完全複製。
接下來,建立和檢查跨維度 2 Mesh 分shard 的 DTensor。下列範例在 6 個 CPU 裝置上使用 3x2 Mesh 執行此操作,其中 mesh 維度 'x' 的大小為 3 個裝置,mesh 維度 'y' 的大小為 2 個裝置
mesh = dtensor.create_mesh([("x", 3), ("y", 2)], devices=DEVICES)
維度 2 Mesh 上完全分shard 的等級 2 張量
建立 3x2 等級 2 DTensor,沿著 'x' mesh 維度分shard 其第一個軸,並沿著 'y' mesh 維度分shard 其第二個軸。
- 由於張量形狀等於沿著所有分shard 軸的 mesh 維度,因此每個裝置都會收到 DTensor 的單一元素。
- 元件張量的等級始終與全域形狀的等級相同。DTensor 採用此慣例作為一種簡單的方式,以保留資訊來找出元件張量與全域 DTensor 之間的關係。
fully_sharded_dtensor = dtensor_from_array(
    tf.reshape(tf.range(6), (3, 2)),
    layout=dtensor.Layout(["x", "y"], mesh))

for raw_component in dtensor.unpack(fully_sharded_dtensor):
  print("Device:", raw_component.device, ",", raw_component)
Device: /job:localhost/replica:0/task:0/device:CPU:0 , tf.Tensor([[0]], shape=(1, 1), dtype=int32)
Device: /job:localhost/replica:0/task:0/device:CPU:1 , tf.Tensor([[1]], shape=(1, 1), dtype=int32)
Device: /job:localhost/replica:0/task:0/device:CPU:2 , tf.Tensor([[2]], shape=(1, 1), dtype=int32)
Device: /job:localhost/replica:0/task:0/device:CPU:3 , tf.Tensor([[3]], shape=(1, 1), dtype=int32)
Device: /job:localhost/replica:0/task:0/device:CPU:4 , tf.Tensor([[4]], shape=(1, 1), dtype=int32)
Device: /job:localhost/replica:0/task:0/device:CPU:5 , tf.Tensor([[5]], shape=(1, 1), dtype=int32)
維度 2 Mesh 上完全複製的等級 2 張量
為了進行比較,請建立 3x2 等級 2 DTensor,完全複製到相同的維度 2 Mesh。
- 由於 DTensor 已完全複製,因此每個裝置都會收到 3x2 DTensor 的完整複本。
- 元件張量的等級與全域形狀的等級相同,這個事實微不足道,因為在這種情況下,元件張量的形狀無論如何都與全域形狀相同。
fully_replicated_dtensor = dtensor_from_array(
    tf.reshape(tf.range(6), (3, 2)),
    layout=dtensor.Layout([dtensor.UNSHARDED, dtensor.UNSHARDED], mesh))
# Or, layout=tensor.Layout.fully_replicated(mesh, rank=2)

for component_tensor in dtensor.unpack(fully_replicated_dtensor):
  print("Device:", component_tensor.device, ",", component_tensor)
Device: /job:localhost/replica:0/task:0/device:CPU:0 , tf.Tensor(
[[0 1]
 [2 3]
 [4 5]], shape=(3, 2), dtype=int32)
Device: /job:localhost/replica:0/task:0/device:CPU:1 , tf.Tensor(
[[0 1]
 [2 3]
 [4 5]], shape=(3, 2), dtype=int32)
Device: /job:localhost/replica:0/task:0/device:CPU:2 , tf.Tensor(
[[0 1]
 [2 3]
 [4 5]], shape=(3, 2), dtype=int32)
Device: /job:localhost/replica:0/task:0/device:CPU:3 , tf.Tensor(
[[0 1]
 [2 3]
 [4 5]], shape=(3, 2), dtype=int32)
Device: /job:localhost/replica:0/task:0/device:CPU:4 , tf.Tensor(
[[0 1]
 [2 3]
 [4 5]], shape=(3, 2), dtype=int32)
Device: /job:localhost/replica:0/task:0/device:CPU:5 , tf.Tensor(
[[0 1]
 [2 3]
 [4 5]], shape=(3, 2), dtype=int32)
維度 2 Mesh 上的混合等級 2 張量
完全分shard 和完全複製之間的某個位置呢?
DTensor 允許 Layout 為混合式,沿著某些軸分shard,但沿著其他軸複製。
例如,您可以使用下列方式分shard 相同的 3x2 等級 2 DTensor
- 第一個軸沿著
'x'mesh 維度分shard。 - 第二個軸沿著
'y'mesh 維度複製。
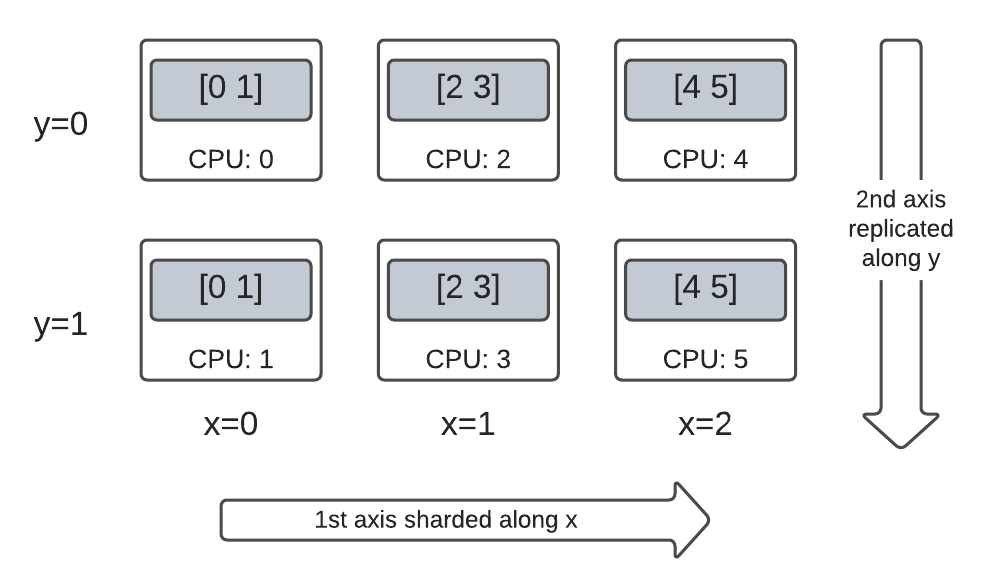
若要達成此分shard 配置,您只需要將第二個軸的分shard 規格從 'y' 變更為 dtensor.UNSHARDED,以指出您想要沿著第二個軸複製。Layout 物件看起來會像 Layout(['x', dtensor.UNSHARDED], mesh)
hybrid_sharded_dtensor = dtensor_from_array(
    tf.reshape(tf.range(6), (3, 2)),
    layout=dtensor.Layout(['x', dtensor.UNSHARDED], mesh))

for component_tensor in dtensor.unpack(hybrid_sharded_dtensor):
  print("Device:", component_tensor.device, ",", component_tensor)
Device: /job:localhost/replica:0/task:0/device:CPU:0 , tf.Tensor([[0 1]], shape=(1, 2), dtype=int32)
Device: /job:localhost/replica:0/task:0/device:CPU:1 , tf.Tensor([[0 1]], shape=(1, 2), dtype=int32)
Device: /job:localhost/replica:0/task:0/device:CPU:2 , tf.Tensor([[2 3]], shape=(1, 2), dtype=int32)
Device: /job:localhost/replica:0/task:0/device:CPU:3 , tf.Tensor([[2 3]], shape=(1, 2), dtype=int32)
Device: /job:localhost/replica:0/task:0/device:CPU:4 , tf.Tensor([[4 5]], shape=(1, 2), dtype=int32)
Device: /job:localhost/replica:0/task:0/device:CPU:5 , tf.Tensor([[4 5]], shape=(1, 2), dtype=int32)
您可以檢查已建立的 DTensor 的元件張量,並驗證它們是否確實根據您的配置進行分shard。使用圖表說明情況可能會有所幫助
Tensor.numpy() 和分shard 的 DTensor
請注意,在分shard 的 DTensor 上呼叫 .numpy() 方法會引發錯誤。產生錯誤的原因是為了防止將資料從多個運算裝置意外收集到支援傳回 NumPy 陣列的主機 CPU 裝置
print(fully_replicated_dtensor.numpy())

try:
  fully_sharded_dtensor.numpy()
except tf.errors.UnimplementedError:
  print("got an error as expected for fully_sharded_dtensor")

try:
  hybrid_sharded_dtensor.numpy()
except tf.errors.UnimplementedError:
  print("got an error as expected for hybrid_sharded_dtensor")
[[0 1]
 [2 3]
 [4 5]]
got an error as expected for fully_sharded_dtensor
got an error as expected for hybrid_sharded_dtensor
DTensor 上的 TensorFlow API
DTensor 致力於成為程式中張量的直接替代品。取用 tf.Tensor 的 TensorFlow Python API (例如 Ops 程式庫函式 tf.function、 tf.GradientTape) 也適用於 DTensor。
為了達成這個目標,對於每個 TensorFlow 圖,DTensor 都會透過稱為SPMD 擴充的程序,產生並執行對等的 SPMD 圖。DTensor SPMD 擴充中的幾個關鍵步驟如下
- 在 TensorFlow 圖中傳播 DTensor 的分shard
Layout - 使用元件張量上對等的 TensorFlow Ops,改寫全域 DTensor 上的 TensorFlow Ops,並在必要時插入集體和通訊 Ops
- 將後端中性 TensorFlow Ops 降低為後端特定 TensorFlow Ops。
最終結果是:DTensor 是張量的直接替代品。
有 2 種方式可觸發 DTensor 執行
- 如果
a、b或兩者都是 DTensor,則作為 Python 函式運算元的 DTensor (例如tf.matmul(a, b)) 會透過 DTensor 執行。 - 要求 Python 函式的結果為 DTensor (例如
dtensor.call_with_layout(tf.ones, layout, shape=(3, 2))) 會透過 DTensor 執行,因為我們要求tf.ones的輸出根據layout進行分shard。
作為運算元的 DTensor
許多 TensorFlow API 函式會採用 tf.Tensor 作為其運算元,並傳回 tf.Tensor 作為其結果。對於這些函式,您可以傳入 DTensor 作為運算元,以表達透過 DTensor 執行函式的意圖。本節使用 tf.matmul(a, b) 作為範例。
完全複製的輸入和輸出
在這種情況下,DTensor 已完全複製。在 Mesh 的每個裝置上,
- 運算元
a的元件張量為[[1, 2, 3], [4, 5, 6]](2x3) - 運算元
b的元件張量為[[6, 5], [4, 3], [2, 1]](3x2) - 運算包含單一
MatMul:(2x3, 3x2) -> 2x2 - 結果
c的元件張量為[[20, 14], [56,41]](2x2)
浮點乘法運算的總數為 6 個裝置 * 4 個結果 * 3 個乘法 = 72。
mesh = dtensor.create_mesh([("x", 6)], devices=DEVICES)
layout = dtensor.Layout([dtensor.UNSHARDED, dtensor.UNSHARDED], mesh)
a = dtensor_from_array([[1, 2, 3], [4, 5, 6]], layout=layout)
b = dtensor_from_array([[6, 5], [4, 3], [2, 1]], layout=layout)

c = tf.matmul(a, b) # runs 6 identical matmuls in parallel on 6 devices

# `c` is a DTensor replicated on all devices (same as `a` and `b`)
print('Sharding spec:', dtensor.fetch_layout(c).sharding_specs)
print("components:")
for component_tensor in dtensor.unpack(c):
  print(component_tensor.device, component_tensor.numpy())
Sharding spec: ['unsharded', 'unsharded']
components:
/job:localhost/replica:0/task:0/device:CPU:0 [[20 14]
 [56 41]]
/job:localhost/replica:0/task:0/device:CPU:1 [[20 14]
 [56 41]]
/job:localhost/replica:0/task:0/device:CPU:2 [[20 14]
 [56 41]]
/job:localhost/replica:0/task:0/device:CPU:3 [[20 14]
 [56 41]]
/job:localhost/replica:0/task:0/device:CPU:4 [[20 14]
 [56 41]]
/job:localhost/replica:0/task:0/device:CPU:5 [[20 14]
 [56 41]]
沿著收縮軸分shard 運算元
您可以透過分shard 運算元 a 和 b,減少每個裝置的運算量。 tf.matmul 的常見分shard 配置是沿著收縮軸分shard 運算元,這表示沿著第二個軸分shard a,並沿著第一個軸分shard b。
根據此配置分shard 的全域矩陣乘積可以有效率地執行,方法是執行並行本機矩陣乘法,然後進行集體縮減以彙總本機結果。這也是實作分散式矩陣點積的標準方式。
浮點乘法運算的總數為 6 個裝置 * 4 個結果 * 1 = 24,與上述完全複製的情況 (72) 相比,減少了 3 倍。減少 3 倍的原因是沿著大小為 3 個裝置的 x mesh 維度進行分shard。
循序執行運算數量的減少是同步模型平行處理加速訓練的主要機制。
mesh = dtensor.create_mesh([("x", 3), ("y", 2)], devices=DEVICES)
a_layout = dtensor.Layout([dtensor.UNSHARDED, 'x'], mesh)
a = dtensor_from_array([[1, 2, 3], [4, 5, 6]], layout=a_layout)
b_layout = dtensor.Layout(['x', dtensor.UNSHARDED], mesh)
b = dtensor_from_array([[6, 5], [4, 3], [2, 1]], layout=b_layout)

c = tf.matmul(a, b)
# `c` is a DTensor replicated on all devices (same as `a` and `b`)
print('Sharding spec:', dtensor.fetch_layout(c).sharding_specs)
Sharding spec: ['unsharded', 'unsharded']
額外分shard
您可以對輸入執行額外分shard,而這些分shard 會適當地傳輸到結果。例如,您可以將運算元 a 沿著其第一個軸額外分shard 到 'y' mesh 維度。額外分shard 會傳輸到結果 c 的第一個軸。
浮點乘法運算的總數為 6 個裝置 * 2 個結果 * 1 = 12,與上述情況 (24) 相比,額外減少了 2 倍。減少 2 倍的原因是沿著大小為 2 個裝置的 y mesh 維度進行分shard。
mesh = dtensor.create_mesh([("x", 3), ("y", 2)], devices=DEVICES)

a_layout = dtensor.Layout(['y', 'x'], mesh)
a = dtensor_from_array([[1, 2, 3], [4, 5, 6]], layout=a_layout)
b_layout = dtensor.Layout(['x', dtensor.UNSHARDED], mesh)
b = dtensor_from_array([[6, 5], [4, 3], [2, 1]], layout=b_layout)

c = tf.matmul(a, b)
# The sharding of `a` on the first axis is carried to `c'
print('Sharding spec:', dtensor.fetch_layout(c).sharding_specs)
print("components:")
for component_tensor in dtensor.unpack(c):
  print(component_tensor.device, component_tensor.numpy())
Sharding spec: ['y', 'unsharded']
components:
/job:localhost/replica:0/task:0/device:CPU:0 [[20 14]]
/job:localhost/replica:0/task:0/device:CPU:1 [[56 41]]
/job:localhost/replica:0/task:0/device:CPU:2 [[20 14]]
/job:localhost/replica:0/task:0/device:CPU:3 [[56 41]]
/job:localhost/replica:0/task:0/device:CPU:4 [[20 14]]
/job:localhost/replica:0/task:0/device:CPU:5 [[56 41]]
作為輸出的 DTensor
那麼不採用運算元,但傳回可以分shard 的張量結果的 Python 函式呢?這類函式的範例包括
對於這些 Python 函式,DTensor 提供了 dtensor.call_with_layout,此函式會以 DTensor 立即執行 Python 函式,並確保傳回的 Tensor 是具有所要求 Layout 的 DTensor。
help(dtensor.call_with_layout)
Help on function call_with_layout in module tensorflow.dtensor.python.api:

call_with_layout(fn: Callable[..., Any], layout: Optional[tensorflow.dtensor.python.layout.Layout], *args, **kwargs) -> Any
    Calls a function in the DTensor device scope if `layout` is not None.

    If `layout` is not None, `fn` consumes DTensor(s) as input and produces a
    DTensor as output; a DTensor is a tf.Tensor with layout-related attributes.

    If `layout` is None, `fn` consumes and produces regular tf.Tensors.

    Args:
      fn: A supported TF API function such as tf.zeros.
      layout: Optional, the layout of the output DTensor.
      *args:  Arguments given to `fn`.
      **kwargs: Keyword arguments given to `fn`.

    Returns:
      The return value of `fn` transformed to a DTensor if requested.
立即執行的 Python 函式通常只包含單一非平凡的 TensorFlow Op。
若要搭配 dtensor.call_with_layout 使用會發出多個 TensorFlow Op 的 Python 函式,則應將該函式轉換為 tf.function。呼叫 tf.function 是單一 TensorFlow Op。當呼叫 tf.function 時,DTensor 可以在分析 tf.function 的運算圖時執行版面配置傳播,然後再具體化任何中繼張量。
發出單一 TensorFlow Op 的 API
如果函式發出單一 TensorFlow Op,您可以直接將 dtensor.call_with_layout 套用至該函式
help(tf.ones)
Help on function ones in module tensorflow.python.ops.array_ops:

ones(shape, dtype=tf.float32, name=None, layout=None)
    Creates a tensor with all elements set to one (1).

    See also `tf.ones_like`, `tf.zeros`, `tf.fill`, `tf.eye`.

    This operation returns a tensor of type `dtype` with shape `shape` and
    all elements set to one.

    >>> tf.ones([3, 4], tf.int32)
    <tf.Tensor: shape=(3, 4), dtype=int32, numpy=
    array([[1, 1, 1, 1],
           [1, 1, 1, 1],
           [1, 1, 1, 1]], dtype=int32)>

    Args:
      shape: A `list` of integers, a `tuple` of integers, or a 1-D `Tensor` of
        type `int32`.
      dtype: Optional DType of an element in the resulting `Tensor`. Default is
        `tf.float32`.
      name: Optional string. A name for the operation.
      layout: Optional, `tf.experimental.dtensor.Layout`. If provided, the result
        is a [DTensor](https://tensorflow.dev.org.tw/guide/dtensor_overview) with the
        provided layout.

    Returns:
      A `Tensor` with all elements set to one (1).
mesh = dtensor.create_mesh([("x", 3), ("y", 2)], devices=DEVICES)
ones = dtensor.call_with_layout(tf.ones, dtensor.Layout(['x', 'y'], mesh), shape=(6, 4))
print(ones)
tf.Tensor({"CPU:0": [[1 1]
 [1 1]], "CPU:1": [[1 1]
 [1 1]], "CPU:2": [[1 1]
 [1 1]], "CPU:3": [[1 1]
 [1 1]], "CPU:4": [[1 1]
 [1 1]], "CPU:5": [[1 1]
 [1 1]]}, layout="sharding_specs:x,y, mesh:|x=3,y=2|0,1,2,3,4,5|0,1,2,3,4,5|/job:localhost/replica:0/task:0/device:CPU:0,/job:localhost/replica:0/task:0/device:CPU:1,/job:localhost/replica:0/task:0/device:CPU:2,/job:localhost/replica:0/task:0/device:CPU:3,/job:localhost/replica:0/task:0/device:CPU:4,/job:localhost/replica:0/task:0/device:CPU:5", shape=(6, 4), dtype=float32)
發出多個 TensorFlow Op 的 API
如果 API 發出多個 TensorFlow Op,請透過 tf.function 將函式轉換為單一 Op。例如,tf.random.stateleess_normal
help(tf.random.stateless_normal)
Help on function stateless_random_normal in module tensorflow.python.ops.stateless_random_ops:

stateless_random_normal(shape, seed, mean=0.0, stddev=1.0, dtype=tf.float32, name=None, alg='auto_select')
    Outputs deterministic pseudorandom values from a normal distribution.

    This is a stateless version of `tf.random.normal`: if run twice with the
    same seeds and shapes, it will produce the same pseudorandom numbers.  The
    output is consistent across multiple runs on the same hardware (and between
    CPU and GPU), but may change between versions of TensorFlow or on non-CPU/GPU
    hardware.

    Args:
      shape: A 1-D integer Tensor or Python array. The shape of the output tensor.
      seed: A shape [2] Tensor, the seed to the random number generator. Must have
        dtype `int32` or `int64`. (When using XLA, only `int32` is allowed.)
      mean: A 0-D Tensor or Python value of type `dtype`. The mean of the normal
        distribution.
      stddev: A 0-D Tensor or Python value of type `dtype`. The standard deviation
        of the normal distribution.
      dtype: The float type of the output: `float16`, `bfloat16`, `float32`,
        `float64`. Defaults to `float32`.
      name: A name for the operation (optional).
      alg: The RNG algorithm used to generate the random numbers. See
        `tf.random.stateless_uniform` for a detailed explanation.

    Returns:
      A tensor of the specified shape filled with random normal values.
ones = dtensor.call_with_layout(
    tf.function(tf.random.stateless_normal),
    dtensor.Layout(['x', 'y'], mesh),
    shape=(6, 4),
    seed=(1, 1))
print(ones)
tf.Tensor({"CPU:0": [[0.0368092842 1.76192284]
 [1.22868407 -0.731756687]], "CPU:1": [[0.255247623 -0.13820985]
 [-0.747412503 1.06443202]], "CPU:2": [[-0.395325899 -0.836183369]
 [0.581941128 -0.2587713]], "CPU:3": [[0.476060659 0.406645179]
 [-0.110623844 -1.49052978]], "CPU:4": [[0.645035267 1.36384416]
 [2.18210244 -0.965060234]], "CPU:5": [[-1.70534277 1.32558191]
 [0.972473264 0.972343624]]}, layout="sharding_specs:x,y, mesh:|x=3,y=2|0,1,2,3,4,5|0,1,2,3,4,5|/job:localhost/replica:0/task:0/device:CPU:0,/job:localhost/replica:0/task:0/device:CPU:1,/job:localhost/replica:0/task:0/device:CPU:2,/job:localhost/replica:0/task:0/device:CPU:3,/job:localhost/replica:0/task:0/device:CPU:4,/job:localhost/replica:0/task:0/device:CPU:5", shape=(6, 4), dtype=float32)
允許使用 tf.function 包裝發出單一 TensorFlow Op 的 Python 函式。唯一的注意事項是,建立 tf.function (從 Python 函式而來) 會產生相關的成本和複雜性。
ones = dtensor.call_with_layout(
    tf.function(tf.ones),
    dtensor.Layout(['x', 'y'], mesh),
    shape=(6, 4))
print(ones)
tf.Tensor({"CPU:0": [[1 1]
 [1 1]], "CPU:1": [[1 1]
 [1 1]], "CPU:2": [[1 1]
 [1 1]], "CPU:3": [[1 1]
 [1 1]], "CPU:4": [[1 1]
 [1 1]], "CPU:5": [[1 1]
 [1 1]]}, layout="sharding_specs:x,y, mesh:|x=3,y=2|0,1,2,3,4,5|0,1,2,3,4,5|/job:localhost/replica:0/task:0/device:CPU:0,/job:localhost/replica:0/task:0/device:CPU:1,/job:localhost/replica:0/task:0/device:CPU:2,/job:localhost/replica:0/task:0/device:CPU:3,/job:localhost/replica:0/task:0/device:CPU:4,/job:localhost/replica:0/task:0/device:CPU:5", shape=(6, 4), dtype=float32)
從 tf.Variable 到 dtensor.DVariable
在 Tensorflow 中,tf.Variable 是可變動 Tensor 值的持有者。使用 DTensor 時,對應的變數語意由 dtensor.DVariable 提供。
為 DTensor 變數引入新類型 DVariable 的原因是,DVariable 有額外的要求,亦即版面配置不得從其初始值變更。
mesh = dtensor.create_mesh([("x", 6)], devices=DEVICES)
layout = dtensor.Layout([dtensor.UNSHARDED, dtensor.UNSHARDED], mesh)

v = dtensor.DVariable(
    initial_value=dtensor.call_with_layout(
        tf.function(tf.random.stateless_normal),
        layout=layout,
        shape=tf.TensorShape([64, 32]),
        seed=[1, 1],
        dtype=tf.float32))

print(v.handle)
assert layout == dtensor.fetch_layout(v)
tf.Tensor(<ResourceHandle(name="Variable/1", device="/job:localhost/replica:0/task:0/device:CPU:0", container="Anonymous", type="tensorflow::Var", dtype and shapes : "[ DType enum: 1, Shape: [64,32] ]")>, layout="sharding_specs:unsharded,unsharded, mesh:|x=6|0,1,2,3,4,5|0,1,2,3,4,5|/job:localhost/replica:0/task:0/device:CPU:0,/job:localhost/replica:0/task:0/device:CPU:1,/job:localhost/replica:0/task:0/device:CPU:2,/job:localhost/replica:0/task:0/device:CPU:3,/job:localhost/replica:0/task:0/device:CPU:4,/job:localhost/replica:0/task:0/device:CPU:5", shape=(), dtype=resource)
除了在符合 layout 上的要求以外,DVariable 的行為與 tf.Variable 相同。例如,您可以將 DVariable 新增至 DTensor,
a = dtensor.call_with_layout(tf.ones, layout=layout, shape=(64, 32))
b = v + a # add DVariable and DTensor
print(b)
tf.Tensor([[2.66521645 2.36637592 1.77863169 ... -1.18624139 2.26035929 0.664066315]
 [0.511952519 0.655031443 0.122243524 ... 0.0424078107 1.67057109 0.912334144]
 [0.769825 1.42743981 3.13473773 ... 1.16159868 0.628931046 0.733521938]
 ...
 [0.388001859 2.72882509 2.92771554 ... 1.17472672 1.72462416 1.5047121]
 [-0.252545118 0.761886716 1.72119033 ... 0.775034547 2.8065362 1.00457215]
 [1.23498726 0.584536672 1.15659761 ... 0.955793858 1.11440909 0.18848455]], layout="sharding_specs:unsharded,unsharded, mesh:|x=6|0,1,2,3,4,5|0,1,2,3,4,5|/job:localhost/replica:0/task:0/device:CPU:0,/job:localhost/replica:0/task:0/device:CPU:1,/job:localhost/replica:0/task:0/device:CPU:2,/job:localhost/replica:0/task:0/device:CPU:3,/job:localhost/replica:0/task:0/device:CPU:4,/job:localhost/replica:0/task:0/device:CPU:5", shape=(64, 32), dtype=float32)
您也可以將 DTensor 指派給 DVariable
v.assign(a) # assign a DTensor to a DVariable
print(a)
tf.Tensor([[1 1 1 ... 1 1 1]
 [1 1 1 ... 1 1 1]
 [1 1 1 ... 1 1 1]
 ...
 [1 1 1 ... 1 1 1]
 [1 1 1 ... 1 1 1]
 [1 1 1 ... 1 1 1]], layout="sharding_specs:unsharded,unsharded, mesh:|x=6|0,1,2,3,4,5|0,1,2,3,4,5|/job:localhost/replica:0/task:0/device:CPU:0,/job:localhost/replica:0/task:0/device:CPU:1,/job:localhost/replica:0/task:0/device:CPU:2,/job:localhost/replica:0/task:0/device:CPU:3,/job:localhost/replica:0/task:0/device:CPU:4,/job:localhost/replica:0/task:0/device:CPU:5", shape=(64, 32), dtype=float32)
嘗試變更 DVariable 的版面配置 (方法是指派具有不相容版面配置的 DTensor) 會產生錯誤
# variable's layout is immutable.
another_mesh = dtensor.create_mesh([("x", 3), ("y", 2)], devices=DEVICES)
b = dtensor.call_with_layout(tf.ones,
                     layout=dtensor.Layout([dtensor.UNSHARDED, dtensor.UNSHARDED], another_mesh),
                     shape=(64, 32))
try:
  v.assign(b)
except:
  print("exception raised")
exception raised
接下來呢?
在這個 Colab 中,您已瞭解 DTensor,這是 TensorFlow 用於分散式運算的擴充功能。如要透過教學課程試用這些概念,請參閱「使用 DTensor 進行分散式訓練」。