
|
|
|
 在 GitHub 上檢視 在 GitHub 上檢視
|
|
在處理包含大量零值的張量時,以節省空間和時間的方式儲存這些張量非常重要。稀疏張量可有效率地儲存和處理包含大量零值的張量。稀疏張量廣泛用於編碼架構中,例如 TF-IDF,作為 NLP 應用程式中資料預先處理的一部分,以及用於預先處理電腦視覺應用程式中包含大量暗像素的圖片。
TensorFlow 中的稀疏張量
TensorFlow 透過 tf.sparse.SparseTensor 物件表示稀疏張量。目前,TensorFlow 中的稀疏張量使用座標列表 (COO) 格式編碼。此編碼格式針對超稀疏矩陣 (例如嵌入) 進行最佳化。
稀疏張量的 COO 編碼包含:
values:形狀為[N]的 1D 張量,包含所有非零值。indices:形狀為[N, rank]的 2D 張量,包含非零值的索引。dense_shape:形狀為[rank]的 1D 張量,指定張量的形狀。
在 tf.sparse.SparseTensor 的上下文中,「非零」值是指未明確編碼的值。可以明確地在 COO 稀疏矩陣的 values 中包含零值,但在提及稀疏張量中的非零值時,通常不包含這些「明確的零值」。
建立 tf.sparse.SparseTensor
透過直接指定稀疏張量的 values、indices 和 dense_shape 來建構稀疏張量。
import tensorflow as tf
2024-02-14 02:25:26.445043: E external/local_xla/xla/stream_executor/cuda/cuda_dnn.cc:9261] Unable to register cuDNN factory: Attempting to register factory for plugin cuDNN when one has already been registered
2024-02-14 02:25:26.445086: E external/local_xla/xla/stream_executor/cuda/cuda_fft.cc:607] Unable to register cuFFT factory: Attempting to register factory for plugin cuFFT when one has already been registered
2024-02-14 02:25:26.446594: E external/local_xla/xla/stream_executor/cuda/cuda_blas.cc:1515] Unable to register cuBLAS factory: Attempting to register factory for plugin cuBLAS when one has already been registered
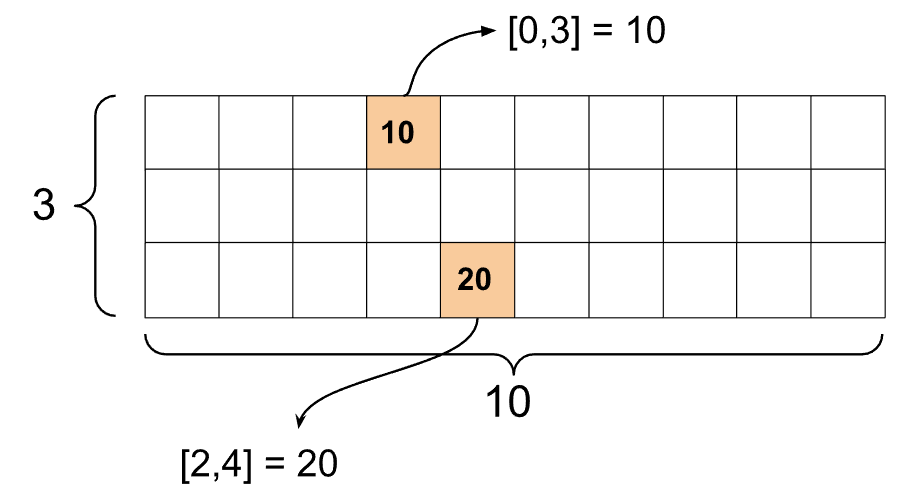
st1 = tf.sparse.SparseTensor(indices=[[0, 3], [2, 4]],
                      values=[10, 20],
                      dense_shape=[3, 10])
當您使用 print() 函式列印稀疏張量時,會顯示三個元件張量的內容
print(st1)
SparseTensor(indices=tf.Tensor(
[[0 3]
 [2 4]], shape=(2, 2), dtype=int64), values=tf.Tensor([10 20], shape=(2,), dtype=int32), dense_shape=tf.Tensor([ 3 10], shape=(2,), dtype=int64))
如果非零值與其對應的 indices 對齊,則更容易理解稀疏張量的內容。定義輔助函式以美觀地列印稀疏張量,以便每個非零值都顯示在自己的行上。
def pprint_sparse_tensor(st):
  s = "<SparseTensor shape=%s \n values={" % (st.dense_shape.numpy().tolist(),)
  for (index, value) in zip(st.indices, st.values):
    s += f"\n  %s: %s" % (index.numpy().tolist(), value.numpy().tolist())
  return s + "}>"
print(pprint_sparse_tensor(st1))
<SparseTensor shape=[3, 10]
 values={
  [0, 3]: 10
  [2, 4]: 20}>
您也可以使用 tf.sparse.from_dense 從密集張量建構稀疏張量,並使用 tf.sparse.to_dense 將它們轉換回密集張量。
st2 = tf.sparse.from_dense([[1, 0, 0, 8], [0, 0, 0, 0], [0, 0, 3, 0]])
print(pprint_sparse_tensor(st2))
<SparseTensor shape=[3, 4]
 values={
  [0, 0]: 1
  [0, 3]: 8
  [2, 2]: 3}>
st3 = tf.sparse.to_dense(st2)
print(st3)
tf.Tensor(
[[1 0 0 8]
 [0 0 0 0]
 [0 0 3 0]], shape=(3, 4), dtype=int32)
操控稀疏張量
使用 tf.sparse 套件中的公用程式來操控稀疏張量。您可以用於密集張量算術操控的運算 (例如 tf.math.add) 不適用於稀疏張量。
使用 tf.sparse.add 新增形狀相同的稀疏張量。
st_a = tf.sparse.SparseTensor(indices=[[0, 2], [3, 4]],
                       values=[31, 2],
                       dense_shape=[4, 10])

st_b = tf.sparse.SparseTensor(indices=[[0, 2], [7, 0]],
                       values=[56, 38],
                       dense_shape=[4, 10])

st_sum = tf.sparse.add(st_a, st_b)

print(pprint_sparse_tensor(st_sum))
<SparseTensor shape=[4, 10]
 values={
  [0, 2]: 87
  [3, 4]: 2
  [7, 0]: 38}>
使用 tf.sparse.sparse_dense_matmul 將稀疏張量與密集矩陣相乘。
st_c = tf.sparse.SparseTensor(indices=([0, 1], [1, 0], [1, 1]),
                       values=[13, 15, 17],
                       dense_shape=(2,2))

mb = tf.constant([[4], [6]])
product = tf.sparse.sparse_dense_matmul(st_c, mb)

print(product)
tf.Tensor(
[[ 78]
 [162]], shape=(2, 1), dtype=int32)
使用 tf.sparse.concat 將稀疏張量放在一起,並使用 tf.sparse.slice 將它們分開。
sparse_pattern_A = tf.sparse.SparseTensor(indices = [[2,4], [3,3], [3,4], [4,3], [4,4], [5,4]],
                         values = [1,1,1,1,1,1],
                         dense_shape = [8,5])
sparse_pattern_B = tf.sparse.SparseTensor(indices = [[0,2], [1,1], [1,3], [2,0], [2,4], [2,5], [3,5],
                                              [4,5], [5,0], [5,4], [5,5], [6,1], [6,3], [7,2]],
                         values = [1,1,1,1,1,1,1,1,1,1,1,1,1,1],
                         dense_shape = [8,6])
sparse_pattern_C = tf.sparse.SparseTensor(indices = [[3,0], [4,0]],
                         values = [1,1],
                         dense_shape = [8,6])

sparse_patterns_list = [sparse_pattern_A, sparse_pattern_B, sparse_pattern_C]
sparse_pattern = tf.sparse.concat(axis=1, sp_inputs=sparse_patterns_list)
print(tf.sparse.to_dense(sparse_pattern))
tf.Tensor(
[[0 0 0 0 0 0 0 1 0 0 0 0 0 0 0 0 0]
 [0 0 0 0 0 0 1 0 1 0 0 0 0 0 0 0 0]
 [0 0 0 0 1 1 0 0 0 1 1 0 0 0 0 0 0]
 [0 0 0 1 1 0 0 0 0 0 1 1 0 0 0 0 0]
 [0 0 0 1 1 0 0 0 0 0 1 1 0 0 0 0 0]
 [0 0 0 0 1 1 0 0 0 1 1 0 0 0 0 0 0]
 [0 0 0 0 0 0 1 0 1 0 0 0 0 0 0 0 0]
 [0 0 0 0 0 0 0 1 0 0 0 0 0 0 0 0 0]], shape=(8, 17), dtype=int32)
sparse_slice_A = tf.sparse.slice(sparse_pattern_A, start = [0,0], size = [8,5])
sparse_slice_B = tf.sparse.slice(sparse_pattern_B, start = [0,5], size = [8,6])
sparse_slice_C = tf.sparse.slice(sparse_pattern_C, start = [0,10], size = [8,6])
print(tf.sparse.to_dense(sparse_slice_A))
print(tf.sparse.to_dense(sparse_slice_B))
print(tf.sparse.to_dense(sparse_slice_C))
tf.Tensor(
[[0 0 0 0 0]
 [0 0 0 0 0]
 [0 0 0 0 1]
 [0 0 0 1 1]
 [0 0 0 1 1]
 [0 0 0 0 1]
 [0 0 0 0 0]
 [0 0 0 0 0]], shape=(8, 5), dtype=int32)
tf.Tensor(
[[0]
 [0]
 [1]
 [1]
 [1]
 [1]
 [0]
 [0]], shape=(8, 1), dtype=int32)
tf.Tensor([], shape=(8, 0), dtype=int32)
如果您使用的是 TensorFlow 2.4 或以上版本,請使用 tf.sparse.map_values 對稀疏張量中的非零值執行元素級運算。
st2_plus_5 = tf.sparse.map_values(tf.add, st2, 5)
print(tf.sparse.to_dense(st2_plus_5))
tf.Tensor(
[[ 6  0  0 13]
 [ 0  0  0  0]
 [ 0  0  8  0]], shape=(3, 4), dtype=int32)
請注意,只有非零值被修改,零值保持為零。
或者,您可以針對舊版 TensorFlow 遵循以下設計模式
st2_plus_5 = tf.sparse.SparseTensor(
    st2.indices,
    st2.values + 5,
    st2.dense_shape)
print(tf.sparse.to_dense(st2_plus_5))
tf.Tensor(
[[ 6  0  0 13]
 [ 0  0  0  0]
 [ 0  0  8  0]], shape=(3, 4), dtype=int32)
將 tf.sparse.SparseTensor 與其他 TensorFlow API 搭配使用
稀疏張量可與以下 TensorFlow API 透明地搭配使用
tf.kerastf.datatf.Train.Exampleprotobuftf.functiontf.while_looptf.condtf.identitytf.casttf.printtf.saved_modeltf.io.serialize_sparsetf.io.serialize_many_sparsetf.io.deserialize_many_sparsetf.math.abstf.math.negativetf.math.signtf.math.squaretf.math.sqrttf.math.erftf.math.tanhtf.math.bessel_i0etf.math.bessel_i1e
以下顯示上述幾個 API 的範例。
tf.keras
tf.keras API 的子集支援稀疏張量,而無需昂貴的轉換或轉換運算。Keras API 可讓您將稀疏張量作為 Keras 模型的輸入傳遞。在呼叫 tf.keras.Input 或 tf.keras.layers.InputLayer 時,請設定 sparse=True。您可以在 Keras 層之間傳遞稀疏張量,也可以讓 Keras 模型將它們作為輸出傳回。如果您在模型中的 tf.keras.layers.Dense 層中使用稀疏張量,它們會輸出密集張量。
以下範例說明如果您僅使用支援稀疏輸入的層,如何將稀疏張量作為輸入傳遞至 Keras 模型。
x = tf.keras.Input(shape=(4,), sparse=True)
y = tf.keras.layers.Dense(4)(x)
model = tf.keras.Model(x, y)

sparse_data = tf.sparse.SparseTensor(
    indices = [(0,0),(0,1),(0,2),
               (4,3),(5,0),(5,1)],
    values = [1,1,1,1,1,1],
    dense_shape = (6,4)
)

model(sparse_data)

model.predict(sparse_data)
1/1 [==============================] - 0s 96ms/step
array([[-1.9626052 ,  1.9385288 , -0.3864261 , -1.4728891 ],
       [ 0.        ,  0.        ,  0.        ,  0.        ],
       [ 0.        ,  0.        ,  0.        ,  0.        ],
       [ 0.        ,  0.        ,  0.        ,  0.        ],
       [ 0.2567069 ,  0.1808129 ,  0.01684809,  0.69576544],
       [-1.2277668 ,  1.4192976 ,  0.0884105 , -0.865898  ]],
      dtype=float32)
tf.data
tf.data API 可讓您從簡單、可重複使用的部分建構複雜的輸入管線。其核心資料結構是 tf.data.Dataset,它代表元素的序列,其中每個元素都包含一個或多個元件。
使用稀疏張量建構資料集
使用與從 tf.Tensor 或 NumPy 陣列 (例如 tf.data.Dataset.from_tensor_slices) 建構資料集相同的方法,從稀疏張量建構資料集。此運算會保留資料的稀疏性 (或稀疏本質)。
dataset = tf.data.Dataset.from_tensor_slices(sparse_data)
for element in dataset:
  print(pprint_sparse_tensor(element))
<SparseTensor shape=[4]
 values={
  [0]: 1
  [1]: 1
  [2]: 1}>
<SparseTensor shape=[4]
 values={}>
<SparseTensor shape=[4]
 values={}>
<SparseTensor shape=[4]
 values={}>
<SparseTensor shape=[4]
 values={
  [3]: 1}>
<SparseTensor shape=[4]
 values={
  [0]: 1
  [1]: 1}>
使用稀疏張量批次處理和取消批次處理資料集
您可以使用 Dataset.batch 和 Dataset.unbatch 方法,分別批次處理 (將連續元素合併為單一元素) 和取消批次處理具有稀疏張量的資料集。
batched_dataset = dataset.batch(2)
for element in batched_dataset:
  print (pprint_sparse_tensor(element))
<SparseTensor shape=[2, 4]
 values={
  [0, 0]: 1
  [0, 1]: 1
  [0, 2]: 1}>
<SparseTensor shape=[2, 4]
 values={}>
<SparseTensor shape=[2, 4]
 values={
  [0, 3]: 1
  [1, 0]: 1
  [1, 1]: 1}>
unbatched_dataset = batched_dataset.unbatch()
for element in unbatched_dataset:
  print (pprint_sparse_tensor(element))
<SparseTensor shape=[4]
 values={
  [0]: 1
  [1]: 1
  [2]: 1}>
<SparseTensor shape=[4]
 values={}>
<SparseTensor shape=[4]
 values={}>
<SparseTensor shape=[4]
 values={}>
<SparseTensor shape=[4]
 values={
  [3]: 1}>
<SparseTensor shape=[4]
 values={
  [0]: 1
  [1]: 1}>
您也可以使用 tf.data.experimental.dense_to_sparse_batch 將形狀不同的資料集元素批次處理為稀疏張量。
使用稀疏張量轉換資料集
使用 Dataset.map 在資料集中轉換和建立稀疏張量。
transform_dataset = dataset.map(lambda x: x*2)
for i in transform_dataset:
  print(pprint_sparse_tensor(i))
<SparseTensor shape=[4]
 values={
  [0]: 2
  [1]: 2
  [2]: 2}>
<SparseTensor shape=[4]
 values={}>
<SparseTensor shape=[4]
 values={}>
<SparseTensor shape=[4]
 values={}>
<SparseTensor shape=[4]
 values={
  [3]: 2}>
<SparseTensor shape=[4]
 values={
  [0]: 2
  [1]: 2}>
tf.train.Example
tf.train.Example 是 TensorFlow 資料的標準 protobuf 編碼。將稀疏張量與 tf.train.Example 搭配使用時,您可以
使用
tf.io.VarLenFeature將變長度資料讀取到tf.sparse.SparseTensor中。但是,您應該考慮改用tf.io.RaggedFeature。使用
tf.io.SparseFeature將任意稀疏資料讀取到tf.sparse.SparseTensor中,tf.io.SparseFeature使用三個不同的特徵金鑰來儲存「indices」、「values」和「dense_shape」。
tf.function
tf.function 裝飾器會預先計算 Python 函式的 TensorFlow 圖,這可以大幅提升 TensorFlow 程式碼的效能。稀疏張量可與 tf.function 和具體函式透明地搭配使用。
@tf.function
def f(x,y):
  return tf.sparse.sparse_dense_matmul(x,y)

a = tf.sparse.SparseTensor(indices=[[0, 3], [2, 4]],
                    values=[15, 25],
                    dense_shape=[3, 10])

b = tf.sparse.to_dense(tf.sparse.transpose(a))

c = f(a,b)

print(c)
tf.Tensor(
[[225   0   0]
 [  0   0   0]
 [  0   0 625]], shape=(3, 3), dtype=int32)
區分遺失值和零值
tf.sparse.SparseTensor 上的大多數運算會將遺失值和明確的零值視為相同。這是經過設計的 - tf.sparse.SparseTensor 應該像密集張量一樣運作。
但是,在少數情況下,區分零值和遺失值可能很有用。尤其是,這提供了一種在訓練資料中編碼遺失/未知資料的方法。例如,假設您有一個分數張量 (可以是從 -Inf 到 +Inf 的任何浮點值),其中包含一些遺失的分數。您可以使用稀疏張量來編碼此張量,其中明確的零值是已知的零分,但隱含的零值實際上代表遺失的資料,而不是零。
請注意,某些運算 (例如 tf.sparse.reduce_max) 不會將遺失值視為零。例如,當您執行以下程式碼區塊時,預期的輸出為 0。但是,由於此例外情況,輸出為 -3。
print(tf.sparse.reduce_max(tf.sparse.from_dense([-5, 0, -3])))
tf.Tensor(-3, shape=(), dtype=int32)
相反地,當您將 tf.math.reduce_max 應用於密集張量時,輸出會如預期般為 0。
print(tf.math.reduce_max([-5, 0, -3]))
tf.Tensor(0, shape=(), dtype=int32)
延伸閱讀和資源
- 請參閱張量指南以瞭解張量。
- 請閱讀參差不齊張量指南,以瞭解如何使用參差不齊張量,這是一種可讓您處理不一致資料的張量。
- 查看 TensorFlow Model Garden 中的此物件偵測模型,該模型在
tf.Example資料解碼器中使用稀疏張量。