
|
|
|
 在 GitHub 上檢視原始碼 在 GitHub 上檢視原始碼
|
|
總覽
本指南深入探討 TensorFlow 和 Keras 的底層運作方式,以示範 TensorFlow 的運作原理。如果您想立即開始使用 Keras,請查看Keras 指南集合。
在本指南中,您將瞭解 TensorFlow 如何讓您透過簡單的程式碼變更來取得圖表、圖表的儲存和表示方式,以及如何使用這些圖表來加速模型運作。
這是概括性總覽,涵蓋 tf.function 如何讓您從立即執行切換為圖表執行。 如需 tf.function 的更完整規格,請參閱「透過 tf.function 提升效能」指南。
什麼是圖表?
在先前的三份指南中,您立即執行了 TensorFlow。這表示 TensorFlow 運算會由 Python 逐一運算執行,並將結果傳回給 Python。
雖然立即執行有數個獨特的優點,但圖表執行可讓您在 Python 之外進行移植,而且通常能提供更佳的效能。圖表執行表示張量運算會以TensorFlow 圖表執行,有時稱為 tf.Graph 或簡稱為「圖表」。
圖表是資料結構,其中包含一組 tf.Operation 物件 (代表運算單位) 和 tf.Tensor 物件 (代表在運算之間流動的資料單位)。 它們是在 tf.Graph 環境定義中定義。由於這些圖表是資料結構,因此可以儲存、執行及還原,而完全不需要原始 Python 程式碼。
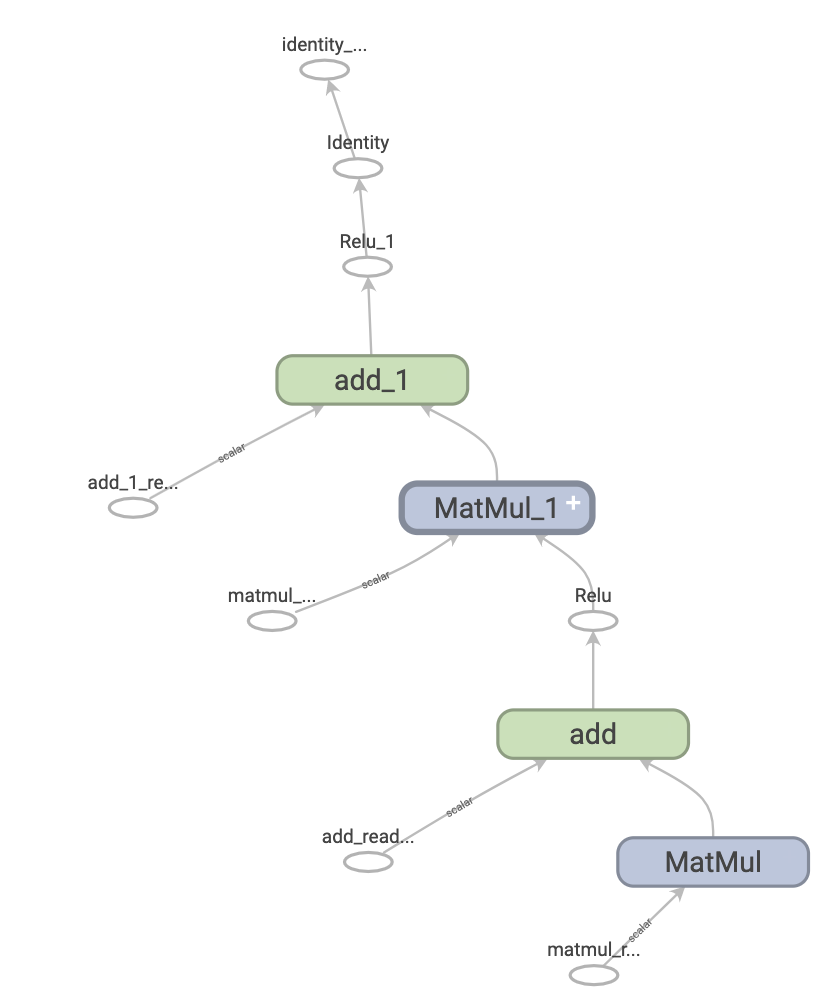
以下是在 TensorBoard 中視覺化呈現的雙層神經網路 TensorFlow 圖表
圖表的優點
有了圖表,您就能享有極大的彈性。您可以在沒有 Python 直譯器的環境中使用 TensorFlow 圖表,例如行動應用程式、嵌入式裝置和後端伺服器。當 TensorFlow 從 Python 匯出模型時,會使用圖表作為已儲存模型的格式。
圖表也很容易最佳化,讓編譯器可以執行下列轉換,例如:
- 透過摺疊運算中的常數節點,靜態推斷張量的值 (「常數摺疊」)。
- 區分獨立的運算子部分,並在執行緒或裝置之間分割。
- 透過消除常見的子運算式來簡化算術運算。
整個最佳化系統 Grappler 會執行此項和其他加速。
簡而言之,圖表非常實用,可讓 TensorFlow 快速執行、平行執行,並在多個裝置上有效率地執行。
不過,您仍然希望在 Python 中定義機器學習模型 (或其他運算),以方便使用,然後在需要時自動建構圖表。
設定
匯入一些必要的程式庫
import tensorflow as tf
import timeit
from datetime import datetime
2023-11-28 02:20:45.671036: E external/local_xla/xla/stream_executor/cuda/cuda_dnn.cc:9261] Unable to register cuDNN factory: Attempting to register factory for plugin cuDNN when one has already been registered
2023-11-28 02:20:45.671078: E external/local_xla/xla/stream_executor/cuda/cuda_fft.cc:607] Unable to register cuFFT factory: Attempting to register factory for plugin cuFFT when one has already been registered
2023-11-28 02:20:45.672497: E external/local_xla/xla/stream_executor/cuda/cuda_blas.cc:1515] Unable to register cuBLAS factory: Attempting to register factory for plugin cuBLAS when one has already been registered
善用圖表
您可以使用 tf.function (直接呼叫或作為裝飾器) 在 TensorFlow 中建立及執行圖表。tf.function 接受一般函式做為輸入,並傳回 tf.types.experimental.PolymorphicFunction。PolymorphicFunction 是 Python 可呼叫物件,可從 Python 函式建構 TensorFlow 圖表。您使用 tf.function 的方式與其 Python 對等項目相同。
# Define a Python function.
def a_regular_function(x, y, b):
  x = tf.matmul(x, y)
  x = x + b
  return x

# The Python type of `a_function_that_uses_a_graph` will now be a
# `PolymorphicFunction`.
a_function_that_uses_a_graph = tf.function(a_regular_function)

# Make some tensors.
x1 = tf.constant([[1.0, 2.0]])
y1 = tf.constant([[2.0], [3.0]])
b1 = tf.constant(4.0)

orig_value = a_regular_function(x1, y1, b1).numpy()
# Call a `tf.function` like a Python function.
tf_function_value = a_function_that_uses_a_graph(x1, y1, b1).numpy()
assert(orig_value == tf_function_value)
在外部,tf.function 看起來就像您使用 TensorFlow 運算編寫的一般函式。然而,在底層,它非常不同。底層 PolymorphicFunction 在單一 API 後方封裝了數個 tf.Graph (詳情請參閱多型章節)。這就是 tf.function 能夠為您提供圖表執行的優點 (例如速度和可部署性) 的原因 (請參閱上方的圖表的優點)。
tf.function 適用於函式及其呼叫的所有其他函式
def inner_function(x, y, b):
  x = tf.matmul(x, y)
  x = x + b
  return x

# Using the `tf.function` decorator makes `outer_function` into a
# `PolymorphicFunction`.
@tf.function
def outer_function(x):
  y = tf.constant([[2.0], [3.0]])
  b = tf.constant(4.0)

  return inner_function(x, y, b)

# Note that the callable will create a graph that
# includes `inner_function` as well as `outer_function`.
outer_function(tf.constant([[1.0, 2.0]])).numpy()
array([[12.]], dtype=float32)
如果您使用過 TensorFlow 1.x,您會注意到您從未需要定義 Placeholder 或 tf.Session。
將 Python 函式轉換為圖表
您使用 TensorFlow 編寫的任何函式都會包含內建 TF 運算和 Python 邏輯的混合,例如 if-then 子句、迴圈、break、return、continue 等等。雖然 TensorFlow 運算很容易由 tf.Graph 擷取,但 Python 專屬邏輯需要經過額外步驟才能成為圖表的一部分。tf.function 使用名為 AutoGraph (tf.autograph) 的程式庫,將 Python 程式碼轉換為圖表產生程式碼。
def simple_relu(x):
  if tf.greater(x, 0):
    return x
  else:
    return 0

# Using `tf.function` makes `tf_simple_relu` a `PolymorphicFunction` that wraps
# `simple_relu`.
tf_simple_relu = tf.function(simple_relu)

print("First branch, with graph:", tf_simple_relu(tf.constant(1)).numpy())
print("Second branch, with graph:", tf_simple_relu(tf.constant(-1)).numpy())
First branch, with graph: 1
Second branch, with graph: 0
雖然您不太可能需要直接檢視圖表,但您可以檢查輸出,以檢查確切的結果。這些結果不容易閱讀,因此不需要太仔細地查看!
# This is the graph-generating output of AutoGraph.
print(tf.autograph.to_code(simple_relu))
def tf__simple_relu(x):
    with ag__.FunctionScope('simple_relu', 'fscope', ag__.ConversionOptions(recursive=True, user_requested=True, optional_features=(), internal_convert_user_code=True)) as fscope:
        do_return = False
        retval_ = ag__.UndefinedReturnValue()

        def get_state():
            return (do_return, retval_)

        def set_state(vars_):
            nonlocal retval_, do_return
            (do_return, retval_) = vars_

        def if_body():
            nonlocal retval_, do_return
            try:
                do_return = True
                retval_ = ag__.ld(x)
            except:
                do_return = False
                raise

        def else_body():
            nonlocal retval_, do_return
            try:
                do_return = True
                retval_ = 0
            except:
                do_return = False
                raise
        ag__.if_stmt(ag__.converted_call(ag__.ld(tf).greater, (ag__.ld(x), 0), None, fscope), if_body, else_body, get_state, set_state, ('do_return', 'retval_'), 2)
        return fscope.ret(retval_, do_return)
# This is the graph itself.
print(tf_simple_relu.get_concrete_function(tf.constant(1)).graph.as_graph_def())
node {
  name: "x"
  op: "Placeholder"
  attr {
    key: "_user_specified_name"
    value {
      s: "x"
    }
  }
  attr {
    key: "dtype"
    value {
      type: DT_INT32
    }
  }
  attr {
    key: "shape"
    value {
      shape {
      }
    }
  }
}
node {
  name: "Greater/y"
  op: "Const"
  attr {
    key: "dtype"
    value {
      type: DT_INT32
    }
  }
  attr {
    key: "value"
    value {
      tensor {
        dtype: DT_INT32
        tensor_shape {
        }
        int_val: 0
      }
    }
  }
}
node {
  name: "Greater"
  op: "Greater"
  input: "x"
  input: "Greater/y"
  attr {
    key: "T"
    value {
      type: DT_INT32
    }
  }
}
node {
  name: "cond"
  op: "StatelessIf"
  input: "Greater"
  input: "x"
  attr {
    key: "Tcond"
    value {
      type: DT_BOOL
    }
  }
  attr {
    key: "Tin"
    value {
      list {
        type: DT_INT32
      }
    }
  }
  attr {
    key: "Tout"
    value {
      list {
        type: DT_BOOL
        type: DT_INT32
      }
    }
  }
  attr {
    key: "_lower_using_switch_merge"
    value {
      b: true
    }
  }
  attr {
    key: "_read_only_resource_inputs"
    value {
      list {
      }
    }
  }
  attr {
    key: "else_branch"
    value {
      func {
        name: "cond_false_31"
      }
    }
  }
  attr {
    key: "output_shapes"
    value {
      list {
        shape {
        }
        shape {
        }
      }
    }
  }
  attr {
    key: "then_branch"
    value {
      func {
        name: "cond_true_30"
      }
    }
  }
}
node {
  name: "cond/Identity"
  op: "Identity"
  input: "cond"
  attr {
    key: "T"
    value {
      type: DT_BOOL
    }
  }
}
node {
  name: "cond/Identity_1"
  op: "Identity"
  input: "cond:1"
  attr {
    key: "T"
    value {
      type: DT_INT32
    }
  }
}
node {
  name: "Identity"
  op: "Identity"
  input: "cond/Identity_1"
  attr {
    key: "T"
    value {
      type: DT_INT32
    }
  }
}
library {
  function {
    signature {
      name: "cond_false_31"
      input_arg {
        name: "cond_placeholder"
        type: DT_INT32
      }
      output_arg {
        name: "cond_identity"
        type: DT_BOOL
      }
      output_arg {
        name: "cond_identity_1"
        type: DT_INT32
      }
    }
    node_def {
      name: "cond/Const"
      op: "Const"
      attr {
        key: "dtype"
        value {
          type: DT_BOOL
        }
      }
      attr {
        key: "value"
        value {
          tensor {
            dtype: DT_BOOL
            tensor_shape {
            }
            bool_val: true
          }
        }
      }
    }
    node_def {
      name: "cond/Const_1"
      op: "Const"
      attr {
        key: "dtype"
        value {
          type: DT_BOOL
        }
      }
      attr {
        key: "value"
        value {
          tensor {
            dtype: DT_BOOL
            tensor_shape {
            }
            bool_val: true
          }
        }
      }
    }
    node_def {
      name: "cond/Const_2"
      op: "Const"
      attr {
        key: "dtype"
        value {
          type: DT_INT32
        }
      }
      attr {
        key: "value"
        value {
          tensor {
            dtype: DT_INT32
            tensor_shape {
            }
            int_val: 0
          }
        }
      }
    }
    node_def {
      name: "cond/Const_3"
      op: "Const"
      attr {
        key: "dtype"
        value {
          type: DT_BOOL
        }
      }
      attr {
        key: "value"
        value {
          tensor {
            dtype: DT_BOOL
            tensor_shape {
            }
            bool_val: true
          }
        }
      }
    }
    node_def {
      name: "cond/Identity"
      op: "Identity"
      input: "cond/Const_3:output:0"
      attr {
        key: "T"
        value {
          type: DT_BOOL
        }
      }
    }
    node_def {
      name: "cond/Const_4"
      op: "Const"
      attr {
        key: "dtype"
        value {
          type: DT_INT32
        }
      }
      attr {
        key: "value"
        value {
          tensor {
            dtype: DT_INT32
            tensor_shape {
            }
            int_val: 0
          }
        }
      }
    }
    node_def {
      name: "cond/Identity_1"
      op: "Identity"
      input: "cond/Const_4:output:0"
      attr {
        key: "T"
        value {
          type: DT_INT32
        }
      }
    }
    ret {
      key: "cond_identity"
      value: "cond/Identity:output:0"
    }
    ret {
      key: "cond_identity_1"
      value: "cond/Identity_1:output:0"
    }
    attr {
      key: "_construction_context"
      value {
        s: "kEagerRuntime"
      }
    }
    arg_attr {
      key: 0
      value {
        attr {
          key: "_output_shapes"
          value {
            list {
              shape {
              }
            }
          }
        }
      }
    }
  }
  function {
    signature {
      name: "cond_true_30"
      input_arg {
        name: "cond_identity_1_x"
        type: DT_INT32
      }
      output_arg {
        name: "cond_identity"
        type: DT_BOOL
      }
      output_arg {
        name: "cond_identity_1"
        type: DT_INT32
      }
    }
    node_def {
      name: "cond/Const"
      op: "Const"
      attr {
        key: "dtype"
        value {
          type: DT_BOOL
        }
      }
      attr {
        key: "value"
        value {
          tensor {
            dtype: DT_BOOL
            tensor_shape {
            }
            bool_val: true
          }
        }
      }
    }
    node_def {
      name: "cond/Identity"
      op: "Identity"
      input: "cond/Const:output:0"
      attr {
        key: "T"
        value {
          type: DT_BOOL
        }
      }
    }
    node_def {
      name: "cond/Identity_1"
      op: "Identity"
      input: "cond_identity_1_x"
      attr {
        key: "T"
        value {
          type: DT_INT32
        }
      }
    }
    ret {
      key: "cond_identity"
      value: "cond/Identity:output:0"
    }
    ret {
      key: "cond_identity_1"
      value: "cond/Identity_1:output:0"
    }
    attr {
      key: "_construction_context"
      value {
        s: "kEagerRuntime"
      }
    }
    arg_attr {
      key: 0
      value {
        attr {
          key: "_output_shapes"
          value {
            list {
              shape {
              }
            }
          }
        }
        attr {
          key: "_user_specified_name"
          value {
            s: "x"
          }
        }
      }
    }
  }
}
versions {
  producer: 1645
  min_consumer: 12
}
在大多數情況下,tf.function 在運作時不需要特別考量。不過,有些注意事項,「tf.function 指南」以及完整的 AutoGraph 參考資料可在此處提供協助。
多型:一個 tf.function,多個圖表
tf.Graph 專門用於特定類型的輸入 (例如,具有特定 dtype 的張量或具有相同 id() 的物件)。
每次您使用一組無法由其任何現有圖表處理的引數 (例如具有新 dtype 或不相容形狀的引數) 叫用 tf.function 時,它都會建立一個新的 tf.Graph,專門用於這些新引數。tf.Graph 輸入的類型規格由 tf.types.experimental.FunctionType 表示,也稱為簽名。如需關於何時產生新的 tf.Graph、如何控制以及 FunctionType 如何實用的詳細資訊,請參閱「透過 tf.function 提升效能」指南的「追蹤規則」章節。
tf.function 會將對應於該簽名的 tf.Graph 儲存在 ConcreteFunction 中。ConcreteFunction 可以視為 tf.Graph 的包裝函式。
@tf.function
def my_relu(x):
  return tf.maximum(0., x)

# `my_relu` creates new graphs as it observes different input types.
print(my_relu(tf.constant(5.5)))
print(my_relu([1, -1]))
print(my_relu(tf.constant([3., -3.])))
tf.Tensor(5.5, shape=(), dtype=float32)
tf.Tensor([1. 0.], shape=(2,), dtype=float32)
tf.Tensor([3. 0.], shape=(2,), dtype=float32)
如果已使用相同的輸入類型呼叫 tf.function,則不會建立新的 tf.Graph。
# These two calls do *not* create new graphs.
print(my_relu(tf.constant(-2.5))) # Input type matches `tf.constant(5.5)`.
print(my_relu(tf.constant([-1., 1.]))) # Input type matches `tf.constant([3., -3.])`.
tf.Tensor(0.0, shape=(), dtype=float32)
tf.Tensor([0. 1.], shape=(2,), dtype=float32)
由於 tf.function 由多個圖表支援,因此 (如同「PolymorphicFunction」這個名稱所表示) 是多型。這使其能夠支援比單一 tf.Graph 可能代表的更多輸入類型,並針對更佳效能最佳化每個 tf.Graph。
# There are three `ConcreteFunction`s (one for each graph) in `my_relu`.
# The `ConcreteFunction` also knows the return type and shape!
print(my_relu.pretty_printed_concrete_signatures())
Input Parameters:
  x (POSITIONAL_OR_KEYWORD): TensorSpec(shape=(), dtype=tf.float32, name=None)
Output Type:
  TensorSpec(shape=(), dtype=tf.float32, name=None)
Captures:
  None

Input Parameters:
  x (POSITIONAL_OR_KEYWORD): List[Literal[1], Literal[-1]]
Output Type:
  TensorSpec(shape=(2,), dtype=tf.float32, name=None)
Captures:
  None

Input Parameters:
  x (POSITIONAL_OR_KEYWORD): TensorSpec(shape=(2,), dtype=tf.float32, name=None)
Output Type:
  TensorSpec(shape=(2,), dtype=tf.float32, name=None)
Captures:
  None
使用 tf.function
到目前為止,您已瞭解如何透過將 tf.function 作為裝飾器或包裝函式使用,將 Python 函式轉換為圖表。但在實務上,讓 tf.function 正確運作可能很棘手!在接下來的章節中,您將瞭解如何讓您的程式碼在 tf.function 中如預期般運作。
圖表執行與立即執行
tf.function 中的程式碼可以立即執行和作為圖表執行。根據預設,tf.function 會將其程式碼作為圖表執行
@tf.function
def get_MSE(y_true, y_pred):
  sq_diff = tf.pow(y_true - y_pred, 2)
  return tf.reduce_mean(sq_diff)
y_true = tf.random.uniform([5], maxval=10, dtype=tf.int32)
y_pred = tf.random.uniform([5], maxval=10, dtype=tf.int32)
print(y_true)
print(y_pred)
tf.Tensor([3 5 2 7 7], shape=(5,), dtype=int32)
tf.Tensor([1 1 7 6 0], shape=(5,), dtype=int32)
get_MSE(y_true, y_pred)
<tf.Tensor: shape=(), dtype=int32, numpy=19>
若要驗證 tf.function 的圖表是否執行與其對等 Python 函式相同的運算,您可以透過 tf.config.run_functions_eagerly(True) 立即執行。這是一個開關,可關閉 tf.function 建立和執行圖表的能力,而不是正常執行程式碼。
tf.config.run_functions_eagerly(True)
get_MSE(y_true, y_pred)
<tf.Tensor: shape=(), dtype=int32, numpy=19>
# Don't forget to set it back when you are done.
tf.config.run_functions_eagerly(False)
不過,tf.function 在圖表和立即執行下的行為可能不同。Python print 函式是這兩種模式差異的一個範例。讓我們查看將 print 陳述式插入函式並重複呼叫時會發生什麼情況。
@tf.function
def get_MSE(y_true, y_pred):
  print("Calculating MSE!")
  sq_diff = tf.pow(y_true - y_pred, 2)
  return tf.reduce_mean(sq_diff)
觀察列印的內容
error = get_MSE(y_true, y_pred)
error = get_MSE(y_true, y_pred)
error = get_MSE(y_true, y_pred)
Calculating MSE!
輸出是否令人驚訝?即使呼叫了 get_MSE三次,它也只列印一次。
若要說明,當 tf.function 執行原始程式碼以在稱為「追蹤」的程序中建立圖表時,就會執行 print 陳述式 (請參閱「tf.function 指南」的「追蹤」章節)。追蹤會將 TensorFlow 運算擷取到圖表中,而 print 不會擷取到圖表中。 然後,系統會針對所有三個呼叫執行該圖表,而永遠不會再次執行 Python 程式碼。
為了進行健全性檢查,讓我們關閉圖表執行以進行比較
# Now, globally set everything to run eagerly to force eager execution.
tf.config.run_functions_eagerly(True)
# Observe what is printed below.
error = get_MSE(y_true, y_pred)
error = get_MSE(y_true, y_pred)
error = get_MSE(y_true, y_pred)
Calculating MSE!
Calculating MSE!
Calculating MSE!
tf.config.run_functions_eagerly(False)
print 是Python 附帶效應,而且在將函式轉換為 tf.function 時,您應注意其他差異。如需詳細資訊,請參閱「透過 tf.function 提升效能」指南的「限制」章節。
非嚴格執行
圖表執行只會執行產生可觀察效果所需的運算,包括:
- 函式的傳回值
- 有文件記載的知名附帶效應,例如:
- 輸入/輸出運算,例如
tf.print - 偵錯運算,例如
tf.debugging中的判斷提示函式 tf.Variable的變動
- 輸入/輸出運算,例如
這種行為通常稱為「非嚴格執行」,且與立即執行不同,立即執行會逐步執行所有程式運算 (無論是否需要)。
特別是,執行階段錯誤檢查不算做可觀察效果。如果因為運算不必要而被略過,則不會引發任何執行階段錯誤。
在下列範例中,圖表執行期間會略過「不必要」的運算 tf.gather,因此不會引發執行階段錯誤 InvalidArgumentError,就像在立即執行中一樣。執行圖表時,請勿仰賴引發錯誤。
def unused_return_eager(x):
  # Get index 1 will fail when `len(x) == 1`
  tf.gather(x, [1]) # unused
  return x

try:
  print(unused_return_eager(tf.constant([0.0])))
except tf.errors.InvalidArgumentError as e:
  # All operations are run during eager execution so an error is raised.
  print(f'{type(e).__name__}: {e}')
tf.Tensor([0.], shape=(1,), dtype=float32)
@tf.function
def unused_return_graph(x):
  tf.gather(x, [1]) # unused
  return x

# Only needed operations are run during graph execution. The error is not raised.
print(unused_return_graph(tf.constant([0.0])))
tf.Tensor([0.], shape=(1,), dtype=float32)
tf.function 最佳做法
可能需要一些時間才能習慣 tf.function 的行為。若要快速開始使用,初次使用者應試著使用 @tf.function 裝飾玩具函式,以取得從立即執行轉換為圖表執行的經驗。
為 tf.function 設計可能是編寫圖表相容 TensorFlow 程式的最佳選擇。以下是一些秘訣:
- 使用
tf.config.run_functions_eagerly盡早且經常在立即執行和圖表執行之間切換,以精確找出兩種模式何時/在何處分歧。 - 在 Python 函式外部建立
tf.Variable,並在內部修改它們。對於使用tf.Variable的物件 (例如tf.keras.layers、tf.keras.Model和tf.keras.optimizers) 也是如此。 - 避免編寫依賴外部 Python 變數 (排除
tf.Variable和 Keras 物件) 的函式。如需詳細資訊,請參閱「tf.function指南」的「依賴 Python 全域和自由變數」。 - 偏好編寫將張量和其他 TensorFlow 類型作為輸入的函式。您可以傳入其他物件類型,但請務必小心!如需詳細資訊,請參閱「
tf.function指南」的「依賴 Python 物件」。 - 在
tf.function下包含盡可能多的運算,以最大化效能增益。例如,裝飾整個訓練步驟或整個訓練迴圈。
查看加速
tf.function 通常會改善程式碼的效能,但加速量取決於您執行的運算類型。小型運算可能會受到呼叫圖表的額外負荷影響。您可以透過以下方式測量效能差異:
x = tf.random.uniform(shape=[10, 10], minval=-1, maxval=2, dtype=tf.dtypes.int32)

def power(x, y):
  result = tf.eye(10, dtype=tf.dtypes.int32)
  for _ in range(y):
    result = tf.matmul(x, result)
  return result
print("Eager execution:", timeit.timeit(lambda: power(x, 100), number=1000), "seconds")
Eager execution: 4.297045933999925 seconds
power_as_graph = tf.function(power)
print("Graph execution:", timeit.timeit(lambda: power_as_graph(x, 100), number=1000), "seconds")
Graph execution: 0.823222464999958 seconds
tf.function 通常用於加速訓練迴圈,您可以在「使用 Keras 從頭開始編寫訓練迴圈」指南的「使用 tf.function 加速訓練步驟」章節中深入瞭解。
效能和取捨
圖表可以加速程式碼,但建立圖表的過程會產生一些額外負荷。對於某些函式,建立圖表所花費的時間比執行圖表還要多。此投資通常會在後續執行的效能提升中快速回收,但務必注意,由於追蹤,任何大型模型訓練的前幾個步驟可能會比較慢。
無論您的模型有多大,您都希望避免頻繁追蹤。在「控制重新追蹤」章節中,「tf.function 指南」討論了如何設定輸入規格並使用張量引數來避免重新追蹤。如果您發現效能異常不佳,最好檢查您是否不小心重新追蹤。
tf.function 何時追蹤?
若要找出 tf.function 何時追蹤,請將 print 陳述式新增至其程式碼。根據經驗法則,tf.function 會在每次追蹤時執行 print 陳述式。
@tf.function
def a_function_with_python_side_effect(x):
  print("Tracing!") # An eager-only side effect.
  return x * x + tf.constant(2)

# This is traced the first time.
print(a_function_with_python_side_effect(tf.constant(2)))
# The second time through, you won't see the side effect.
print(a_function_with_python_side_effect(tf.constant(3)))
Tracing!
tf.Tensor(6, shape=(), dtype=int32)
tf.Tensor(11, shape=(), dtype=int32)
# This retraces each time the Python argument changes,
# as a Python argument could be an epoch count or other
# hyperparameter.
print(a_function_with_python_side_effect(2))
print(a_function_with_python_side_effect(3))
Tracing!
tf.Tensor(6, shape=(), dtype=int32)
Tracing!
tf.Tensor(11, shape=(), dtype=int32)
新的 Python 引數一律會觸發建立新的圖表,因此會產生額外的追蹤。
後續步驟
您可以在 API 參考頁面上瞭解關於 tf.function 的詳細資訊,並依照「透過 tf.function 提升效能」指南操作。