
|
|
|
 在 GitHub 上檢視原始碼 在 GitHub 上檢視原始碼
|
|
tf.data API 可讓您從簡單、可重複使用的片段建構複雜的輸入管線。例如,影像模型的管線可能會彙總來自分散式檔案系統中檔案的資料、對每張影像套用隨機擾動,以及將隨機選取的影像合併成批次以進行訓練。文字模型的管線可能涉及從原始文字資料中擷取符號、使用查閱表將其轉換為嵌入識別碼,以及將不同長度的序列分批處理。tf.data API 讓處理大量資料、從不同資料格式讀取,以及執行複雜轉換成為可能。
tf.data API 引入了 tf.data.Dataset 抽象概念,代表一系列元素,其中每個元素都由一個或多個元件組成。例如,在影像管線中,元素可能是單一訓練範例,具有一對張量元件代表影像及其標籤。
有兩種不同的方式可以建立資料集
資料來源會從記憶體或一或多個檔案中儲存的資料建構
Dataset。資料轉換會從一或多個
tf.data.Dataset物件建構資料集。
import tensorflow as tf
2024-01-17 02:24:38.925403: E external/local_xla/xla/stream_executor/cuda/cuda_dnn.cc:9261] Unable to register cuDNN factory: Attempting to register factory for plugin cuDNN when one has already been registered
2024-01-17 02:24:38.925446: E external/local_xla/xla/stream_executor/cuda/cuda_fft.cc:607] Unable to register cuFFT factory: Attempting to register factory for plugin cuFFT when one has already been registered
2024-01-17 02:24:38.927059: E external/local_xla/xla/stream_executor/cuda/cuda_blas.cc:1515] Unable to register cuBLAS factory: Attempting to register factory for plugin cuBLAS when one has already been registered
import pathlib
import os
import matplotlib.pyplot as plt
import pandas as pd
import numpy as np

np.set_printoptions(precision=4)
基本機制
若要建立輸入管線,您必須從資料來源開始。例如,若要從記憶體中的資料建構 Dataset,您可以使用 tf.data.Dataset.from_tensors() 或 tf.data.Dataset.from_tensor_slices()。或者,如果您的輸入資料以建議的 TFRecord 格式儲存在檔案中,則可以使用 tf.data.TFRecordDataset()。
取得 Dataset 物件後,您可以透過在 tf.data.Dataset 物件上串連方法呼叫來將其轉換為新的 Dataset。例如,您可以套用每個元素的轉換,例如 Dataset.map,以及多元素轉換,例如 Dataset.batch。請參閱 tf.data.Dataset 的文件,以取得完整的轉換清單。
Dataset 物件是 Python 可迭代物件。這使得可以使用 for 迴圈來取用其元素
dataset = tf.data.Dataset.from_tensor_slices([8, 3, 0, 8, 2, 1])
dataset
<_TensorSliceDataset element_spec=TensorSpec(shape=(), dtype=tf.int32, name=None)>
for elem in dataset:
  print(elem.numpy())
8
3
0
8
2
1
或透過使用 iter 明確建立 Python 迭代器,並使用 next 取用其元素
it = iter(dataset)

print(next(it).numpy())
8
或者,可以使用 reduce 轉換來取用資料集元素,這會減少所有元素以產生單一結果。以下範例說明如何使用 reduce 轉換來計算整數資料集的總和。
print(dataset.reduce(0, lambda state, value: state + value).numpy())
22
資料集結構
資料集會產生一系列元素,其中每個元素都是相同的 (巢狀) 元件結構。結構的個別元件可以是 tf.TypeSpec 可表示的任何類型,包括 tf.Tensor、tf.sparse.SparseTensor、tf.RaggedTensor、tf.TensorArray 或 tf.data.Dataset。
可用於表示元素 (巢狀) 結構的 Python 建構包括 tuple、dict、NamedTuple 和 OrderedDict。特別是,list 不是表示資料集元素結構的有效建構。這是因為早期的 tf.data 使用者強烈感覺到 list 輸入 (例如,傳遞至 tf.data.Dataset.from_tensors 時) 會自動封裝為張量,而 list 輸出 (例如,使用者定義函式的傳回值) 會強制轉換為 tuple。因此,如果您希望將 list 輸入視為結構,則需要將其轉換為 tuple,如果您希望 list 輸出是單一元件,則需要使用 tf.stack 明確封裝它。
Dataset.element_spec 屬性可讓您檢查每個元素元件的類型。此屬性會傳回 tf.TypeSpec 物件的巢狀結構,與元素的結構 (可能是單一元件、元件元組或元件的巢狀元組) 相符。例如
dataset1 = tf.data.Dataset.from_tensor_slices(tf.random.uniform([4, 10]))

dataset1.element_spec
TensorSpec(shape=(10,), dtype=tf.float32, name=None)
dataset2 = tf.data.Dataset.from_tensor_slices(
   (tf.random.uniform([4]),
    tf.random.uniform([4, 100], maxval=100, dtype=tf.int32)))

dataset2.element_spec
(TensorSpec(shape=(), dtype=tf.float32, name=None),
 TensorSpec(shape=(100,), dtype=tf.int32, name=None))
dataset3 = tf.data.Dataset.zip((dataset1, dataset2))

dataset3.element_spec
(TensorSpec(shape=(10,), dtype=tf.float32, name=None),
 (TensorSpec(shape=(), dtype=tf.float32, name=None),
  TensorSpec(shape=(100,), dtype=tf.int32, name=None)))
# Dataset containing a sparse tensor.
dataset4 = tf.data.Dataset.from_tensors(tf.SparseTensor(indices=[[0, 0], [1, 2]], values=[1, 2], dense_shape=[3, 4]))

dataset4.element_spec
SparseTensorSpec(TensorShape([3, 4]), tf.int32)
# Use value_type to see the type of value represented by the element spec
dataset4.element_spec.value_type
tensorflow.python.framework.sparse_tensor.SparseTensor
Dataset 轉換支援任何結構的資料集。當使用 Dataset.map 和 Dataset.filter 轉換 (將函式套用至每個元素) 時,元素結構會決定函式的引數
dataset1 = tf.data.Dataset.from_tensor_slices(
    tf.random.uniform([4, 10], minval=1, maxval=10, dtype=tf.int32))

dataset1
<_TensorSliceDataset element_spec=TensorSpec(shape=(10,), dtype=tf.int32, name=None)>
for z in dataset1:
  print(z.numpy())
[2 1 3 2 1 3 9 6 4 5]
[8 9 2 9 1 4 7 2 4 5]
[3 9 6 8 4 6 8 4 9 5]
[4 3 7 2 8 6 4 9 7 6]
dataset2 = tf.data.Dataset.from_tensor_slices(
   (tf.random.uniform([4]),
    tf.random.uniform([4, 100], maxval=100, dtype=tf.int32)))

dataset2
<_TensorSliceDataset element_spec=(TensorSpec(shape=(), dtype=tf.float32, name=None), TensorSpec(shape=(100,), dtype=tf.int32, name=None))>
dataset3 = tf.data.Dataset.zip((dataset1, dataset2))

dataset3
<_ZipDataset element_spec=(TensorSpec(shape=(10,), dtype=tf.int32, name=None), (TensorSpec(shape=(), dtype=tf.float32, name=None), TensorSpec(shape=(100,), dtype=tf.int32, name=None)))>
for a, (b,c) in dataset3:
  print('shapes: {a.shape}, {b.shape}, {c.shape}'.format(a=a, b=b, c=c))
shapes: (10,), (), (100,)
shapes: (10,), (), (100,)
shapes: (10,), (), (100,)
shapes: (10,), (), (100,)
讀取輸入資料
取用 NumPy 陣列
如需更多範例,請參閱載入 NumPy 陣列教學課程。
如果您的所有輸入資料都適合放在記憶體中,則從它們建立 Dataset 的最簡單方法是將它們轉換為 tf.Tensor 物件,並使用 Dataset.from_tensor_slices。
train, test = tf.keras.datasets.fashion_mnist.load_data()
Downloading data from https://storage.googleapis.com/tensorflow/tf-keras-datasets/train-labels-idx1-ubyte.gz
29515/29515 [==============================] - 0s 0us/step
Downloading data from https://storage.googleapis.com/tensorflow/tf-keras-datasets/train-images-idx3-ubyte.gz
26421880/26421880 [==============================] - 0s 0us/step
Downloading data from https://storage.googleapis.com/tensorflow/tf-keras-datasets/t10k-labels-idx1-ubyte.gz
5148/5148 [==============================] - 0s 0us/step
Downloading data from https://storage.googleapis.com/tensorflow/tf-keras-datasets/t10k-images-idx3-ubyte.gz
4422102/4422102 [==============================] - 0s 0us/step
images, labels = train
images = images/255

dataset = tf.data.Dataset.from_tensor_slices((images, labels))
dataset
<_TensorSliceDataset element_spec=(TensorSpec(shape=(28, 28), dtype=tf.float64, name=None), TensorSpec(shape=(), dtype=tf.uint8, name=None))>
取用 Python 產生器
可以輕鬆作為 tf.data.Dataset 擷取的另一個常見資料來源是 Python 產生器。
def count(stop):
  i = 0
  while i<stop:
    yield i
    i += 1
for n in count(5):
  print(n)
0
1
2
3
4
Dataset.from_generator 建構函式會將 Python 產生器轉換為功能完整的 tf.data.Dataset。
此建構函式採用可呼叫物件作為輸入,而非迭代器。這使其可以在產生器到達結尾時重新啟動產生器。它採用選用的 args 引數,該引數會作為可呼叫物件的引數傳遞。
output_types 引數是必要的,因為 tf.data 在內部建置 tf.Graph,而圖邊緣需要 tf.dtype。
ds_counter = tf.data.Dataset.from_generator(count, args=[25], output_types=tf.int32, output_shapes = (), )
for count_batch in ds_counter.repeat().batch(10).take(10):
  print(count_batch.numpy())
[0 1 2 3 4 5 6 7 8 9]
[10 11 12 13 14 15 16 17 18 19]
[20 21 22 23 24  0  1  2  3  4]
[ 5  6  7  8  9 10 11 12 13 14]
[15 16 17 18 19 20 21 22 23 24]
[0 1 2 3 4 5 6 7 8 9]
[10 11 12 13 14 15 16 17 18 19]
[20 21 22 23 24  0  1  2  3  4]
[ 5  6  7  8  9 10 11 12 13 14]
[15 16 17 18 19 20 21 22 23 24]
output_shapes 引數不是必要的,但強烈建議使用,因為許多 TensorFlow 運算不支援具有未知等級的張量。如果特定軸的長度未知或可變,請在 output_shapes 中將其設定為 None。
同樣重要的是要注意,output_shapes 和 output_types 遵循與其他資料集方法相同的巢狀規則。
以下是一個範例產生器,示範了這兩個方面:它傳回陣列的元組,其中第二個陣列是具有未知長度的向量。
def gen_series():
  i = 0
  while True:
    size = np.random.randint(0, 10)
    yield i, np.random.normal(size=(size,))
    i += 1
for i, series in gen_series():
  print(i, ":", str(series))
  if i > 5:
    break
0 : [-1.1977 -1.3099]
1 : [-0.3763  1.3639  0.0703  0.7888  0.3659 -0.0422 -0.5699 -1.4458]
2 : [ 0.4438  0.2206 -0.8348  3.0743 -0.2304  0.6876]
3 : [ 0.1138  0.3484 -0.3989  0.1871 -0.9462  0.7905  0.0224  0.204  -1.2715]
4 : [ 1.0292 -1.7965 -1.1569  0.437   1.9364  0.4718 -0.5036 -0.1318]
5 : [0.6893]
6 : [-0.2385 -0.3129  0.4913  0.2546  1.4849 -1.3109 -0.3785]
第一個輸出是 int32,第二個輸出是 float32。
第一個項目是純量,形狀為 (),第二個項目是未知長度的向量,形狀為 (None,)
ds_series = tf.data.Dataset.from_generator(
    gen_series,
    output_types=(tf.int32, tf.float32),
    output_shapes=((), (None,)))

ds_series
<_FlatMapDataset element_spec=(TensorSpec(shape=(), dtype=tf.int32, name=None), TensorSpec(shape=(None,), dtype=tf.float32, name=None))>
現在可以像常規 tf.data.Dataset 一樣使用它。請注意,在批次處理具有可變形狀的資料集時,您需要使用 Dataset.padded_batch。
ds_series_batch = ds_series.shuffle(20).padded_batch(10)

ids, sequence_batch = next(iter(ds_series_batch))
print(ids.numpy())
print()
print(sequence_batch.numpy())
[ 4 18 19  2  8 22 13  0 25 27]

[[-0.5268  0.8465  1.8949 -0.6337 -0.9212  0.2917  0.1995 -0.2283  1.5621]
 [-0.7196  0.3447 -0.5744 -1.6807  1.9387 -0.7832  1.1232  0.5444  0.3566]
 [-1.0073  0.      0.      0.      0.      0.      0.      0.      0.    ]
 [ 1.3614 -0.0866  0.4309 -1.1438  0.066   0.3847 -0.8009  0.      0.    ]
 [-0.7528  0.      0.      0.      0.      0.      0.      0.      0.    ]
 [-0.006   0.9022  1.2462  0.0703  0.      0.      0.      0.      0.    ]
 [ 0.5811  0.      0.      0.      0.      0.      0.      0.      0.    ]
 [-0.1996  1.6923 -0.274  -0.7509 -0.6734 -1.687  -0.8438 -1.0904  0.    ]
 [ 0.3178  0.0775  1.3367  1.0921  0.1651  0.9298  0.0764 -0.4039  0.    ]
 [ 1.5668 -1.3154  0.8587 -0.7022  0.      0.      0.      0.      0.    ]]
如需更實際的範例,請嘗試將 preprocessing.image.ImageDataGenerator 包裝為 tf.data.Dataset。
首先下載資料
flowers = tf.keras.utils.get_file(
    'flower_photos',
    'https://storage.googleapis.com/download.tensorflow.org/example_images/flower_photos.tgz',
    untar=True)
Downloading data from https://storage.googleapis.com/download.tensorflow.org/example_images/flower_photos.tgz
228813984/228813984 [==============================] - 1s 0us/step
img_gen = tf.keras.preprocessing.image.ImageDataGenerator(rescale=1./255, rotation_range=20)
images, labels = next(img_gen.flow_from_directory(flowers))
Found 3670 images belonging to 5 classes.
print(images.dtype, images.shape)
print(labels.dtype, labels.shape)
float32 (32, 256, 256, 3)
float32 (32, 5)
ds = tf.data.Dataset.from_generator(
    lambda: img_gen.flow_from_directory(flowers),
    output_types=(tf.float32, tf.float32),
    output_shapes=([32,256,256,3], [32,5])
)

ds.element_spec
(TensorSpec(shape=(32, 256, 256, 3), dtype=tf.float32, name=None),
 TensorSpec(shape=(32, 5), dtype=tf.float32, name=None))
for images, labels in ds.take(1):
  print('images.shape: ', images.shape)
  print('labels.shape: ', labels.shape)
Found 3670 images belonging to 5 classes.
images.shape:  (32, 256, 256, 3)
labels.shape:  (32, 5)
取用 TFRecord 資料
如需端對端範例,請參閱載入 TFRecords 教學課程。
tf.data API 支援各種檔案格式,以便您可以處理不適合放在記憶體中的大型資料集。例如,TFRecord 檔案格式是一種簡單的記錄導向二進位格式,許多 TensorFlow 應用程式使用它來處理訓練資料。tf.data.TFRecordDataset 類別可讓您串流處理一或多個 TFRecord 檔案的內容,作為輸入管線的一部分。
以下範例使用來自法國街道名稱標誌 (FSNS) 的測試檔案。
# Creates a dataset that reads all of the examples from two files.
fsns_test_file = tf.keras.utils.get_file("fsns.tfrec", "https://storage.googleapis.com/download.tensorflow.org/data/fsns-20160927/testdata/fsns-00000-of-00001")
Downloading data from https://storage.googleapis.com/download.tensorflow.org/data/fsns-20160927/testdata/fsns-00000-of-00001
7904079/7904079 [==============================] - 0s 0us/step
TFRecordDataset 初始化程式的 filenames 引數可以是字串、字串清單或字串的 tf.Tensor。因此,如果您有兩組檔案用於訓練和驗證目的,您可以建立一個工廠方法來產生資料集,並將檔案名稱作為輸入引數
dataset = tf.data.TFRecordDataset(filenames = [fsns_test_file])
dataset
<TFRecordDatasetV2 element_spec=TensorSpec(shape=(), dtype=tf.string, name=None)>
許多 TensorFlow 專案在其 TFRecord 檔案中使用序列化的 tf.train.Example 記錄。這些記錄需要先解碼才能檢查
raw_example = next(iter(dataset))
parsed = tf.train.Example.FromString(raw_example.numpy())

parsed.features.feature['image/text']
bytes_list {
  value: "Rue Perreyon"
}
取用文字資料
如需端對端範例,請參閱載入文字教學課程。
許多資料集以一或多個文字檔案的形式散佈。tf.data.TextLineDataset 提供了一種從一或多個文字檔案中擷取行的簡單方法。給定一或多個檔案名稱,TextLineDataset 將為這些檔案的每一行產生一個字串值元素。
directory_url = 'https://storage.googleapis.com/download.tensorflow.org/data/illiad/'
file_names = ['cowper.txt', 'derby.txt', 'butler.txt']

file_paths = [
    tf.keras.utils.get_file(file_name, directory_url + file_name)
    for file_name in file_names
]
Downloading data from https://storage.googleapis.com/download.tensorflow.org/data/illiad/cowper.txt
815980/815980 [==============================] - 0s 0us/step
Downloading data from https://storage.googleapis.com/download.tensorflow.org/data/illiad/derby.txt
809730/809730 [==============================] - 0s 0us/step
Downloading data from https://storage.googleapis.com/download.tensorflow.org/data/illiad/butler.txt
807992/807992 [==============================] - 0s 0us/step
dataset = tf.data.TextLineDataset(file_paths)
以下是第一個檔案的前幾行
for line in dataset.take(5):
  print(line.numpy())
b"\xef\xbb\xbfAchilles sing, O Goddess! Peleus' son;"
b'His wrath pernicious, who ten thousand woes'
b"Caused to Achaia's host, sent many a soul"
b'Illustrious into Ades premature,'
b'And Heroes gave (so stood the will of Jove)'
若要在檔案之間交替行,請使用 Dataset.interleave。這使得更易於將檔案混洗在一起。以下是每個翻譯的第一行、第二行和第三行
files_ds = tf.data.Dataset.from_tensor_slices(file_paths)
lines_ds = files_ds.interleave(tf.data.TextLineDataset, cycle_length=3)

for i, line in enumerate(lines_ds.take(9)):
  if i % 3 == 0:
    print()
  print(line.numpy())
b"\xef\xbb\xbfAchilles sing, O Goddess! Peleus' son;"
b"\xef\xbb\xbfOf Peleus' son, Achilles, sing, O Muse,"
b'\xef\xbb\xbfSing, O goddess, the anger of Achilles son of Peleus, that brought'

b'His wrath pernicious, who ten thousand woes'
b'The vengeance, deep and deadly; whence to Greece'
b'countless ills upon the Achaeans. Many a brave soul did it send'

b"Caused to Achaia's host, sent many a soul"
b'Unnumbered ills arose; which many a soul'
b'hurrying down to Hades, and many a hero did it yield a prey to dogs and'
預設情況下,TextLineDataset 會產生每個檔案的每一行,這可能不是理想的,例如,如果檔案以標頭行開頭,或包含註解。可以使用 Dataset.skip() 或 Dataset.filter 轉換來移除這些行。在這裡,您跳過第一行,然後篩選以僅尋找倖存者。
titanic_file = tf.keras.utils.get_file("train.csv", "https://storage.googleapis.com/tf-datasets/titanic/train.csv")
titanic_lines = tf.data.TextLineDataset(titanic_file)
Downloading data from https://storage.googleapis.com/tf-datasets/titanic/train.csv
30874/30874 [==============================] - 0s 0us/step
for line in titanic_lines.take(10):
  print(line.numpy())
b'survived,sex,age,n_siblings_spouses,parch,fare,class,deck,embark_town,alone'
b'0,male,22.0,1,0,7.25,Third,unknown,Southampton,n'
b'1,female,38.0,1,0,71.2833,First,C,Cherbourg,n'
b'1,female,26.0,0,0,7.925,Third,unknown,Southampton,y'
b'1,female,35.0,1,0,53.1,First,C,Southampton,n'
b'0,male,28.0,0,0,8.4583,Third,unknown,Queenstown,y'
b'0,male,2.0,3,1,21.075,Third,unknown,Southampton,n'
b'1,female,27.0,0,2,11.1333,Third,unknown,Southampton,n'
b'1,female,14.0,1,0,30.0708,Second,unknown,Cherbourg,n'
b'1,female,4.0,1,1,16.7,Third,G,Southampton,n'
def survived(line):
  return tf.not_equal(tf.strings.substr(line, 0, 1), "0")

survivors = titanic_lines.skip(1).filter(survived)
for line in survivors.take(10):
  print(line.numpy())
b'1,female,38.0,1,0,71.2833,First,C,Cherbourg,n'
b'1,female,26.0,0,0,7.925,Third,unknown,Southampton,y'
b'1,female,35.0,1,0,53.1,First,C,Southampton,n'
b'1,female,27.0,0,2,11.1333,Third,unknown,Southampton,n'
b'1,female,14.0,1,0,30.0708,Second,unknown,Cherbourg,n'
b'1,female,4.0,1,1,16.7,Third,G,Southampton,n'
b'1,male,28.0,0,0,13.0,Second,unknown,Southampton,y'
b'1,female,28.0,0,0,7.225,Third,unknown,Cherbourg,y'
b'1,male,28.0,0,0,35.5,First,A,Southampton,y'
b'1,female,38.0,1,5,31.3875,Third,unknown,Southampton,n'
取用 CSV 資料
如需更多範例,請參閱載入 CSV 檔案和載入 Pandas DataFrame 教學課程。
CSV 檔案格式是以純文字儲存表格資料的常用格式。
例如
titanic_file = tf.keras.utils.get_file("train.csv", "https://storage.googleapis.com/tf-datasets/titanic/train.csv")
df = pd.read_csv(titanic_file)
df.head()
如果您的資料適合放在記憶體中,則相同的 Dataset.from_tensor_slices 方法適用於字典,允許輕鬆匯入此資料
titanic_slices = tf.data.Dataset.from_tensor_slices(dict(df))

for feature_batch in titanic_slices.take(1):
  for key, value in feature_batch.items():
    print("  {!r:20s}: {}".format(key, value))
'survived'          : 0
  'sex'               : b'male'
  'age'               : 22.0
  'n_siblings_spouses': 1
  'parch'             : 0
  'fare'              : 7.25
  'class'             : b'Third'
  'deck'              : b'unknown'
  'embark_town'       : b'Southampton'
  'alone'             : b'n'
更具延展性的方法是根據需要從磁碟載入。
tf.data 模組提供從符合 RFC 4180 的一或多個 CSV 檔案中擷取記錄的方法。
tf.data.experimental.make_csv_dataset 函式是讀取 CSV 檔案集的高階介面。它支援欄類型推斷和許多其他功能,例如批次處理和混洗,使使用變得簡單。
titanic_batches = tf.data.experimental.make_csv_dataset(
    titanic_file, batch_size=4,
    label_name="survived")
for feature_batch, label_batch in titanic_batches.take(1):
  print("'survived': {}".format(label_batch))
  print("features:")
  for key, value in feature_batch.items():
    print("  {!r:20s}: {}".format(key, value))
'survived': [0 1 0 0]
features:
  'sex'               : [b'male' b'male' b'male' b'female']
  'age'               : [28. 25. 30. 28.]
  'n_siblings_spouses': [1 1 0 3]
  'parch'             : [0 0 0 1]
  'fare'              : [15.5     7.775  27.75   25.4667]
  'class'             : [b'Third' b'Third' b'First' b'Third']
  'deck'              : [b'unknown' b'unknown' b'C' b'unknown']
  'embark_town'       : [b'Queenstown' b'Southampton' b'Cherbourg' b'Southampton']
  'alone'             : [b'n' b'n' b'y' b'n']
如果您只需要欄的子集,可以使用 select_columns 引數。
titanic_batches = tf.data.experimental.make_csv_dataset(
    titanic_file, batch_size=4,
    label_name="survived", select_columns=['class', 'fare', 'survived'])
for feature_batch, label_batch in titanic_batches.take(1):
  print("'survived': {}".format(label_batch))
  for key, value in feature_batch.items():
    print("  {!r:20s}: {}".format(key, value))
'survived': [1 0 1 0]
  'fare'              : [11.1333 24.15    7.925  52.    ]
  'class'             : [b'Third' b'Third' b'Third' b'First']
還有一個較低階的 experimental.CsvDataset 類別,它提供更精細的控制。它不支援欄類型推斷。相反,您必須指定每欄的類型。
titanic_types  = [tf.int32, tf.string, tf.float32, tf.int32, tf.int32, tf.float32, tf.string, tf.string, tf.string, tf.string]
dataset = tf.data.experimental.CsvDataset(titanic_file, titanic_types , header=True)

for line in dataset.take(10):
  print([item.numpy() for item in line])
[0, b'male', 22.0, 1, 0, 7.25, b'Third', b'unknown', b'Southampton', b'n']
[1, b'female', 38.0, 1, 0, 71.2833, b'First', b'C', b'Cherbourg', b'n']
[1, b'female', 26.0, 0, 0, 7.925, b'Third', b'unknown', b'Southampton', b'y']
[1, b'female', 35.0, 1, 0, 53.1, b'First', b'C', b'Southampton', b'n']
[0, b'male', 28.0, 0, 0, 8.4583, b'Third', b'unknown', b'Queenstown', b'y']
[0, b'male', 2.0, 3, 1, 21.075, b'Third', b'unknown', b'Southampton', b'n']
[1, b'female', 27.0, 0, 2, 11.1333, b'Third', b'unknown', b'Southampton', b'n']
[1, b'female', 14.0, 1, 0, 30.0708, b'Second', b'unknown', b'Cherbourg', b'n']
[1, b'female', 4.0, 1, 1, 16.7, b'Third', b'G', b'Southampton', b'n']
[0, b'male', 20.0, 0, 0, 8.05, b'Third', b'unknown', b'Southampton', b'y']
如果某些欄為空,則此低階介面允許您提供預設值而不是欄類型。
%%writefile missing.csv
1,2,3,4
,2,3,4
1,,3,4
1,2,,4
1,2,3,
,,,
Writing missing.csv
# Creates a dataset that reads all of the records from two CSV files, each with
# four float columns which may have missing values.

record_defaults = [999,999,999,999]
dataset = tf.data.experimental.CsvDataset("missing.csv", record_defaults)
dataset = dataset.map(lambda *items: tf.stack(items))
dataset
<_MapDataset element_spec=TensorSpec(shape=(4,), dtype=tf.int32, name=None)>
for line in dataset:
  print(line.numpy())
[1 2 3 4]
[999   2   3   4]
[  1 999   3   4]
[  1   2 999   4]
[  1   2   3 999]
[999 999 999 999]
預設情況下,CsvDataset 會產生檔案每行的每一欄,這可能不是理想的,例如,如果檔案以應忽略的標頭行開頭,或者如果輸入中不需要某些欄。可以使用 header 和 select_cols 引數分別移除這些行和欄位。
# Creates a dataset that reads all of the records from two CSV files with
# headers, extracting float data from columns 2 and 4.
record_defaults = [999, 999] # Only provide defaults for the selected columns
dataset = tf.data.experimental.CsvDataset("missing.csv", record_defaults, select_cols=[1, 3])
dataset = dataset.map(lambda *items: tf.stack(items))
dataset
<_MapDataset element_spec=TensorSpec(shape=(2,), dtype=tf.int32, name=None)>
for line in dataset:
  print(line.numpy())
[2 4]
[2 4]
[999   4]
[2 4]
[  2 999]
[999 999]
取用檔案集
有許多資料集以檔案集的形式散佈,其中每個檔案都是一個範例。
flowers_root = tf.keras.utils.get_file(
    'flower_photos',
    'https://storage.googleapis.com/download.tensorflow.org/example_images/flower_photos.tgz',
    untar=True)
flowers_root = pathlib.Path(flowers_root)
根目錄包含每個類別的目錄
for item in flowers_root.glob("*"):
  print(item.name)
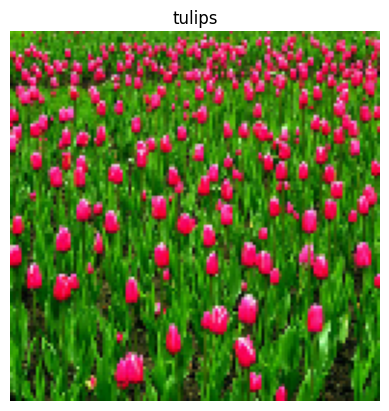
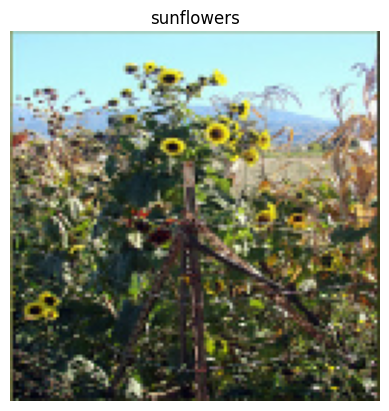
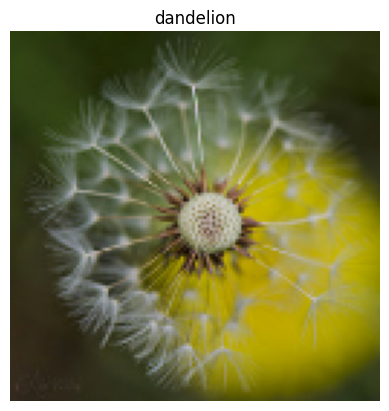
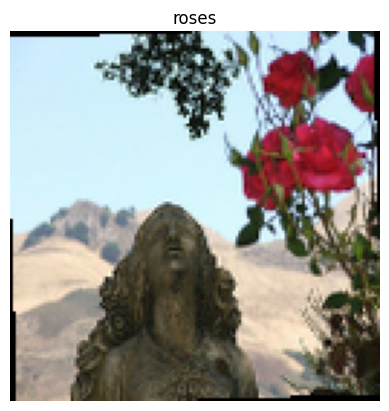
roses
sunflowers
LICENSE.txt
dandelion
tulips
daisy
每個類別目錄中的檔案都是範例
list_ds = tf.data.Dataset.list_files(str(flowers_root/'*/*'))

for f in list_ds.take(5):
  print(f.numpy())
b'/home/kbuilder/.keras/datasets/flower_photos/tulips/4520577328_a94c11e806_n.jpg'
b'/home/kbuilder/.keras/datasets/flower_photos/dandelion/22679060358_561ec823ae_m.jpg'
b'/home/kbuilder/.keras/datasets/flower_photos/daisy/6978826370_7b9aa7c7d5.jpg'
b'/home/kbuilder/.keras/datasets/flower_photos/tulips/3447650747_8299786b80_n.jpg'
b'/home/kbuilder/.keras/datasets/flower_photos/tulips/112951022_4892b1348b_n.jpg'
使用 tf.io.read_file 函式讀取資料,並從路徑中擷取標籤,傳回 (image, label) 配對
def process_path(file_path):
  label = tf.strings.split(file_path, os.sep)[-2]
  return tf.io.read_file(file_path), label

labeled_ds = list_ds.map(process_path)
for image_raw, label_text in labeled_ds.take(1):
  print(repr(image_raw.numpy()[:100]))
  print()
  print(label_text.numpy())
b"\xff\xd8\xff\xe0\x00\x10JFIF\x00\x01\x01\x01\x00H\x00H\x00\x00\xff\xe1\t\xcbXMP\x00://ns.adobe.com/xap/1.0/\x00<?xpacket begin='\xef\xbb\xbf' id='W5M0MpCehiHzreSzNTczk"

b'roses'
批次處理資料集元素
簡單批次處理
最簡單的批次處理形式是將資料集的 n 個連續元素堆疊到單一元素中。Dataset.batch() 轉換完全執行此操作,其約束與 tf.stack() 運算子相同,套用於元素的每個元件:即,對於每個元件i,所有元素都必須具有形狀完全相同的張量。
inc_dataset = tf.data.Dataset.range(100)
dec_dataset = tf.data.Dataset.range(0, -100, -1)
dataset = tf.data.Dataset.zip((inc_dataset, dec_dataset))
batched_dataset = dataset.batch(4)

for batch in batched_dataset.take(4):
  print([arr.numpy() for arr in batch])
[array([0, 1, 2, 3]), array([ 0, -1, -2, -3])]
[array([4, 5, 6, 7]), array([-4, -5, -6, -7])]
[array([ 8,  9, 10, 11]), array([ -8,  -9, -10, -11])]
[array([12, 13, 14, 15]), array([-12, -13, -14, -15])]
雖然 tf.data 嘗試傳播形狀資訊,但 Dataset.batch 的預設設定會導致未知的批次大小,因為最後一批次可能未滿。請注意形狀中的 None
batched_dataset
<_BatchDataset element_spec=(TensorSpec(shape=(None,), dtype=tf.int64, name=None), TensorSpec(shape=(None,), dtype=tf.int64, name=None))>
使用 drop_remainder 引數來忽略最後一批次,並取得完整的形狀傳播
batched_dataset = dataset.batch(7, drop_remainder=True)
batched_dataset
<_BatchDataset element_spec=(TensorSpec(shape=(7,), dtype=tf.int64, name=None), TensorSpec(shape=(7,), dtype=tf.int64, name=None))>
使用填補批次處理張量
上述方法適用於所有大小相同的張量。但是,許多模型 (包括序列模型) 使用可能具有不同大小的輸入資料 (例如,不同長度的序列)。為了處理這種情況,Dataset.padded_batch 轉換可讓您透過指定一或多個可以填補的維度來批次處理不同形狀的張量。
dataset = tf.data.Dataset.range(100)
dataset = dataset.map(lambda x: tf.fill([tf.cast(x, tf.int32)], x))
dataset = dataset.padded_batch(4, padded_shapes=(None,))

for batch in dataset.take(2):
  print(batch.numpy())
  print()
[[0 0 0]
 [1 0 0]
 [2 2 0]
 [3 3 3]]

[[4 4 4 4 0 0 0]
 [5 5 5 5 5 0 0]
 [6 6 6 6 6 6 0]
 [7 7 7 7 7 7 7]]
Dataset.padded_batch 轉換可讓您為每個元件的每個維度設定不同的填補,並且可以是可變長度 (以上範例中以 None 表示) 或固定長度。也可以覆寫填補值,預設值為 0。
訓練工作流程
處理多個週期
tf.data API 提供兩種主要方式來處理相同資料的多個週期。
在多個週期中迭代資料集的最簡單方法是使用 Dataset.repeat() 轉換。首先,建立 titanic 資料的資料集
titanic_file = tf.keras.utils.get_file("train.csv", "https://storage.googleapis.com/tf-datasets/titanic/train.csv")
titanic_lines = tf.data.TextLineDataset(titanic_file)
def plot_batch_sizes(ds):
  batch_sizes = [batch.shape[0] for batch in ds]
  plt.bar(range(len(batch_sizes)), batch_sizes)
  plt.xlabel('Batch number')
  plt.ylabel('Batch size')
套用不帶引數的 Dataset.repeat() 轉換將無限期地重複輸入。
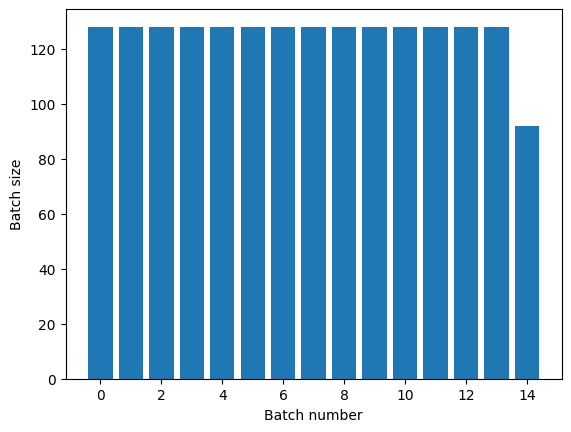
Dataset.repeat 轉換會串連其引數,而不發出一個週期結束和下一個週期開始的訊號。因此,在 Dataset.repeat 之後套用的 Dataset.batch 將產生跨越週期邊界的批次
titanic_batches = titanic_lines.repeat(3).batch(128)
plot_batch_sizes(titanic_batches)
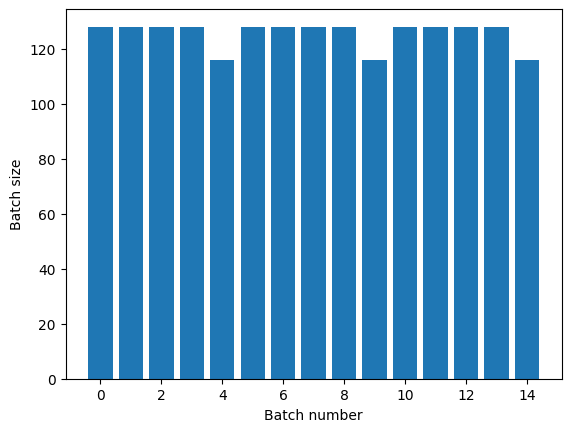
如果您需要明確的週期分隔,請將 Dataset.batch 放在 repeat 之前
titanic_batches = titanic_lines.batch(128).repeat(3)

plot_batch_sizes(titanic_batches)
如果您想要在每個 epoch 結束時執行自訂計算 (例如,收集統計資料),那麼最簡單的方法是在每個 epoch 重新啟動資料集迭代。
epochs = 3
dataset = titanic_lines.batch(128)

for epoch in range(epochs):
  for batch in dataset:
    print(batch.shape)
  print("End of epoch: ", epoch)
(128,)
(128,)
(128,)
(128,)
(116,)
End of epoch:  0
(128,)
(128,)
(128,)
(128,)
(116,)
End of epoch:  1
(128,)
(128,)
(128,)
(128,)
(116,)
End of epoch:  2
隨機洗牌輸入資料
The Dataset.shuffle() 轉換會維護固定大小的緩衝區,並從該緩衝區中均勻隨機選擇下一個元素。
在資料集中新增索引,以便您可以查看效果
lines = tf.data.TextLineDataset(titanic_file)
counter = tf.data.experimental.Counter()

dataset = tf.data.Dataset.zip((counter, lines))
dataset = dataset.shuffle(buffer_size=100)
dataset = dataset.batch(20)
dataset
WARNING:tensorflow:From /tmpfs/tmp/ipykernel_14491/4092668703.py:2: CounterV2 (from tensorflow.python.data.experimental.ops.counter) is deprecated and will be removed in a future version.
Instructions for updating:
Use `tf.data.Dataset.counter(...)` instead.
<_BatchDataset element_spec=(TensorSpec(shape=(None,), dtype=tf.int64, name=None), TensorSpec(shape=(None,), dtype=tf.string, name=None))>
由於 buffer_size 為 100,且批次大小為 20,因此第一個批次不包含索引超過 120 的元素。
n,line_batch = next(iter(dataset))
print(n.numpy())
[ 43  13  17  72  33  89  83 105  96  81   0  67  97  84  73  32  30  71
  64 103]
與 Dataset.batch 一樣,相對於 Dataset.repeat 的順序很重要。
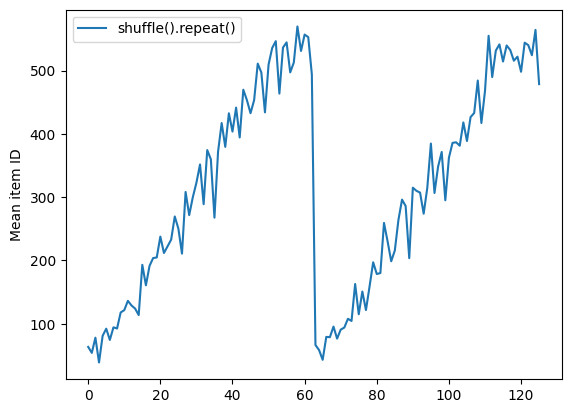
Dataset.shuffle 在洗牌緩衝區為空之前不會發出 epoch 結束的訊號。因此,在 repeat 之前放置 shuffle 將顯示一個 epoch 的每個元素,然後再移至下一個 epoch
dataset = tf.data.Dataset.zip((counter, lines))
shuffled = dataset.shuffle(buffer_size=100).batch(10).repeat(2)

print("Here are the item ID's near the epoch boundary:\n")
for n, line_batch in shuffled.skip(60).take(5):
  print(n.numpy())
Here are the item ID's near the epoch boundary:

[625 583 586 606 504 597 453 615 575 429]
[424 456 452 605 483 566 395 556 492 365]
[570 573 611 540 545 559 388 579]
[  0  18  92  79  81  86  62 103  29  82]
[47 69 17 95  9 11 77 84 31 53]
shuffle_repeat = [n.numpy().mean() for n, line_batch in shuffled]
plt.plot(shuffle_repeat, label="shuffle().repeat()")
plt.ylabel("Mean item ID")
plt.legend()
<matplotlib.legend.Legend at 0x7f32b0355dc0>
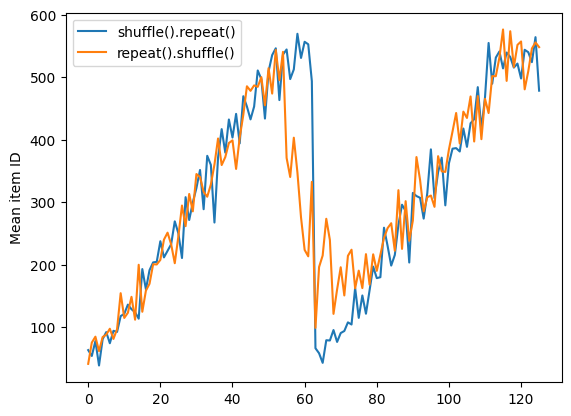
但是在 shuffle 之前的 repeat 會將 epoch 邊界混合在一起
dataset = tf.data.Dataset.zip((counter, lines))
shuffled = dataset.repeat(2).shuffle(buffer_size=100).batch(10)

print("Here are the item ID's near the epoch boundary:\n")
for n, line_batch in shuffled.skip(55).take(15):
  print(n.numpy())
Here are the item ID's near the epoch boundary:

[464 377 595 328 614 504   7  20 433 623]
[419 550 615 509 499 540 557 622 570 544]
[588 618 616   4 460  38  16 617  31 591]
[440 610 585 600  36  17  35  52 592  19]
[523  59 545 624 607  51  53  26  33 318]
[510  37   6 448 612 469  32  10  39 594]
[ 41  63  13 627  67  76 386 579 412  55]
[  1  54 626  71  64  22  47 553 525  65]
[ 69   3  15 102  14 455  23  98  74  78]
[596  12  50   5  18 112 114  97  61  42]
[103  84 583  90 350 575 606  85 107 108]
[115 127  60 602 118  43  34  58  46 587]
[119  56 620  75 564 625  88 140 539  45]
[589 100 149 452 110  11  66 132 142 111]
[101 334  94 497 520 158 120  86 135  95]
repeat_shuffle = [n.numpy().mean() for n, line_batch in shuffled]

plt.plot(shuffle_repeat, label="shuffle().repeat()")
plt.plot(repeat_shuffle, label="repeat().shuffle()")
plt.ylabel("Mean item ID")
plt.legend()
<matplotlib.legend.Legend at 0x7f32b033bdf0>
預處理資料
The Dataset.map(f) 轉換透過將給定的函數 f 應用於輸入資料集的每個元素,來產生新的資料集。它基於 map() 函數,該函數通常應用於函數式程式語言中的列表(和其他結構)。函數 f 接受代表輸入中單個元素的 tf.Tensor 物件,並傳回將代表新資料集中單個元素的 tf.Tensor 物件。它的實作使用標準 TensorFlow 運算將一個元素轉換為另一個元素。
本節涵蓋如何使用 Dataset.map() 的常見範例。
解碼影像資料並調整其大小
當在真實世界的影像資料上訓練神經網路時,通常需要將不同大小的影像轉換為通用大小,以便可以將它們分批處理為固定大小。
重建花卉檔案名稱資料集
list_ds = tf.data.Dataset.list_files(str(flowers_root/'*/*'))
撰寫一個操作資料集元素的函數。
# Reads an image from a file, decodes it into a dense tensor, and resizes it
# to a fixed shape.
def parse_image(filename):
  parts = tf.strings.split(filename, os.sep)
  label = parts[-2]

  image = tf.io.read_file(filename)
  image = tf.io.decode_jpeg(image)
  image = tf.image.convert_image_dtype(image, tf.float32)
  image = tf.image.resize(image, [128, 128])
  return image, label
測試它是否運作。
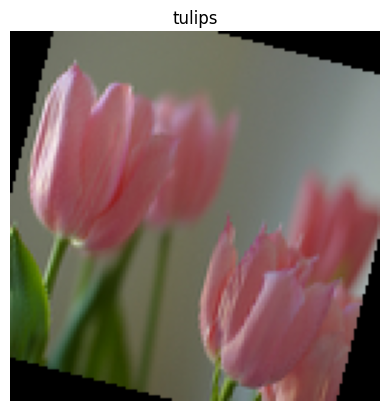
file_path = next(iter(list_ds))
image, label = parse_image(file_path)

def show(image, label):
  plt.figure()
  plt.imshow(image)
  plt.title(label.numpy().decode('utf-8'))
  plt.axis('off')

show(image, label)
將其對應到資料集。
images_ds = list_ds.map(parse_image)

for image, label in images_ds.take(2):
  show(image, label)
應用任意 Python 邏輯
為了效能考量,請盡可能使用 TensorFlow 運算來預處理您的資料。但是,有時在剖析您的輸入資料時,呼叫外部 Python 程式庫會很有用。您可以在 tf.py_function 轉換中使用 Dataset.map 運算。
例如,如果您想要套用隨機旋轉,tf.image 模組只有 tf.image.rot90,對於影像增強來說不是很有用。
為了示範 tf.py_function,請嘗試改用 scipy.ndimage.rotate 函數
import scipy.ndimage as ndimage

@tf.py_function(Tout=tf.float32)
def random_rotate_image(image):
  image = ndimage.rotate(image, np.random.uniform(-30, 30), reshape=False)
  return image
image, label = next(iter(images_ds))
image = random_rotate_image(image)
show(image, label)
Clipping input data to the valid range for imshow with RGB data ([0..1] for floats or [0..255] for integers).
若要將此函數與 Dataset.map 搭配使用,與 Dataset.from_generator 適用相同的注意事項,您需要在套用函數時描述傳回形狀和類型
def tf_random_rotate_image(image, label):
  im_shape = image.shape
  image = random_rotate_image(image)
  image.set_shape(im_shape)
  return image, label
rot_ds = images_ds.map(tf_random_rotate_image)

for image, label in rot_ds.take(2):
  show(image, label)
Clipping input data to the valid range for imshow with RGB data ([0..1] for floats or [0..255] for integers).
Clipping input data to the valid range for imshow with RGB data ([0..1] for floats or [0..255] for integers).

剖析 tf.Example 協定緩衝區訊息
許多輸入管線從 TFRecord 格式擷取 tf.train.Example 協定緩衝區訊息。每個 tf.train.Example 記錄包含一個或多個「特徵」,而輸入管線通常會將這些特徵轉換為張量。
fsns_test_file = tf.keras.utils.get_file("fsns.tfrec", "https://storage.googleapis.com/download.tensorflow.org/data/fsns-20160927/testdata/fsns-00000-of-00001")
dataset = tf.data.TFRecordDataset(filenames = [fsns_test_file])
dataset
<TFRecordDatasetV2 element_spec=TensorSpec(shape=(), dtype=tf.string, name=None)>
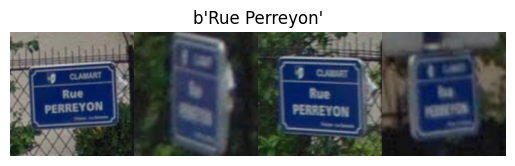
您可以在 tf.data.Dataset 之外使用 tf.train.Example 原型,以了解資料
raw_example = next(iter(dataset))
parsed = tf.train.Example.FromString(raw_example.numpy())

feature = parsed.features.feature
raw_img = feature['image/encoded'].bytes_list.value[0]
img = tf.image.decode_png(raw_img)
plt.imshow(img)
plt.axis('off')
_ = plt.title(feature["image/text"].bytes_list.value[0])
raw_example = next(iter(dataset))
def tf_parse(eg):
  example = tf.io.parse_example(
      eg[tf.newaxis], {
          'image/encoded': tf.io.FixedLenFeature(shape=(), dtype=tf.string),
          'image/text': tf.io.FixedLenFeature(shape=(), dtype=tf.string)
      })
  return example['image/encoded'][0], example['image/text'][0]
img, txt = tf_parse(raw_example)
print(txt.numpy())
print(repr(img.numpy()[:20]), "...")
b'Rue Perreyon'
b'\x89PNG\r\n\x1a\n\x00\x00\x00\rIHDR\x00\x00\x02X' ...
decoded = dataset.map(tf_parse)
decoded
<_MapDataset element_spec=(TensorSpec(shape=(), dtype=tf.string, name=None), TensorSpec(shape=(), dtype=tf.string, name=None))>
image_batch, text_batch = next(iter(decoded.batch(10)))
image_batch.shape
TensorShape([10])
時間序列視窗化
如需端對端時間序列範例,請參閱:時間序列預測。
時間序列資料通常在時間軸完整的情況下組織。
使用簡單的 Dataset.range 進行示範
range_ds = tf.data.Dataset.range(100000)
通常,基於此類資料的模型會需要連續的時間片段。
最簡單的方法是將資料分批處理
使用 batch
batches = range_ds.batch(10, drop_remainder=True)

for batch in batches.take(5):
  print(batch.numpy())
[0 1 2 3 4 5 6 7 8 9]
[10 11 12 13 14 15 16 17 18 19]
[20 21 22 23 24 25 26 27 28 29]
[30 31 32 33 34 35 36 37 38 39]
[40 41 42 43 44 45 46 47 48 49]
或者,為了對未來進行密集預測,您可以將特徵和標籤彼此相對移動一步
def dense_1_step(batch):
  # Shift features and labels one step relative to each other.
  return batch[:-1], batch[1:]

predict_dense_1_step = batches.map(dense_1_step)

for features, label in predict_dense_1_step.take(3):
  print(features.numpy(), " => ", label.numpy())
[0 1 2 3 4 5 6 7 8]  =>  [1 2 3 4 5 6 7 8 9]
[10 11 12 13 14 15 16 17 18]  =>  [11 12 13 14 15 16 17 18 19]
[20 21 22 23 24 25 26 27 28]  =>  [21 22 23 24 25 26 27 28 29]
若要預測整個視窗而不是固定偏移量,您可以將批次分割成兩部分
batches = range_ds.batch(15, drop_remainder=True)

def label_next_5_steps(batch):
  return (batch[:-5],   # Inputs: All except the last 5 steps
          batch[-5:])   # Labels: The last 5 steps

predict_5_steps = batches.map(label_next_5_steps)

for features, label in predict_5_steps.take(3):
  print(features.numpy(), " => ", label.numpy())
[0 1 2 3 4 5 6 7 8 9]  =>  [10 11 12 13 14]
[15 16 17 18 19 20 21 22 23 24]  =>  [25 26 27 28 29]
[30 31 32 33 34 35 36 37 38 39]  =>  [40 41 42 43 44]
若要允許一個批次的特徵與另一個批次的標籤之間有一些重疊,請使用 Dataset.zip
feature_length = 10
label_length = 3

features = range_ds.batch(feature_length, drop_remainder=True)
labels = range_ds.batch(feature_length).skip(1).map(lambda labels: labels[:label_length])

predicted_steps = tf.data.Dataset.zip((features, labels))

for features, label in predicted_steps.take(5):
  print(features.numpy(), " => ", label.numpy())
[0 1 2 3 4 5 6 7 8 9]  =>  [10 11 12]
[10 11 12 13 14 15 16 17 18 19]  =>  [20 21 22]
[20 21 22 23 24 25 26 27 28 29]  =>  [30 31 32]
[30 31 32 33 34 35 36 37 38 39]  =>  [40 41 42]
[40 41 42 43 44 45 46 47 48 49]  =>  [50 51 52]
使用 window
雖然使用 Dataset.batch 可以運作,但在某些情況下,您可能需要更精細的控制。Dataset.window 方法可讓您完全控制,但需要小心:它會傳回 Datasets 的 Dataset。前往「資料集結構」章節以取得詳細資訊。
window_size = 5

windows = range_ds.window(window_size, shift=1)
for sub_ds in windows.take(5):
  print(sub_ds)
<_VariantDataset element_spec=TensorSpec(shape=(), dtype=tf.int64, name=None)>
<_VariantDataset element_spec=TensorSpec(shape=(), dtype=tf.int64, name=None)>
<_VariantDataset element_spec=TensorSpec(shape=(), dtype=tf.int64, name=None)>
<_VariantDataset element_spec=TensorSpec(shape=(), dtype=tf.int64, name=None)>
<_VariantDataset element_spec=TensorSpec(shape=(), dtype=tf.int64, name=None)>
The Dataset.flat_map 方法可以取得資料集的資料集,並將其展平為單一資料集
for x in windows.flat_map(lambda x: x).take(30):
   print(x.numpy(), end=' ')
0 1 2 3 4 1 2 3 4 5 2 3 4 5 6 3 4 5 6 7 4 5 6 7 8 5 6 7 8 9
在幾乎所有情況下,您都會想要先 Dataset.batch 資料集
def sub_to_batch(sub):
  return sub.batch(window_size, drop_remainder=True)

for example in windows.flat_map(sub_to_batch).take(5):
  print(example.numpy())
[0 1 2 3 4]
[1 2 3 4 5]
[2 3 4 5 6]
[3 4 5 6 7]
[4 5 6 7 8]
現在,您可以看到 shift 引數控制每個視窗移動的距離。
將這些放在一起,您可能會撰寫此函數
def make_window_dataset(ds, window_size=5, shift=1, stride=1):
  windows = ds.window(window_size, shift=shift, stride=stride)

  def sub_to_batch(sub):
    return sub.batch(window_size, drop_remainder=True)

  windows = windows.flat_map(sub_to_batch)
  return windows
ds = make_window_dataset(range_ds, window_size=10, shift = 5, stride=3)

for example in ds.take(10):
  print(example.numpy())
[ 0  3  6  9 12 15 18 21 24 27]
[ 5  8 11 14 17 20 23 26 29 32]
[10 13 16 19 22 25 28 31 34 37]
[15 18 21 24 27 30 33 36 39 42]
[20 23 26 29 32 35 38 41 44 47]
[25 28 31 34 37 40 43 46 49 52]
[30 33 36 39 42 45 48 51 54 57]
[35 38 41 44 47 50 53 56 59 62]
[40 43 46 49 52 55 58 61 64 67]
[45 48 51 54 57 60 63 66 69 72]
然後,就像之前一樣,很容易擷取標籤
dense_labels_ds = ds.map(dense_1_step)

for inputs,labels in dense_labels_ds.take(3):
  print(inputs.numpy(), "=>", labels.numpy())
[ 0  3  6  9 12 15 18 21 24] => [ 3  6  9 12 15 18 21 24 27]
[ 5  8 11 14 17 20 23 26 29] => [ 8 11 14 17 20 23 26 29 32]
[10 13 16 19 22 25 28 31 34] => [13 16 19 22 25 28 31 34 37]
重新取樣
當處理類別非常不平衡的資料集時,您可能會想要重新取樣資料集。tf.data 提供了兩種方法來執行此操作。信用卡詐欺資料集是這類問題的一個很好的例子。
zip_path = tf.keras.utils.get_file(
    origin='https://storage.googleapis.com/download.tensorflow.org/data/creditcard.zip',
    fname='creditcard.zip',
    extract=True)

csv_path = zip_path.replace('.zip', '.csv')
Downloading data from https://storage.googleapis.com/download.tensorflow.org/data/creditcard.zip
69155632/69155632 [==============================] - 0s 0us/step
creditcard_ds = tf.data.experimental.make_csv_dataset(
    csv_path, batch_size=1024, label_name="Class",
    # Set the column types: 30 floats and an int.
    column_defaults=[float()]*30+[int()])
現在,檢查類別的分配,它是高度偏斜的
def count(counts, batch):
  features, labels = batch
  class_1 = labels == 1
  class_1 = tf.cast(class_1, tf.int32)

  class_0 = labels == 0
  class_0 = tf.cast(class_0, tf.int32)

  counts['class_0'] += tf.reduce_sum(class_0)
  counts['class_1'] += tf.reduce_sum(class_1)

  return counts
counts = creditcard_ds.take(10).reduce(
    initial_state={'class_0': 0, 'class_1': 0},
    reduce_func = count)

counts = np.array([counts['class_0'].numpy(),
                   counts['class_1'].numpy()]).astype(np.float32)

fractions = counts/counts.sum()
print(fractions)
[0.9953 0.0047]
使用不平衡資料集進行訓練的常見方法是平衡它。tf.data 包含幾種啟用此工作流程的方法
資料集取樣
重新取樣資料集的一種方法是使用 sample_from_datasets。當您為每個類別都有單獨的 tf.data.Dataset 時,這更適用。
在此,僅使用篩選器從信用卡詐欺資料中產生它們
negative_ds = (
  creditcard_ds
    .unbatch()
    .filter(lambda features, label: label==0)
    .repeat())
positive_ds = (
  creditcard_ds
    .unbatch()
    .filter(lambda features, label: label==1)
    .repeat())
for features, label in positive_ds.batch(10).take(1):
  print(label.numpy())
[1 1 1 1 1 1 1 1 1 1]
若要使用 tf.data.Dataset.sample_from_datasets,請傳遞資料集和每個資料集的權重
balanced_ds = tf.data.Dataset.sample_from_datasets(
    [negative_ds, positive_ds], [0.5, 0.5]).batch(10)
現在,資料集以 50/50 的機率產生每個類別的範例
for features, labels in balanced_ds.take(10):
  print(labels.numpy())
[0 0 0 1 0 0 1 0 0 0]
[1 1 0 0 1 1 1 0 0 1]
[1 0 0 0 1 1 0 0 0 0]
[1 0 0 0 0 1 0 1 0 0]
[1 1 1 1 0 1 0 0 1 0]
[0 1 1 0 0 0 1 1 0 1]
[0 1 1 0 1 1 0 1 1 1]
[0 0 0 1 0 0 1 1 0 0]
[0 1 0 0 1 1 1 0 1 0]
[1 1 1 1 1 1 0 0 0 0]
拒絕重新取樣
上述 Dataset.sample_from_datasets 方法的一個問題是,它需要每個類別都有單獨的 tf.data.Dataset。您可以使用 Dataset.filter 來建立這兩個資料集,但這會導致所有資料載入兩次。
The tf.data.Dataset.rejection_resample 方法可以應用於資料集以重新平衡它,同時僅載入一次。元素將被捨棄或重複以實現平衡。
The rejection_resample 方法採用 class_func 引數。此 class_func 會應用於每個資料集元素,並用於判斷範例屬於哪個類別,以達到平衡的目的。
此處的目標是平衡標籤分佈,而 creditcard_ds 的元素已經是 (features, label) 配對。因此,class_func 只需要傳回這些標籤
def class_func(features, label):
  return label
重新取樣方法處理個別範例,因此在這種情況下,您必須在套用該方法之前 unbatch 資料集。
此方法需要目標分佈,以及選擇性的初始分佈估計作為輸入。
resample_ds = (
    creditcard_ds
    .unbatch()
    .rejection_resample(class_func, target_dist=[0.5,0.5],
                        initial_dist=fractions)
    .batch(10))
WARNING:tensorflow:From /tmpfs/src/tf_docs_env/lib/python3.9/site-packages/tensorflow/python/data/ops/dataset_ops.py:4963: Print (from tensorflow.python.ops.logging_ops) is deprecated and will be removed after 2018-08-20.
Instructions for updating:
Use tf.print instead of tf.Print. Note that tf.print returns a no-output operator that directly prints the output. Outside of defuns or eager mode, this operator will not be executed unless it is directly specified in session.run or used as a control dependency for other operators. This is only a concern in graph mode. Below is an example of how to ensure tf.print executes in graph mode:
The rejection_resample 方法傳回 (class, example) 配對,其中 class 是 class_func 的輸出。在這種情況下,example 已經是 (feature, label) 配對,因此使用 map 來捨棄標籤的額外副本
balanced_ds = resample_ds.map(lambda extra_label, features_and_label: features_and_label)
現在,資料集以 50/50 的機率產生每個類別的範例
for features, labels in balanced_ds.take(10):
  print(labels.numpy())
Proportion of examples rejected by sampler is high: [0.995312512][0.995312512 0.0046875][0 1]
Proportion of examples rejected by sampler is high: [0.995312512][0.995312512 0.0046875][0 1]
Proportion of examples rejected by sampler is high: [0.995312512][0.995312512 0.0046875][0 1]
Proportion of examples rejected by sampler is high: [0.995312512][0.995312512 0.0046875][0 1]
Proportion of examples rejected by sampler is high: [0.995312512][0.995312512 0.0046875][0 1]
Proportion of examples rejected by sampler is high: [0.995312512][0.995312512 0.0046875][0 1]
Proportion of examples rejected by sampler is high: [0.995312512][0.995312512 0.0046875][0 1]
Proportion of examples rejected by sampler is high: [0.995312512][0.995312512 0.0046875][0 1]
Proportion of examples rejected by sampler is high: [0.995312512][0.995312512 0.0046875][0 1]
Proportion of examples rejected by sampler is high: [0.995312512][0.995312512 0.0046875][0 1]
[0 1 0 1 0 0 1 1 0 1]
[1 1 0 1 0 0 1 1 0 0]
[0 0 1 0 1 0 0 0 0 1]
[1 0 0 1 0 0 1 0 1 0]
[0 1 1 0 0 1 0 1 1 0]
[1 1 0 1 1 0 1 1 0 1]
[1 1 1 0 0 0 0 0 0 1]
[0 1 0 0 0 0 0 1 1 1]
[0 1 0 1 1 0 0 1 0 1]
[0 0 1 0 1 1 1 0 0 1]
迭代器檢查點
Tensorflow 支援建立檢查點,以便在您的訓練程序重新啟動時,它可以還原最新的檢查點以恢復其大部分進度。除了檢查模型變數之外,您還可以檢查資料集迭代器的進度。如果您有一個大型資料集,並且不希望在每次重新啟動時都從頭開始資料集,這可能會很有用。但是請注意,迭代器檢查點可能很大,因為 Dataset.shuffle 和 Dataset.prefetch 等轉換需要在迭代器內緩衝元素。
若要將您的迭代器包含在檢查點中,請將迭代器傳遞至 tf.train.Checkpoint 建構函式。
range_ds = tf.data.Dataset.range(20)

iterator = iter(range_ds)
ckpt = tf.train.Checkpoint(step=tf.Variable(0), iterator=iterator)
manager = tf.train.CheckpointManager(ckpt, '/tmp/my_ckpt', max_to_keep=3)

print([next(iterator).numpy() for _ in range(5)])

save_path = manager.save()

print([next(iterator).numpy() for _ in range(5)])

ckpt.restore(manager.latest_checkpoint)

print([next(iterator).numpy() for _ in range(5)])
[0, 1, 2, 3, 4]
[5, 6, 7, 8, 9]
[5, 6, 7, 8, 9]
將 tf.data 與 tf.keras 搭配使用
The tf.keras API 簡化了建立和執行機器學習模型的許多方面。其 Model.fit 和 Model.evaluate 以及 Model.predict API 支援資料集作為輸入。以下是快速資料集和模型設定
train, test = tf.keras.datasets.fashion_mnist.load_data()

images, labels = train
images = images/255.0
labels = labels.astype(np.int32)
fmnist_train_ds = tf.data.Dataset.from_tensor_slices((images, labels))
fmnist_train_ds = fmnist_train_ds.shuffle(5000).batch(32)

model = tf.keras.Sequential([
  tf.keras.layers.Flatten(),
  tf.keras.layers.Dense(10)
])

model.compile(optimizer='adam',
              loss=tf.keras.losses.SparseCategoricalCrossentropy(from_logits=True),
              metrics=['accuracy'])
傳遞 (feature, label) 配對的資料集是 Model.fit 和 Model.evaluate 所需的全部內容
model.fit(fmnist_train_ds, epochs=2)
Epoch 1/2
  26/1875 [..............................] - ETA: 3s - loss: 1.7645 - accuracy: 0.3930
WARNING: All log messages before absl::InitializeLog() is called are written to STDERR
I0000 00:00:1705458306.961075   14743 device_compiler.h:186] Compiled cluster using XLA!  This line is logged at most once for the lifetime of the process.
1875/1875 [==============================] - 4s 2ms/step - loss: 0.5948 - accuracy: 0.7994
Epoch 2/2
1875/1875 [==============================] - 4s 2ms/step - loss: 0.4601 - accuracy: 0.8427
<keras.src.callbacks.History at 0x7f32b0722250>
如果您傳遞無限資料集,例如透過呼叫 Dataset.repeat,您只需要同時傳遞 steps_per_epoch 引數
model.fit(fmnist_train_ds.repeat(), epochs=2, steps_per_epoch=20)
Epoch 1/2
20/20 [==============================] - 0s 2ms/step - loss: 0.4791 - accuracy: 0.8344
Epoch 2/2
20/20 [==============================] - 0s 2ms/step - loss: 0.4777 - accuracy: 0.8438
<keras.src.callbacks.History at 0x7f32b0457100>
為了評估,您可以傳遞評估步驟的數量
loss, accuracy = model.evaluate(fmnist_train_ds)
print("Loss :", loss)
print("Accuracy :", accuracy)
1875/1875 [==============================] - 3s 2ms/step - loss: 0.4396 - accuracy: 0.8490
Loss : 0.4396059811115265
Accuracy : 0.8489833474159241
對於大型資料集,請設定要評估的步驟數
loss, accuracy = model.evaluate(fmnist_train_ds.repeat(), steps=10)
print("Loss :", loss)
print("Accuracy :", accuracy)
10/10 [==============================] - 0s 2ms/step - loss: 0.4079 - accuracy: 0.8844
Loss : 0.4079427719116211
Accuracy : 0.8843749761581421
呼叫 Model.predict 時不需要標籤。
predict_ds = tf.data.Dataset.from_tensor_slices(images).batch(32)
result = model.predict(predict_ds, steps = 10)
print(result.shape)
10/10 [==============================] - 0s 1ms/step
(320, 10)
但是,如果您確實傳遞包含標籤的資料集,則會忽略標籤
result = model.predict(fmnist_train_ds, steps = 10)
print(result.shape)
10/10 [==============================] - 0s 1ms/step
(320, 10)