
|
|
|
 在 GitHub 上檢視原始碼 在 GitHub 上檢視原始碼
|
|
本教學課程示範如何使用 UCF101 人類動作資料集載入和預先處理 AVI 影片資料。預先處理資料後,即可用於影片分類/辨識、字幕或叢集等工作。原始資料集包含從 YouTube 收集的真實動作影片,共有 101 個類別,包括演奏大提琴、刷牙和化眼妝。您將學習如何:
從 zip 檔案載入資料。
從影片檔案讀取影格序列。
視覺化影片資料。
包裝影格產生器
tf.data.Dataset。
本影片載入和預先處理教學課程是 TensorFlow 影片教學課程系列的第一部分。以下是其他三個教學課程:
- 建構用於影片分類的 3D CNN 模型:請注意,本教學課程使用 (2+1)D CNN 來分解 3D 資料的空間和時間面向;如果您使用 MRI 掃描等體積資料,請考慮使用 3D CNN 而不是 (2+1)D CNN。
- 用於串流動作辨識的 MoViNet:熟悉 TF Hub 上提供的 MoViNet 模型。
- 使用 MoViNet 進行影片分類的遷移學習:本教學課程說明如何搭配 UCF-101 資料集使用在不同資料集上訓練的預先訓練影片分類模型。
設定
首先安裝和匯入一些必要的程式庫,包括:remotezip 以檢查 ZIP 檔案的內容、tqdm 以使用進度列、OpenCV 以處理影片檔案,以及 tensorflow_docs 以將資料嵌入 Jupyter 筆記本。
# The way this tutorial uses the `TimeDistributed` layer requires TF>=2.10pip install -U "tensorflow>=2.10.0"
pip install remotezip tqdm opencv-pythonpip install -q git+https://github.com/tensorflow/docs
import tqdm
import random
import pathlib
import itertools
import collections

import os
import cv2
import numpy as np
import remotezip as rz

import tensorflow as tf

# Some modules to display an animation using imageio.
import imageio
from IPython import display
from urllib import request
from tensorflow_docs.vis import embed
下載 UCF101 資料集的子集
UCF101 資料集包含 101 個不同影片動作類別,主要用於動作辨識。您將在本示範中使用的這些類別的子集。
URL = 'https://storage.googleapis.com/thumos14_files/UCF101_videos.zip'
上述網址包含 UCF 101 資料集的 zip 檔案。建立一個函式,使用 remotezip 程式庫檢查該網址中 zip 檔案的內容
def list_files_from_zip_url(zip_url):
  """ List the files in each class of the dataset given a URL with the zip file.

    Args:
      zip_url: A URL from which the files can be extracted from.

    Returns:
      List of files in each of the classes.
  """
  files = []
  with rz.RemoteZip(zip_url) as zip:
    for zip_info in zip.infolist():
      files.append(zip_info.filename)
  return files
files = list_files_from_zip_url(URL)
files = [f for f in files if f.endswith('.avi')]
files[:10]
從幾個影片和有限數量的類別開始進行訓練。執行上述程式碼區塊後,請注意類別名稱包含在每個影片的檔案名稱中。
定義 get_class 函式,從檔案名稱擷取類別名稱。然後,建立一個名為 get_files_per_class 的函式,將所有檔案清單 (上方的 files) 轉換成列出每個類別檔案的字典
def get_class(fname):
  """ Retrieve the name of the class given a filename.

    Args:
      fname: Name of the file in the UCF101 dataset.

    Returns:
      Class that the file belongs to.
  """
  return fname.split('_')[-3]
def get_files_per_class(files):
  """ Retrieve the files that belong to each class.

    Args:
      files: List of files in the dataset.

    Returns:
      Dictionary of class names (key) and files (values).
  """
  files_for_class = collections.defaultdict(list)
  for fname in files:
    class_name = get_class(fname)
    files_for_class[class_name].append(fname)
  return files_for_class
取得每個類別的檔案清單後,您可以選擇要使用的類別數量,以及每個類別要使用的影片數量,以便建立您的資料集。
NUM_CLASSES = 10
FILES_PER_CLASS = 50
files_for_class = get_files_per_class(files)
classes = list(files_for_class.keys())
print('Num classes:', len(classes))
print('Num videos for class[0]:', len(files_for_class[classes[0]]))
建立一個名為 select_subset_of_classes 的新函式,選取資料集中存在的類別子集,以及每個類別的特定檔案數
def select_subset_of_classes(files_for_class, classes, files_per_class):
  """ Create a dictionary with the class name and a subset of the files in that class.

    Args:
      files_for_class: Dictionary of class names (key) and files (values).
      classes: List of classes.
      files_per_class: Number of files per class of interest.

    Returns:
      Dictionary with class as key and list of specified number of video files in that class.
  """
  files_subset = dict()

  for class_name in classes:
    class_files = files_for_class[class_name]
    files_subset[class_name] = class_files[:files_per_class]

  return files_subset
files_subset = select_subset_of_classes(files_for_class, classes[:NUM_CLASSES], FILES_PER_CLASS)
list(files_subset.keys())
定義協助程式函式,將影片分割成訓練集、驗證集和測試集。影片是從包含 zip 檔案的網址下載,並放置在各自的子目錄中。
def download_from_zip(zip_url, to_dir, file_names):
  """ Download the contents of the zip file from the zip URL.

    Args:
      zip_url: A URL with a zip file containing data.
      to_dir: A directory to download data to.
      file_names: Names of files to download.
  """
  with rz.RemoteZip(zip_url) as zip:
    for fn in tqdm.tqdm(file_names):
      class_name = get_class(fn)
      zip.extract(fn, str(to_dir / class_name))
      unzipped_file = to_dir / class_name / fn

      fn = pathlib.Path(fn).parts[-1]
      output_file = to_dir / class_name / fn
      unzipped_file.rename(output_file)
下列函式會傳回尚未放置在資料子集中的剩餘資料。它可讓您將該剩餘資料放置在下一個指定的資料子集中。
def split_class_lists(files_for_class, count):
  """ Returns the list of files belonging to a subset of data as well as the remainder of
    files that need to be downloaded.

    Args:
      files_for_class: Files belonging to a particular class of data.
      count: Number of files to download.

    Returns:
      Files belonging to the subset of data and dictionary of the remainder of files that need to be downloaded.
  """
  split_files = []
  remainder = {}
  for cls in files_for_class:
    split_files.extend(files_for_class[cls][:count])
    remainder[cls] = files_for_class[cls][count:]
  return split_files, remainder
下列 download_ucf_101_subset 函式可讓您下載 UCF101 資料集的子集,並將其分割成訓練集、驗證集和測試集。您可以指定要使用的類別數量。splits 引數可讓您傳入字典,其中的鍵值是子集名稱 (範例:「train」) 和您想要擁有的每個類別影片數量。
def download_ucf_101_subset(zip_url, num_classes, splits, download_dir):
  """ Download a subset of the UCF101 dataset and split them into various parts, such as
    training, validation, and test.

    Args:
      zip_url: A URL with a ZIP file with the data.
      num_classes: Number of labels.
      splits: Dictionary specifying the training, validation, test, etc. (key) division of data
              (value is number of files per split).
      download_dir: Directory to download data to.

    Return:
      Mapping of the directories containing the subsections of data.
  """
  files = list_files_from_zip_url(zip_url)
  for f in files:
    path = os.path.normpath(f)
    tokens = path.split(os.sep)
    if len(tokens) <= 2:
      files.remove(f) # Remove that item from the list if it does not have a filename

  files_for_class = get_files_per_class(files)

  classes = list(files_for_class.keys())[:num_classes]

  for cls in classes:
    random.shuffle(files_for_class[cls])

  # Only use the number of classes you want in the dictionary
  files_for_class = {x: files_for_class[x] for x in classes}

  dirs = {}
  for split_name, split_count in splits.items():
    print(split_name, ":")
    split_dir = download_dir / split_name
    split_files, files_for_class = split_class_lists(files_for_class, split_count)
    download_from_zip(zip_url, split_dir, split_files)
    dirs[split_name] = split_dir

  return dirs
download_dir = pathlib.Path('./UCF101_subset/')
subset_paths = download_ucf_101_subset(URL,
                                       num_classes = NUM_CLASSES,
                                       splits = {"train": 30, "val": 10, "test": 10},
                                       download_dir = download_dir)
下載資料後,您現在應該擁有 UCF101 資料集子集的副本。執行下列程式碼以印出您在所有資料子集中擁有的影片總數。
video_count_train = len(list(download_dir.glob('train/*/*.avi')))
video_count_val = len(list(download_dir.glob('val/*/*.avi')))
video_count_test = len(list(download_dir.glob('test/*/*.avi')))
video_total = video_count_train + video_count_val + video_count_test
print(f"Total videos: {video_total}")
您現在也可以預覽資料檔案的目錄。
find ./UCF101_subset
從每個影片檔案建立影格
frames_from_video_file 函式會將影片分割成影格,從影片檔案中讀取隨機選擇的 n_frames 跨度,並將它們以 NumPy array 形式傳回。為了減少記憶體和計算負擔,請選擇少量影格。此外,從每個影片挑選相同數量的影格,這樣可以更輕鬆地處理批次資料。
def format_frames(frame, output_size):
  """
    Pad and resize an image from a video.

    Args:
      frame: Image that needs to resized and padded.
      output_size: Pixel size of the output frame image.

    Return:
      Formatted frame with padding of specified output size.
  """
  frame = tf.image.convert_image_dtype(frame, tf.float32)
  frame = tf.image.resize_with_pad(frame, *output_size)
  return frame
def frames_from_video_file(video_path, n_frames, output_size = (224,224), frame_step = 15):
  """
    Creates frames from each video file present for each category.

    Args:
      video_path: File path to the video.
      n_frames: Number of frames to be created per video file.
      output_size: Pixel size of the output frame image.

    Return:
      An NumPy array of frames in the shape of (n_frames, height, width, channels).
  """
  # Read each video frame by frame
  result = []
  src = cv2.VideoCapture(str(video_path))

  video_length = src.get(cv2.CAP_PROP_FRAME_COUNT)

  need_length = 1 + (n_frames - 1) * frame_step

  if need_length > video_length:
    start = 0
  else:
    max_start = video_length - need_length
    start = random.randint(0, max_start + 1)

  src.set(cv2.CAP_PROP_POS_FRAMES, start)
  # ret is a boolean indicating whether read was successful, frame is the image itself
  ret, frame = src.read()
  result.append(format_frames(frame, output_size))

  for _ in range(n_frames - 1):
    for _ in range(frame_step):
      ret, frame = src.read()
    if ret:
      frame = format_frames(frame, output_size)
      result.append(frame)
    else:
      result.append(np.zeros_like(result[0]))
  src.release()
  result = np.array(result)[..., [2, 1, 0]]

  return result
視覺化影片資料
frames_from_video_file 函式會傳回一組影格作為 NumPy 陣列。試著在 Patrick Gillett 提供的 Wikimedia 新影片上使用此函式
curl -O https://upload.wikimedia.org/wikipedia/commons/8/86/End_of_a_jam.ogv
video_path = "End_of_a_jam.ogv"
sample_video = frames_from_video_file(video_path, n_frames = 10)
sample_video.shape
def to_gif(images):
  converted_images = np.clip(images * 255, 0, 255).astype(np.uint8)
  imageio.mimsave('./animation.gif', converted_images, fps=10)
  return embed.embed_file('./animation.gif')
to_gif(sample_video)
除了檢查此影片外,您也可以顯示 UCF-101 資料。若要執行此操作,請執行下列程式碼
# docs-infra: no-execute
ucf_sample_video = frames_from_video_file(next(subset_paths['train'].glob('*/*.avi')), 50)
to_gif(ucf_sample_video)
接下來,定義 FrameGenerator 類別,以便建立可將資料饋送到 TensorFlow 資料管道的可迭代物件。產生器 (__call__) 函式會產生 frames_from_video_file 產生的影格陣列,以及與影格集相關聯的單熱編碼向量標籤。
class FrameGenerator:
  def __init__(self, path, n_frames, training = False):
    """ Returns a set of frames with their associated label.

      Args:
        path: Video file paths.
        n_frames: Number of frames.
        training: Boolean to determine if training dataset is being created.
    """
    self.path = path
    self.n_frames = n_frames
    self.training = training
    self.class_names = sorted(set(p.name for p in self.path.iterdir() if p.is_dir()))
    self.class_ids_for_name = dict((name, idx) for idx, name in enumerate(self.class_names))

  def get_files_and_class_names(self):
    video_paths = list(self.path.glob('*/*.avi'))
    classes = [p.parent.name for p in video_paths]
    return video_paths, classes

  def __call__(self):
    video_paths, classes = self.get_files_and_class_names()

    pairs = list(zip(video_paths, classes))

    if self.training:
      random.shuffle(pairs)

    for path, name in pairs:
      video_frames = frames_from_video_file(path, self.n_frames)
      label = self.class_ids_for_name[name] # Encode labels
      yield video_frames, label
在將 FrameGenerator 物件包裝為 TensorFlow Dataset 物件之前,先測試它。此外,對於訓練資料集,請確保您啟用訓練模式,以便隨機排序資料。
fg = FrameGenerator(subset_paths['train'], 10, training=True)

frames, label = next(fg())

print(f"Shape: {frames.shape}")
print(f"Label: {label}")
最後,建立 TensorFlow 資料輸入管道。您從產生器物件建立的這個管道可讓您將資料饋送到深度學習模型。在此影片管道中,每個元素都是一組影格及其相關聯的標籤。
# Create the training set
output_signature = (tf.TensorSpec(shape = (None, None, None, 3), dtype = tf.float32),
                    tf.TensorSpec(shape = (), dtype = tf.int16))
train_ds = tf.data.Dataset.from_generator(FrameGenerator(subset_paths['train'], 10, training=True),
                                          output_signature = output_signature)
檢查以查看標籤是否已隨機排序。
for frames, labels in train_ds.take(10):
  print(labels)
# Create the validation set
val_ds = tf.data.Dataset.from_generator(FrameGenerator(subset_paths['val'], 10),
                                        output_signature = output_signature)
# Print the shapes of the data
train_frames, train_labels = next(iter(train_ds))
print(f'Shape of training set of frames: {train_frames.shape}')
print(f'Shape of training labels: {train_labels.shape}')

val_frames, val_labels = next(iter(val_ds))
print(f'Shape of validation set of frames: {val_frames.shape}')
print(f'Shape of validation labels: {val_labels.shape}')
設定資料集以獲得效能
使用緩衝預先擷取,以便您可以從磁碟產生資料,而不會讓 I/O 成為封鎖。載入資料時要使用的兩個重要函式是:
Dataset.cache:在第一個週期期間從磁碟載入後,將影格集保留在記憶體中。此函式確保資料集在訓練模型時不會成為瓶頸。如果您的資料集太大而無法放入記憶體,您也可以使用此方法來建立高效能的磁碟快取。Dataset.prefetch:在訓練時重疊資料預先處理和模型執行。請參閱 使用tf.data獲得更佳效能 以取得詳細資訊。
AUTOTUNE = tf.data.AUTOTUNE

train_ds = train_ds.cache().shuffle(1000).prefetch(buffer_size = AUTOTUNE)
val_ds = val_ds.cache().shuffle(1000).prefetch(buffer_size = AUTOTUNE)
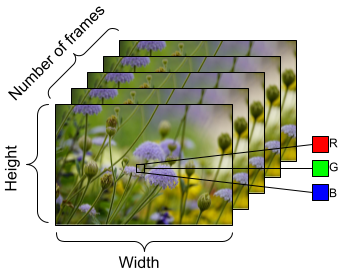
為了準備要饋送到模型中的資料,請使用批次處理,如下所示。請注意,當處理影片資料 (例如 AVI 檔案) 時,資料應塑造成五維物件。這些維度如下:[batch_size, number_of_frames, height, width, channels]。相比之下,圖片將具有四個維度:[batch_size, height, width, channels]。下圖說明了影片資料形狀的表示方式。
train_ds = train_ds.batch(2)
val_ds = val_ds.batch(2)

train_frames, train_labels = next(iter(train_ds))
print(f'Shape of training set of frames: {train_frames.shape}')
print(f'Shape of training labels: {train_labels.shape}')

val_frames, val_labels = next(iter(val_ds))
print(f'Shape of validation set of frames: {val_frames.shape}')
print(f'Shape of validation labels: {val_labels.shape}')
後續步驟
現在您已建立包含影片影格及其標籤的 TensorFlow Dataset,您可以將其與深度學習模型搭配使用。下列分類模型使用預先訓練的 EfficientNet,可在幾分鐘內訓練到高準確度
net = tf.keras.applications.EfficientNetB0(include_top = False)
net.trainable = False

model = tf.keras.Sequential([
    tf.keras.layers.Rescaling(scale=255),
    tf.keras.layers.TimeDistributed(net),
    tf.keras.layers.Dense(10),
    tf.keras.layers.GlobalAveragePooling3D()
])

model.compile(optimizer = 'adam',
              loss=tf.keras.losses.SparseCategoricalCrossentropy(from_logits = True),
              metrics=['accuracy'])

model.fit(train_ds,
          epochs = 10,
          validation_data = val_ds,
          callbacks = tf.keras.callbacks.EarlyStopping(patience = 2, monitor = 'val_loss'))
若要深入瞭解如何在 TensorFlow 中處理影片資料,請查看下列教學課程: