
|
|
|
 在 GitHub 上檢視原始碼 在 GitHub 上檢視原始碼
|
|
本教學課程示範如何使用結構化資料 (例如表格資料) 搭配簡化版的 PetFinder Kaggle 競賽資料集 (儲存在 CSV 檔案中) 進行分類。
您將使用 Keras 定義模型,並使用 Keras 預處理層 作為橋樑,將 CSV 檔案中的欄位對應至用於訓練模型的特徵。目標是預測寵物是否會被領養。
本教學課程包含下列項目的完整程式碼:
- 使用 pandas 將 CSV 檔案載入 DataFrame。
- 使用
tf.data建構輸入管線,以批次處理及隨機排序資料列。(如需更多詳細資訊,請參閱 tf.data:建構 TensorFlow 輸入管線。) - 使用 Keras 預處理層將 CSV 檔案中的欄位對應至用於訓練模型的特徵。
- 使用 Keras 內建方法建構、訓練及評估模型。
PetFinder.my 迷你資料集
PetFinder.my 迷你 CSV 資料集檔案中有數千列,其中每列描述一隻寵物 (狗或貓),每欄描述一個屬性,例如年齡、品種、顏色等等。
在下方的資料集摘要中,請注意,欄位大多是數值和類別欄位。在本教學課程中,您只會處理這兩種特徵類型,並在資料預處理期間捨棄 Description (自由文字特徵) 和 AdoptionSpeed (分類特徵)。
| 欄位 | 寵物描述 | 特徵類型 | 資料類型 |
|---|---|---|---|
類型 |
動物類型 (Dog、Cat) |
類別 | 字串 |
年齡 |
年齡 | 數值 | 整數 |
Breed1 |
主要品種 | 類別 | 字串 |
Color1 |
顏色 1 | 類別 | 字串 |
Color2 |
顏色 2 | 類別 | 字串 |
MaturitySize |
成熟時的大小 | 類別 | 字串 |
FurLength |
毛皮長度 | 類別 | 字串 |
Vaccinated |
寵物是否已接種疫苗 | 類別 | 字串 |
Sterilized |
寵物是否已絕育 | 類別 | 字串 |
Health |
健康狀況 | 類別 | 字串 |
Fee |
領養費用 | 數值 | 整數 |
Description |
個人資料撰寫 | 文字 | 字串 |
PhotoAmt |
上傳相片總數 | 數值 | 整數 |
AdoptionSpeed |
領養速度的類別 | 分類 | 整數 |
匯入 TensorFlow 和其他程式庫
import numpy as np
import pandas as pd
import tensorflow as tf

from tensorflow.keras import layers
2024-01-12 02:20:50.190753: E external/local_xla/xla/stream_executor/cuda/cuda_dnn.cc:9261] Unable to register cuDNN factory: Attempting to register factory for plugin cuDNN when one has already been registered
2024-01-12 02:20:50.190796: E external/local_xla/xla/stream_executor/cuda/cuda_fft.cc:607] Unable to register cuFFT factory: Attempting to register factory for plugin cuFFT when one has already been registered
2024-01-12 02:20:50.192423: E external/local_xla/xla/stream_executor/cuda/cuda_blas.cc:1515] Unable to register cuBLAS factory: Attempting to register factory for plugin cuBLAS when one has already been registered
tf.__version__
'2.15.0'
載入資料集並讀取到 pandas DataFrame 中
pandas 是一個 Python 程式庫,提供許多實用的工具,可載入及處理結構化資料。使用 tf.keras.utils.get_file 下載並解壓縮包含 PetFinder.my 迷你資料集的 CSV 檔案,然後使用 pandas.read_csv 將其載入 DataFrame
dataset_url = 'http://storage.googleapis.com/download.tensorflow.org/data/petfinder-mini.zip'
csv_file = 'datasets/petfinder-mini/petfinder-mini.csv'

tf.keras.utils.get_file('petfinder_mini.zip', dataset_url,
                        extract=True, cache_dir='.')
dataframe = pd.read_csv(csv_file)
Downloading data from http://storage.googleapis.com/download.tensorflow.org/data/petfinder-mini.zip
1668792/1668792 [==============================] - 0s 0us/step
檢查資料集,方法是查看 DataFrame 的前五列
dataframe.head()
建立目標變數
Kaggle PetFinder.my Adoption Prediction 競賽的原始任務是預測寵物被領養的速度 (例如在第一週、第一個月、前三個月等等)。
在本教學課程中,您將簡化任務,方法是將其轉換為二元分類問題,您只需預測寵物是否被領養即可。
修改 AdoptionSpeed 欄位後,0 表示寵物未被領養,而 1 表示寵物已被領養。
# In the original dataset, `'AdoptionSpeed'` of `4` indicates
# a pet was not adopted.
dataframe['target'] = np.where(dataframe['AdoptionSpeed']==4, 0, 1)

# Drop unused features.
dataframe = dataframe.drop(columns=['AdoptionSpeed', 'Description'])
將 DataFrame 分割成訓練集、驗證集和測試集
資料集位於單一 pandas DataFrame 中。將其分割成訓練集、驗證集和測試集,例如分別使用 80:10:10 的比例
train, val, test = np.split(dataframe.sample(frac=1), [int(0.8*len(dataframe)), int(0.9*len(dataframe))])
/tmpfs/src/tf_docs_env/lib/python3.9/site-packages/numpy/core/fromnumeric.py:59: FutureWarning: 'DataFrame.swapaxes' is deprecated and will be removed in a future version. Please use 'DataFrame.transpose' instead.
  return bound(*args, **kwds)
print(len(train), 'training examples')
print(len(val), 'validation examples')
print(len(test), 'test examples')
9229 training examples
1154 validation examples
1154 test examples
使用 tf.data 建立輸入管線
接下來,建立公用程式函式,將每個訓練集、驗證集和測試集 DataFrame 轉換為 tf.data.Dataset,然後隨機排序資料並將其批次處理。
def df_to_dataset(dataframe, shuffle=True, batch_size=32):
  df = dataframe.copy()
  labels = df.pop('target')
  df = {key: value.values[:,tf.newaxis] for key, value in dataframe.items()}
  ds = tf.data.Dataset.from_tensor_slices((dict(df), labels))
  if shuffle:
    ds = ds.shuffle(buffer_size=len(dataframe))
  ds = ds.batch(batch_size)
  ds = ds.prefetch(batch_size)
  return ds
現在,使用新建立的函式 (df_to_dataset) 檢查輸入管線輔助函式傳回的資料格式,方法是在訓練資料上呼叫該函式,並使用小批次大小以保持輸出可讀
batch_size = 5
train_ds = df_to_dataset(train, batch_size=batch_size)
[(train_features, label_batch)] = train_ds.take(1)
print('Every feature:', list(train_features.keys()))
print('A batch of ages:', train_features['Age'])
print('A batch of targets:', label_batch )
Every feature: ['Type', 'Age', 'Breed1', 'Gender', 'Color1', 'Color2', 'MaturitySize', 'FurLength', 'Vaccinated', 'Sterilized', 'Health', 'Fee', 'PhotoAmt', 'target']
A batch of ages: tf.Tensor(
[[18]
 [48]
 [ 1]
 [38]
 [12]], shape=(5, 1), dtype=int64)
A batch of targets: tf.Tensor([1 1 1 1 0], shape=(5,), dtype=int64)
如輸出所示,訓練集會傳回欄位名稱 (來自 DataFrame) 字典,該字典會對應至資料列中的欄位值。
套用 Keras 預處理層
Keras 預處理層可讓您建構 Keras 原生輸入處理管線,這些管線可用於非 Keras 工作流程中的獨立預處理程式碼、直接與 Keras 模型結合,以及匯出為 Keras SavedModel 的一部分。
在本教學課程中,您將使用下列四個預處理層,示範如何執行預處理、結構化資料編碼和特徵工程
tf.keras.layers.Normalization:執行輸入特徵的特徵式正規化。tf.keras.layers.CategoryEncoding:將整數類別特徵轉換為單熱、多熱或 tf-idf 密集表示法。tf.keras.layers.StringLookup:將字串類別值轉換為整數索引。tf.keras.layers.IntegerLookup:將整數類別值轉換為整數索引。
您可以在使用預處理層指南中進一步瞭解可用的層。
- 對於 PetFinder.my 迷你資料集的數值特徵,您將使用
tf.keras.layers.Normalization層來標準化資料的分佈。 - 對於類別特徵 (例如寵物
Type(Dog和Cat字串)),您會使用tf.keras.layers.CategoryEncoding將其轉換為多熱編碼張量。
數值欄位
對於 PetFinder.my 迷你資料集中的每個數值特徵,您將使用 tf.keras.layers.Normalization 層來標準化資料的分佈。
定義新的公用程式函式,傳回使用該 Keras 預處理層將特徵式正規化套用至數值特徵的層
def get_normalization_layer(name, dataset):
  # Create a Normalization layer for the feature.
  normalizer = layers.Normalization(axis=None)

  # Prepare a Dataset that only yields the feature.
  feature_ds = dataset.map(lambda x, y: x[name])

  # Learn the statistics of the data.
  normalizer.adapt(feature_ds)

  return normalizer
接下來,在寵物上傳相片總數特徵上呼叫新函式,以測試新函式,以正規化 'PhotoAmt'
photo_count_col = train_features['PhotoAmt']
layer = get_normalization_layer('PhotoAmt', train_ds)
layer(photo_count_col)
<tf.Tensor: shape=(5, 1), dtype=float32, numpy=
array([[0.12533209],
       [0.12533209],
       [1.079441  ],
       [2.9876585 ],
       [1.079441  ]], dtype=float32)>
類別欄位
資料集中的寵物 Type 以字串 (Dog 和 Cat) 表示,這些字串需要先進行多熱編碼,才能饋送至模型。Age 特徵
定義另一個新的公用程式函式,傳回一個層,該層會使用 tf.keras.layers.StringLookup、tf.keras.layers.IntegerLookup 和 tf.keras.CategoryEncoding 預處理層,將詞彙表中的值對應至整數索引,並對特徵進行多熱編碼
def get_category_encoding_layer(name, dataset, dtype, max_tokens=None):
  # Create a layer that turns strings into integer indices.
  if dtype == 'string':
    index = layers.StringLookup(max_tokens=max_tokens)
  # Otherwise, create a layer that turns integer values into integer indices.
  else:
    index = layers.IntegerLookup(max_tokens=max_tokens)

  # Prepare a `tf.data.Dataset` that only yields the feature.
  feature_ds = dataset.map(lambda x, y: x[name])

  # Learn the set of possible values and assign them a fixed integer index.
  index.adapt(feature_ds)

  # Encode the integer indices.
  encoder = layers.CategoryEncoding(num_tokens=index.vocabulary_size())

  # Apply multi-hot encoding to the indices. The lambda function captures the
  # layer, so you can use them, or include them in the Keras Functional model later.
  return lambda feature: encoder(index(feature))
在寵物 'Type' 特徵上呼叫 get_category_encoding_layer 函式,以測試該函式,將這些特徵轉換為多熱編碼張量
test_type_col = train_features['Type']
test_type_layer = get_category_encoding_layer(name='Type',
                                              dataset=train_ds,
                                              dtype='string')
test_type_layer(test_type_col)
<tf.Tensor: shape=(5, 3), dtype=float32, numpy=
array([[0., 1., 0.],
       [0., 1., 0.],
       [0., 1., 0.],
       [0., 1., 0.],
       [0., 1., 0.]], dtype=float32)>
在寵物 'Age' 特徵上重複此程序
test_age_col = train_features['Age']
test_age_layer = get_category_encoding_layer(name='Age',
                                             dataset=train_ds,
                                             dtype='int64',
                                             max_tokens=5)
test_age_layer(test_age_col)
<tf.Tensor: shape=(5, 5), dtype=float32, numpy=
array([[1., 0., 0., 0., 0.],
       [1., 0., 0., 0., 0.],
       [0., 0., 0., 1., 0.],
       [1., 0., 0., 0., 0.],
       [1., 0., 0., 0., 0.]], dtype=float32)>
預處理選取的特徵以訓練模型
您已瞭解如何使用幾種類型的 Keras 預處理層。接下來,您將
- 將先前定義的預處理公用程式函式套用至 PetFinder.my 迷你資料集的 13 個數值和類別特徵。
- 將所有特徵輸入新增至清單。
如開頭所述,為了訓練模型,您將使用 PetFinder.my 迷你資料集的數值 ('PhotoAmt'、'Fee') 和類別 ('Age'、'Type'、'Color1'、'Color2'、'Gender'、'MaturitySize'、'FurLength'、'Vaccinated'、'Sterilized'、'Health'、'Breed1') 特徵。
先前,您使用小批次大小來示範輸入管線。現在讓我們建立新的輸入管線,其批次大小較大,為 256
batch_size = 256
train_ds = df_to_dataset(train, batch_size=batch_size)
val_ds = df_to_dataset(val, shuffle=False, batch_size=batch_size)
test_ds = df_to_dataset(test, shuffle=False, batch_size=batch_size)
正規化數值特徵 (寵物相片數量和領養費用),並將其新增至名為 encoded_features 的輸入清單
all_inputs = []
encoded_features = []

# Numerical features.
for header in ['PhotoAmt', 'Fee']:
  numeric_col = tf.keras.Input(shape=(1,), name=header)
  normalization_layer = get_normalization_layer(header, train_ds)
  encoded_numeric_col = normalization_layer(numeric_col)
  all_inputs.append(numeric_col)
  encoded_features.append(encoded_numeric_col)
將資料集中的整數類別值 (寵物年齡) 轉換為整數索引,執行多熱編碼,然後將產生的特徵輸入新增至 encoded_features
age_col = tf.keras.Input(shape=(1,), name='Age', dtype='int64')

encoding_layer = get_category_encoding_layer(name='Age',
                                             dataset=train_ds,
                                             dtype='int64',
                                             max_tokens=5)
encoded_age_col = encoding_layer(age_col)
all_inputs.append(age_col)
encoded_features.append(encoded_age_col)
針對字串類別值重複相同的步驟
categorical_cols = ['Type', 'Color1', 'Color2', 'Gender', 'MaturitySize',
                    'FurLength', 'Vaccinated', 'Sterilized', 'Health', 'Breed1']

for header in categorical_cols:
  categorical_col = tf.keras.Input(shape=(1,), name=header, dtype='string')
  encoding_layer = get_category_encoding_layer(name=header,
                                               dataset=train_ds,
                                               dtype='string',
                                               max_tokens=5)
  encoded_categorical_col = encoding_layer(categorical_col)
  all_inputs.append(categorical_col)
  encoded_features.append(encoded_categorical_col)
建立、編譯及訓練模型
下一步是使用 Keras Functional API 建立模型。對於模型中的第一層,使用 tf.keras.layers.concatenate 透過串連將特徵輸入清單 (encoded_features) 合併為一個向量。
all_features = tf.keras.layers.concatenate(encoded_features)
x = tf.keras.layers.Dense(32, activation="relu")(all_features)
x = tf.keras.layers.Dropout(0.5)(x)
output = tf.keras.layers.Dense(1)(x)

model = tf.keras.Model(all_inputs, output)
使用 Keras Model.compile 設定模型
model.compile(optimizer='adam',
              loss=tf.keras.losses.BinaryCrossentropy(from_logits=True),
              metrics=["accuracy"])
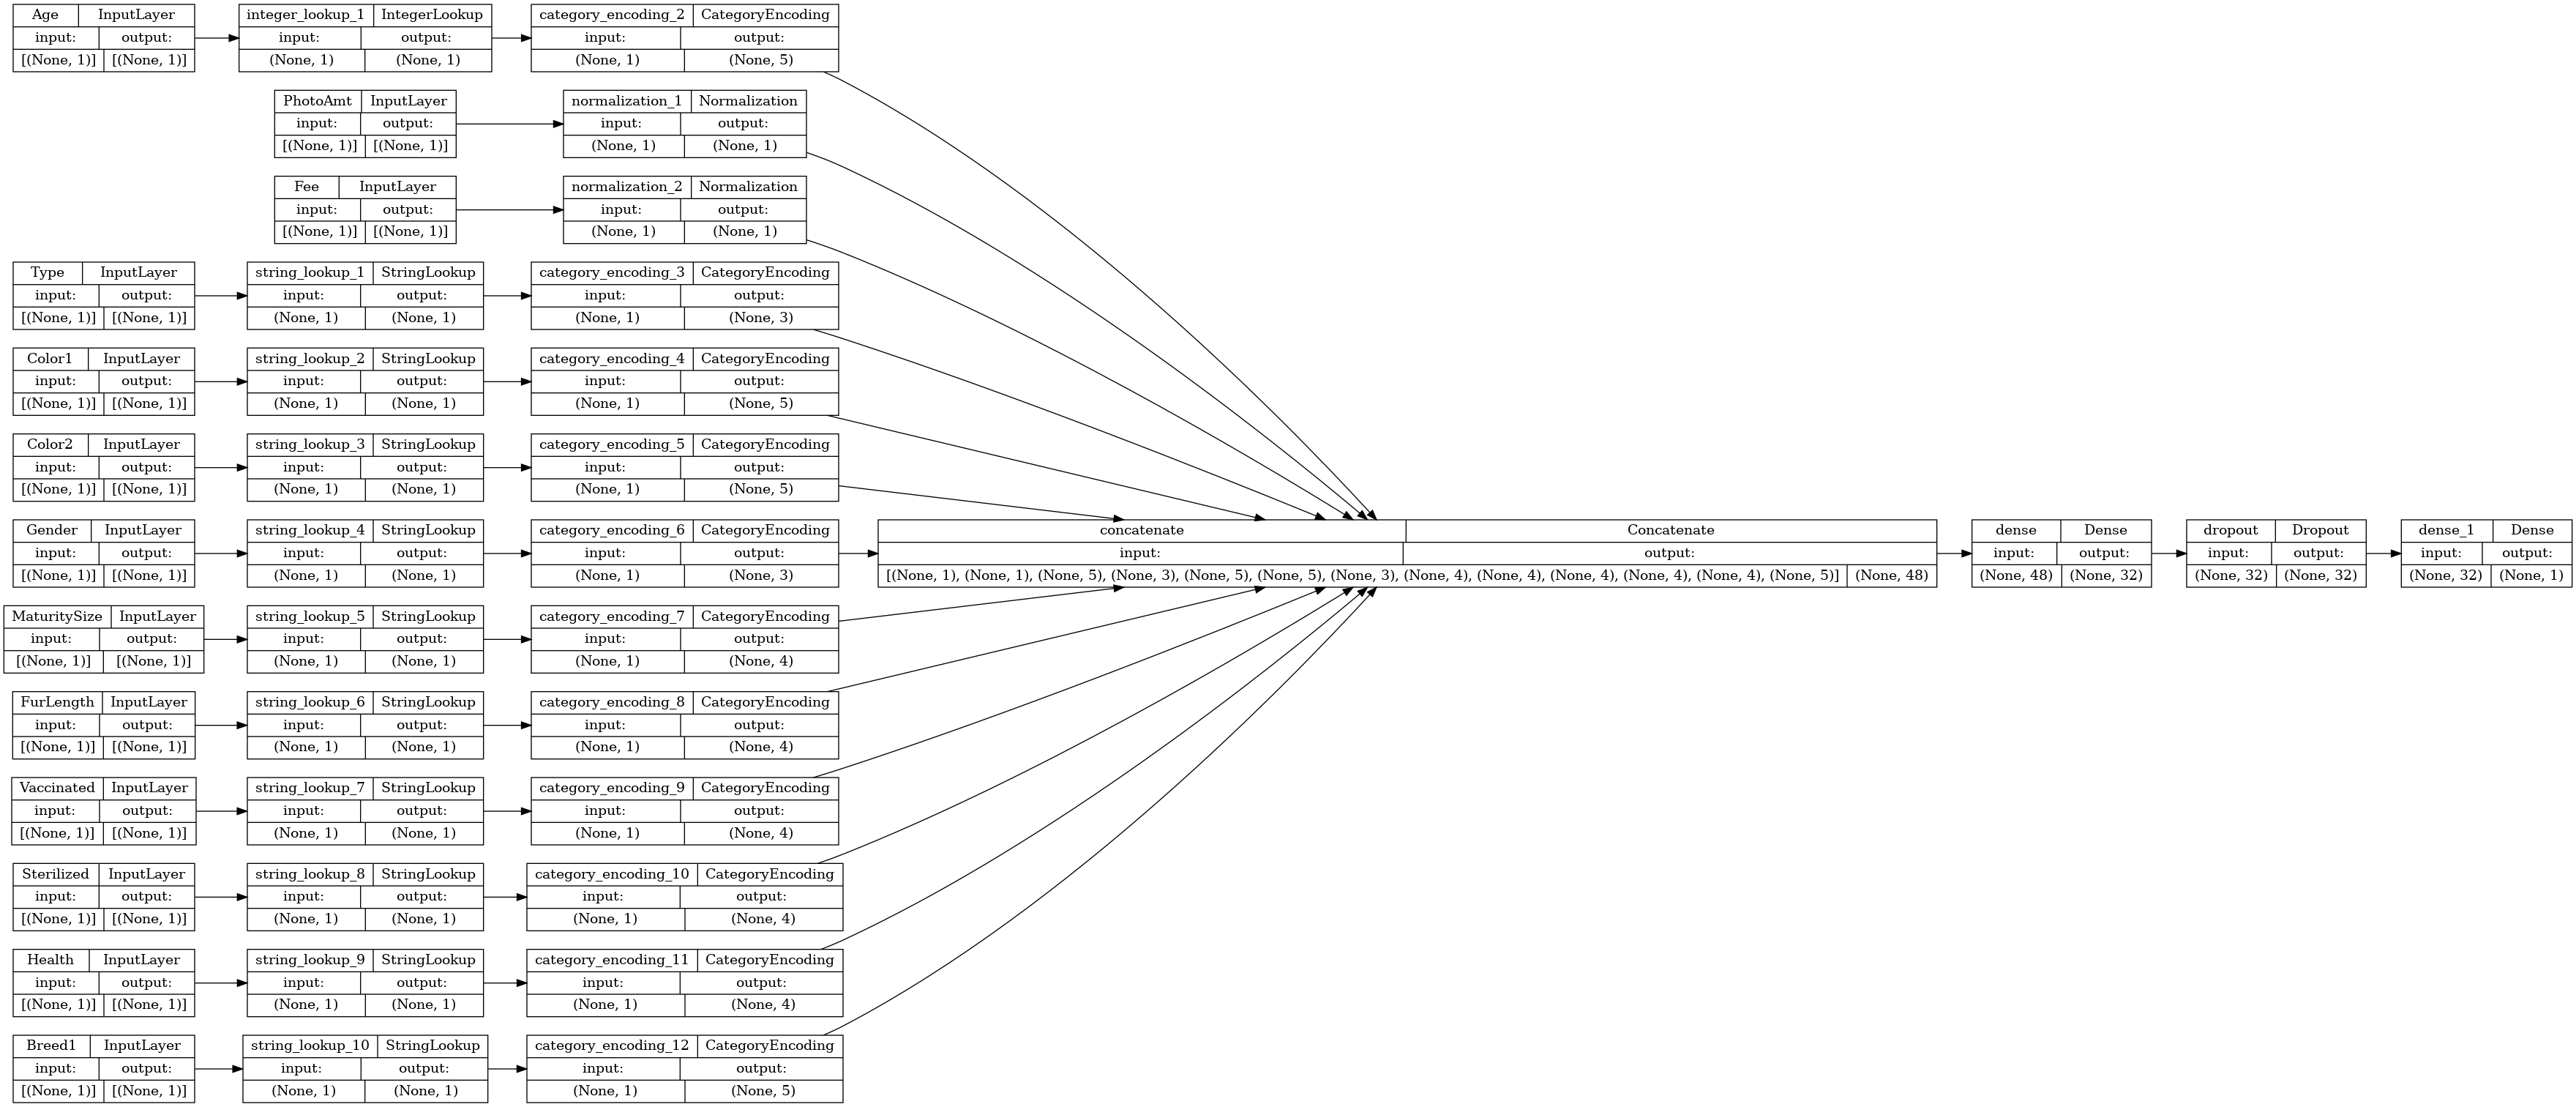
讓我們視覺化連線圖
# Use `rankdir='LR'` to make the graph horizontal.
tf.keras.utils.plot_model(model, show_shapes=True, rankdir="LR")
接下來,訓練及測試模型
model.fit(train_ds, epochs=10, validation_data=val_ds)
Epoch 1/10
/tmpfs/src/tf_docs_env/lib/python3.9/site-packages/keras/src/engine/functional.py:642: UserWarning: Input dict contained keys ['target'] which did not match any model input. They will be ignored by the model.
  inputs = self._flatten_to_reference_inputs(inputs)
WARNING: All log messages before absl::InitializeLog() is called are written to STDERR
I0000 00:00:1705026069.800827    9903 device_compiler.h:186] Compiled cluster using XLA!  This line is logged at most once for the lifetime of the process.
37/37 [==============================] - 4s 18ms/step - loss: 0.6416 - accuracy: 0.5808 - val_loss: 0.5700 - val_accuracy: 0.7253
Epoch 2/10
37/37 [==============================] - 0s 6ms/step - loss: 0.5878 - accuracy: 0.6641 - val_loss: 0.5470 - val_accuracy: 0.7314
Epoch 3/10
37/37 [==============================] - 0s 6ms/step - loss: 0.5700 - accuracy: 0.6863 - val_loss: 0.5353 - val_accuracy: 0.7409
Epoch 4/10
37/37 [==============================] - 0s 6ms/step - loss: 0.5525 - accuracy: 0.7009 - val_loss: 0.5267 - val_accuracy: 0.7392
Epoch 5/10
37/37 [==============================] - 0s 6ms/step - loss: 0.5438 - accuracy: 0.7070 - val_loss: 0.5219 - val_accuracy: 0.7400
Epoch 6/10
37/37 [==============================] - 0s 6ms/step - loss: 0.5379 - accuracy: 0.7120 - val_loss: 0.5179 - val_accuracy: 0.7374
Epoch 7/10
37/37 [==============================] - 0s 6ms/step - loss: 0.5381 - accuracy: 0.7150 - val_loss: 0.5157 - val_accuracy: 0.7392
Epoch 8/10
37/37 [==============================] - 0s 6ms/step - loss: 0.5352 - accuracy: 0.7216 - val_loss: 0.5140 - val_accuracy: 0.7383
Epoch 9/10
37/37 [==============================] - 0s 6ms/step - loss: 0.5299 - accuracy: 0.7230 - val_loss: 0.5120 - val_accuracy: 0.7418
Epoch 10/10
37/37 [==============================] - 0s 6ms/step - loss: 0.5283 - accuracy: 0.7293 - val_loss: 0.5112 - val_accuracy: 0.7435
<keras.src.callbacks.History at 0x7f858015b280>
loss, accuracy = model.evaluate(test_ds)
print("Accuracy", accuracy)
5/5 [==============================] - 0s 5ms/step - loss: 0.4979 - accuracy: 0.7591
Accuracy 0.7590987682342529
執行推論
現在,在模型本身中納入預處理層後,您開發的模型可以直接分類 CSV 檔案中的資料列。
您現在可以儲存並重新載入 Keras 模型,方法是使用 Model.save 和 Model.load_model,然後對新資料執行推論
model.save('my_pet_classifier.keras')
reloaded_model = tf.keras.models.load_model('my_pet_classifier.keras')
若要取得新樣本的預測,您只需呼叫 Keras Model.predict 方法。您只需要執行兩件事:
- 將純量包裝到清單中,以便具有批次維度 (
Model只處理批次資料,而非單一範例)。 - 在每個特徵上呼叫
tf.convert_to_tensor。
sample = {
    'Type': 'Cat',
    'Age': 3,
    'Breed1': 'Tabby',
    'Gender': 'Male',
    'Color1': 'Black',
    'Color2': 'White',
    'MaturitySize': 'Small',
    'FurLength': 'Short',
    'Vaccinated': 'No',
    'Sterilized': 'No',
    'Health': 'Healthy',
    'Fee': 100,
    'PhotoAmt': 2,
}

input_dict = {name: tf.convert_to_tensor([value]) for name, value in sample.items()}
predictions = reloaded_model.predict(input_dict)
prob = tf.nn.sigmoid(predictions[0])

print(
    "This particular pet had a %.1f percent probability "
    "of getting adopted." % (100 * prob)
)
1/1 [==============================] - 0s 412ms/step
This particular pet had a 79.3 percent probability of getting adopted.
後續步驟
如要進一步瞭解如何分類結構化資料,請嘗試使用其他資料集。為了在訓練和測試模型期間提高準確度,請仔細思考要在模型中納入哪些特徵,以及應如何表示這些特徵。
以下是一些資料集建議:
- TensorFlow 資料集:MovieLens:電影推薦服務中的一組電影評分。
- TensorFlow 資料集:Wine Quality:與葡萄牙「Vinho Verde」葡萄酒的紅葡萄酒和白葡萄酒變體相關的兩個資料集。您也可以在 Kaggle 上找到「Red Wine Quality」資料集。
- Kaggle:arXiv 資料集:來自 arXiv 的 170 萬篇學術文章語料庫,涵蓋物理、電腦科學、數學、統計學、電機工程、計量生物學和經濟學。