
|
|
|
 在 GitHub 上檢視原始碼 在 GitHub 上檢視原始碼
|
|
本教學課程說明如何透過三種方式載入和預先處理圖片資料集
- 首先,您將使用高階 Keras 預先處理公用程式 (例如
tf.keras.utils.image_dataset_from_directory) 和層 (例如tf.keras.layers.Rescaling),以讀取磁碟上的圖片目錄。 - 接下來,您將從頭開始編寫自己的輸入管線,使用 tf.data。
- 最後,您將從 TensorFlow Datasets 中提供的大型目錄下載資料集。
設定
import numpy as np
import os
import PIL
import PIL.Image
import tensorflow as tf
import tensorflow_datasets as tfds
2024-07-13 05:34:47.523839: E external/local_xla/xla/stream_executor/cuda/cuda_fft.cc:479] Unable to register cuFFT factory: Attempting to register factory for plugin cuFFT when one has already been registered
2024-07-13 05:34:47.550016: E external/local_xla/xla/stream_executor/cuda/cuda_dnn.cc:10575] Unable to register cuDNN factory: Attempting to register factory for plugin cuDNN when one has already been registered
2024-07-13 05:34:47.550056: E external/local_xla/xla/stream_executor/cuda/cuda_blas.cc:1442] Unable to register cuBLAS factory: Attempting to register factory for plugin cuBLAS when one has already been registered
print(tf.__version__)
2.16.2
下載花卉資料集
本教學課程使用包含數千張花卉相片的資料集。花卉資料集包含五個子目錄,每個類別各一個
flowers_photos/
  daisy/
  dandelion/
  roses/
  sunflowers/
  tulips/
import pathlib
dataset_url = "https://storage.googleapis.com/download.tensorflow.org/example_images/flower_photos.tgz"
archive = tf.keras.utils.get_file(origin=dataset_url, extract=True)
data_dir = pathlib.Path(archive).with_suffix('')
Downloading data from https://storage.googleapis.com/download.tensorflow.org/example_images/flower_photos.tgz
228813984/228813984 ━━━━━━━━━━━━━━━━━━━━ 1s 0us/step
下載 (218MB) 後,您現在應該擁有花卉相片的副本。總共有 3,670 張圖片
image_count = len(list(data_dir.glob('*/*.jpg')))
print(image_count)
3670
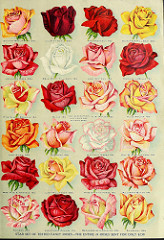
每個目錄都包含該類型花卉的圖片。以下是一些玫瑰
roses = list(data_dir.glob('roses/*'))
PIL.Image.open(str(roses[0]))

roses = list(data_dir.glob('roses/*'))
PIL.Image.open(str(roses[1]))
使用 Keras 公用程式載入資料
讓我們使用實用的 tf.keras.utils.image_dataset_from_directory 公用程式,從磁碟載入這些圖片。
建立資料集
定義載入器的某些參數
batch_size = 32
img_height = 180
img_width = 180
在開發模型時,最好採用驗證分割。您將使用 80% 的圖片進行訓練,並使用 20% 進行驗證。
train_ds = tf.keras.utils.image_dataset_from_directory(
  data_dir,
  validation_split=0.2,
  subset="training",
  seed=123,
  image_size=(img_height, img_width),
  batch_size=batch_size)
Found 3670 files belonging to 5 classes.
Using 2936 files for training.
val_ds = tf.keras.utils.image_dataset_from_directory(
  data_dir,
  validation_split=0.2,
  subset="validation",
  seed=123,
  image_size=(img_height, img_width),
  batch_size=batch_size)
Found 3670 files belonging to 5 classes.
Using 734 files for validation.
您可以在這些資料集的 class_names 屬性中找到類別名稱。
class_names = train_ds.class_names
print(class_names)
['daisy', 'dandelion', 'roses', 'sunflowers', 'tulips']
視覺化資料
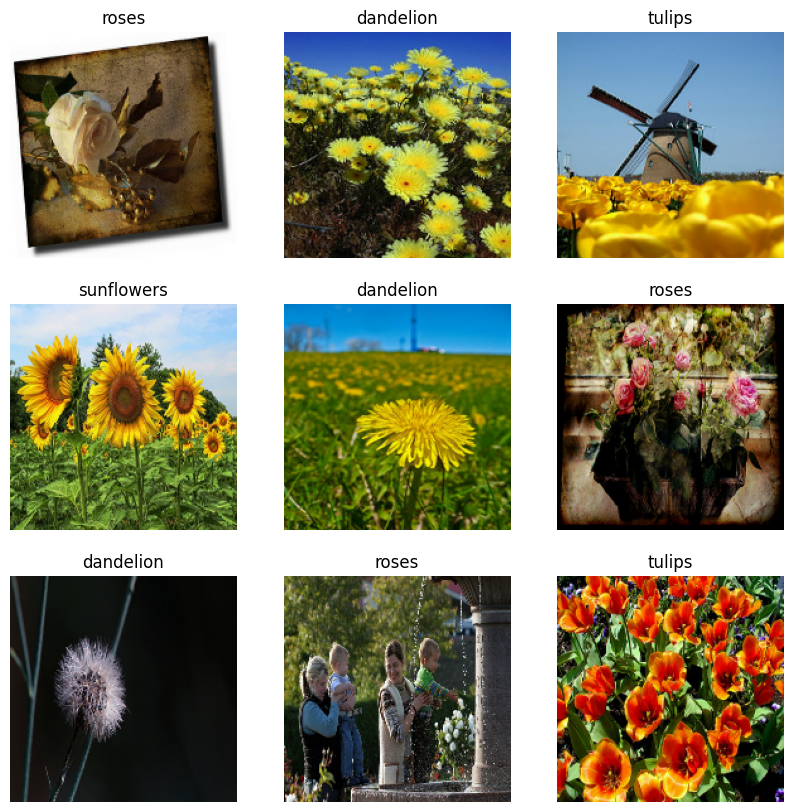
以下是訓練資料集的前九張圖片。
import matplotlib.pyplot as plt

plt.figure(figsize=(10, 10))
for images, labels in train_ds.take(1):
  for i in range(9):
    ax = plt.subplot(3, 3, i + 1)
    plt.imshow(images[i].numpy().astype("uint8"))
    plt.title(class_names[labels[i]])
    plt.axis("off")
2024-07-13 05:34:57.652132: W tensorflow/core/framework/local_rendezvous.cc:404] Local rendezvous is aborting with status: OUT_OF_RANGE: End of sequence
您可以將這些資料集傳遞至 model.fit (稍後在本教學課程中顯示),藉此使用這些資料集訓練模型。如果您願意,也可以手動疊代資料集並擷取圖片批次
for image_batch, labels_batch in train_ds:
  print(image_batch.shape)
  print(labels_batch.shape)
  break
(32, 180, 180, 3)
(32,)
image_batch 是形狀為 (32, 180, 180, 3) 的張量。這是形狀為 180x180x3 (最後一個維度指的是色彩通道 RGB) 的 32 張圖片批次。label_batch 是形狀為 (32,) 的張量,這些是 32 張圖片的對應標籤。
您可以對這些張量的任一張量呼叫 .numpy(),將其轉換為 numpy.ndarray。
標準化資料
RGB 通道值位於 [0, 255] 範圍內。這對於神經網路而言並不理想;一般來說,您應該盡可能縮小輸入值。
在這裡,您將使用 tf.keras.layers.Rescaling 將值標準化為 [0, 1] 範圍
normalization_layer = tf.keras.layers.Rescaling(1./255)
有兩種方式可使用此層。您可以呼叫 Dataset.map 將其套用至資料集
normalized_ds = train_ds.map(lambda x, y: (normalization_layer(x), y))
image_batch, labels_batch = next(iter(normalized_ds))
first_image = image_batch[0]
# Notice the pixel values are now in `[0,1]`.
print(np.min(first_image), np.max(first_image))
0.0 0.96902645
或者,您可以將層包含在模型定義中,以簡化部署。您將在此處使用第二種方法。
設定資料集以提升效能
請務必使用緩衝預先擷取,讓您可以從磁碟產生資料,而不會讓 I/O 變成封鎖。這些是您在載入資料時應使用的兩個重要方法
Dataset.cache會在圖片從磁碟載入後,將其保留在記憶體中,直到第一個週期結束為止。這可確保資料集在訓練模型時不會變成瓶頸。如果您的資料集太大而無法放入記憶體,您也可以使用此方法來建立高效能的磁碟快取。Dataset.prefetch會在訓練期間重疊資料預先處理和模型執行。
感興趣的讀者可以進一步瞭解這兩種方法,以及如何在 使用 tf.data API 提升效能指南的「預先擷取」章節中將資料快取至磁碟。
AUTOTUNE = tf.data.AUTOTUNE

train_ds = train_ds.cache().prefetch(buffer_size=AUTOTUNE)
val_ds = val_ds.cache().prefetch(buffer_size=AUTOTUNE)
訓練模型
為了完整起見,您將示範如何使用您剛準備好的資料集來訓練簡易模型。
Sequential 模型包含三個卷積區塊 (tf.keras.layers.Conv2D),每個區塊中都有一個最大池化層 (tf.keras.layers.MaxPooling2D)。模型頂端有一個全連接層 (tf.keras.layers.Dense),其中包含 128 個單元,並透過 ReLU 啟動函式 ('relu') 啟動。此模型未經任何調整,目標是向您展示使用您剛建立的資料集的操作機制。若要進一步瞭解圖片分類,請參閱圖片分類教學課程。
num_classes = 5

model = tf.keras.Sequential([
  tf.keras.layers.Rescaling(1./255),
  tf.keras.layers.Conv2D(32, 3, activation='relu'),
  tf.keras.layers.MaxPooling2D(),
  tf.keras.layers.Conv2D(32, 3, activation='relu'),
  tf.keras.layers.MaxPooling2D(),
  tf.keras.layers.Conv2D(32, 3, activation='relu'),
  tf.keras.layers.MaxPooling2D(),
  tf.keras.layers.Flatten(),
  tf.keras.layers.Dense(128, activation='relu'),
  tf.keras.layers.Dense(num_classes)
])
選擇 tf.keras.optimizers.Adam 最佳化工具和 tf.keras.losses.SparseCategoricalCrossentropy 損失函式。若要檢視每個訓練週期的訓練和驗證準確度,請將 metrics 引數傳遞至 Model.compile。
model.compile(
  optimizer='adam',
  loss=tf.keras.losses.SparseCategoricalCrossentropy(from_logits=True),
  metrics=['accuracy'])
model.fit(
  train_ds,
  validation_data=val_ds,
  epochs=3
)
Epoch 1/3
WARNING: All log messages before absl::InitializeLog() is called are written to STDERR
I0000 00:00:1720848900.011329  457136 service.cc:145] XLA service 0x7f2c68006430 initialized for platform CUDA (this does not guarantee that XLA will be used). Devices:
I0000 00:00:1720848900.011431  457136 service.cc:153]   StreamExecutor device (0): Tesla T4, Compute Capability 7.5
I0000 00:00:1720848900.011437  457136 service.cc:153]   StreamExecutor device (1): Tesla T4, Compute Capability 7.5
I0000 00:00:1720848900.011441  457136 service.cc:153]   StreamExecutor device (2): Tesla T4, Compute Capability 7.5
I0000 00:00:1720848900.011446  457136 service.cc:153]   StreamExecutor device (3): Tesla T4, Compute Capability 7.5
10/92 ━━━━━━━━━━━━━━━━━━━━ 1s 18ms/step - accuracy: 0.1843 - loss: 1.7662
I0000 00:00:1720848903.023839  457136 device_compiler.h:188] Compiled cluster using XLA!  This line is logged at most once for the lifetime of the process.
92/92 ━━━━━━━━━━━━━━━━━━━━ 11s 69ms/step - accuracy: 0.3327 - loss: 1.4697 - val_accuracy: 0.5668 - val_loss: 1.0640
Epoch 2/3
92/92 ━━━━━━━━━━━━━━━━━━━━ 2s 18ms/step - accuracy: 0.6000 - loss: 1.0092 - val_accuracy: 0.5790 - val_loss: 1.0287
Epoch 3/3
92/92 ━━━━━━━━━━━━━━━━━━━━ 2s 18ms/step - accuracy: 0.6545 - loss: 0.8629 - val_accuracy: 0.6144 - val_loss: 0.9710
<keras.src.callbacks.history.History at 0x7f2dec3897f0>
您可能會注意到驗證準確度相較於訓練準確度偏低,這表示您的模型過度擬合。您可以在這個教學課程中進一步瞭解過度擬合以及如何減少過度擬合。
使用 tf.data 進行更精細的控制
上述 Keras 預先處理公用程式—tf.keras.utils.image_dataset_from_directory—是從圖片目錄建立 tf.data.Dataset 的便利方式。
若要進行更精細的控制,您可以使用 tf.data 編寫自己的輸入管線。本節說明如何執行此操作,從您稍早下載的 TGZ 檔案中的檔案路徑開始。
list_ds = tf.data.Dataset.list_files(str(data_dir/'*/*'), shuffle=False)
list_ds = list_ds.shuffle(image_count, reshuffle_each_iteration=False)
for f in list_ds.take(5):
  print(f.numpy())
b'/home/kbuilder/.keras/datasets/flower_photos/roses/102501987_3cdb8e5394_n.jpg'
b'/home/kbuilder/.keras/datasets/flower_photos/sunflowers/6050020905_881295ac72_n.jpg'
b'/home/kbuilder/.keras/datasets/flower_photos/sunflowers/6061177447_d8ce96aee0.jpg'
b'/home/kbuilder/.keras/datasets/flower_photos/roses/4325834819_ab56661dcc_m.jpg'
b'/home/kbuilder/.keras/datasets/flower_photos/tulips/19413898445_69344f9956_n.jpg'
2024-07-13 05:35:12.764905: W tensorflow/core/framework/local_rendezvous.cc:404] Local rendezvous is aborting with status: OUT_OF_RANGE: End of sequence
檔案的樹狀結構可用於編譯 class_names 清單。
class_names = np.array(sorted([item.name for item in data_dir.glob('*') if item.name != "LICENSE.txt"]))
print(class_names)
['daisy' 'dandelion' 'roses' 'sunflowers' 'tulips']
將資料集分割成訓練和驗證集
val_size = int(image_count * 0.2)
train_ds = list_ds.skip(val_size)
val_ds = list_ds.take(val_size)
您可以列印每個資料集的長度,如下所示
print(tf.data.experimental.cardinality(train_ds).numpy())
print(tf.data.experimental.cardinality(val_ds).numpy())
2936
734
編寫一個簡短的函式,將檔案路徑轉換為 (img, label) 配對
def get_label(file_path):
  # Convert the path to a list of path components
  parts = tf.strings.split(file_path, os.path.sep)
  # The second to last is the class-directory
  one_hot = parts[-2] == class_names
  # Integer encode the label
  return tf.argmax(one_hot)
def decode_img(img):
  # Convert the compressed string to a 3D uint8 tensor
  img = tf.io.decode_jpeg(img, channels=3)
  # Resize the image to the desired size
  return tf.image.resize(img, [img_height, img_width])
def process_path(file_path):
  label = get_label(file_path)
  # Load the raw data from the file as a string
  img = tf.io.read_file(file_path)
  img = decode_img(img)
  return img, label
使用 Dataset.map 建立 image, label 配對的資料集
# Set `num_parallel_calls` so multiple images are loaded/processed in parallel.
train_ds = train_ds.map(process_path, num_parallel_calls=AUTOTUNE)
val_ds = val_ds.map(process_path, num_parallel_calls=AUTOTUNE)
for image, label in train_ds.take(1):
  print("Image shape: ", image.numpy().shape)
  print("Label: ", label.numpy())
Image shape:  (180, 180, 3)
Label:  1
2024-07-13 05:35:13.038820: W tensorflow/core/framework/local_rendezvous.cc:404] Local rendezvous is aborting with status: OUT_OF_RANGE: End of sequence
設定資料集以提升效能
若要使用此資料集訓練模型,您會希望資料
- 經過充分隨機排序。
- 已分批處理。
- 批次儘快可用。
可以使用 tf.data API 新增這些功能。如需更多詳細資訊,請參閱輸入管線效能指南。
def configure_for_performance(ds):
  ds = ds.cache()
  ds = ds.shuffle(buffer_size=1000)
  ds = ds.batch(batch_size)
  ds = ds.prefetch(buffer_size=AUTOTUNE)
  return ds

train_ds = configure_for_performance(train_ds)
val_ds = configure_for_performance(val_ds)
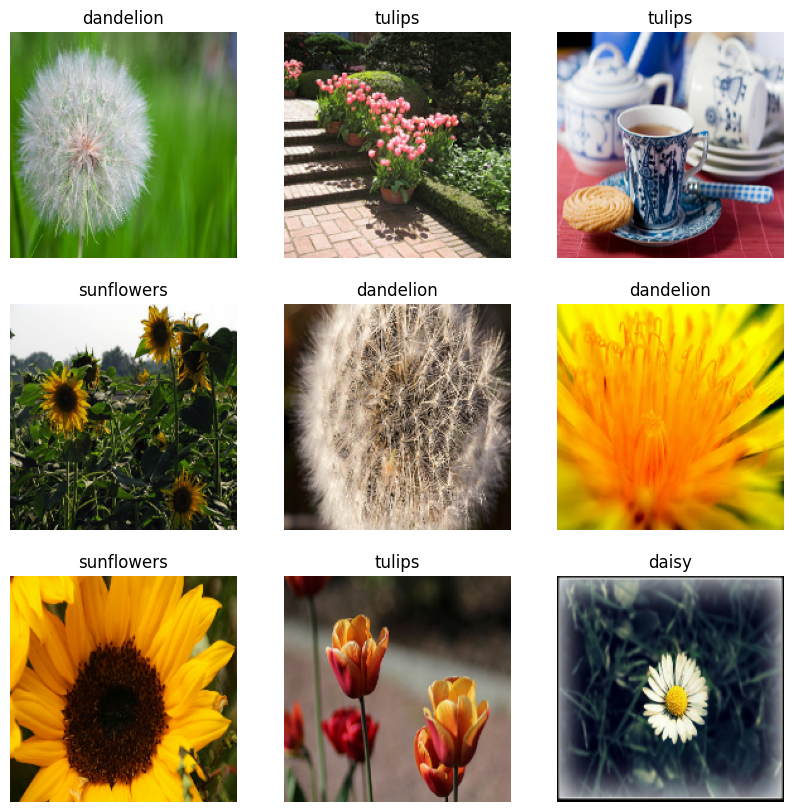
視覺化資料
您可以視覺化此資料集,方式與您先前建立的資料集類似
image_batch, label_batch = next(iter(train_ds))

plt.figure(figsize=(10, 10))
for i in range(9):
  ax = plt.subplot(3, 3, i + 1)
  plt.imshow(image_batch[i].numpy().astype("uint8"))
  label = label_batch[i]
  plt.title(class_names[label])
  plt.axis("off")
2024-07-13 05:35:13.274884: W tensorflow/core/kernels/data/cache_dataset_ops.cc:858] The calling iterator did not fully read the dataset being cached. In order to avoid unexpected truncation of the dataset, the partially cached contents of the dataset will be discarded. This can happen if you have an input pipeline similar to `dataset.cache().take(k).repeat()`. You should use `dataset.take(k).cache().repeat()` instead.
繼續訓練模型
您現在已手動建構類似於 tf.keras.utils.image_dataset_from_directory 上方建立的 tf.data.Dataset。您可以繼續使用它來訓練模型。與先前一樣,您將僅訓練幾個週期,以縮短執行時間。
model.fit(
  train_ds,
  validation_data=val_ds,
  epochs=3
)
Epoch 1/3
92/92 ━━━━━━━━━━━━━━━━━━━━ 5s 42ms/step - accuracy: 0.6975 - loss: 0.7811 - val_accuracy: 0.7112 - val_loss: 0.7230
Epoch 2/3
92/92 ━━━━━━━━━━━━━━━━━━━━ 2s 22ms/step - accuracy: 0.7734 - loss: 0.5998 - val_accuracy: 0.7262 - val_loss: 0.6824
Epoch 3/3
92/92 ━━━━━━━━━━━━━━━━━━━━ 2s 22ms/step - accuracy: 0.8561 - loss: 0.4123 - val_accuracy: 0.7425 - val_loss: 0.6843
<keras.src.callbacks.history.History at 0x7f2dcc1aa820>
使用 TensorFlow Datasets
到目前為止,本教學課程的重點在於從磁碟載入資料。您也可以在 TensorFlow Datasets 的大型目錄中探索資料集,以尋找要使用的資料集,這些資料集都可輕鬆下載。
由於您先前已從磁碟載入花卉資料集,現在讓我們使用 TensorFlow Datasets 匯入它。
使用 TensorFlow Datasets 下載花卉資料集
(train_ds, val_ds, test_ds), metadata = tfds.load(
    'tf_flowers',
    split=['train[:80%]', 'train[80%:90%]', 'train[90%:]'],
    with_info=True,
    as_supervised=True,
)
花卉資料集有五個類別
num_classes = metadata.features['label'].num_classes
print(num_classes)
5
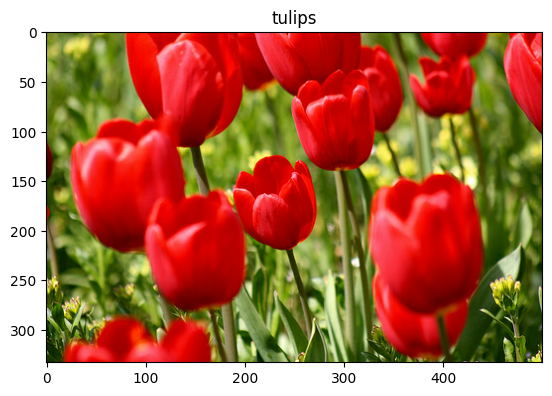
從資料集中擷取圖片
get_label_name = metadata.features['label'].int2str

image, label = next(iter(train_ds))
_ = plt.imshow(image)
_ = plt.title(get_label_name(label))
2024-07-13 05:35:25.302143: W tensorflow/core/kernels/data/cache_dataset_ops.cc:858] The calling iterator did not fully read the dataset being cached. In order to avoid unexpected truncation of the dataset, the partially cached contents of the dataset will be discarded. This can happen if you have an input pipeline similar to `dataset.cache().take(k).repeat()`. You should use `dataset.take(k).cache().repeat()` instead.
與先前一樣,請記住將訓練、驗證和測試集分批處理、隨機排序和設定效能
train_ds = configure_for_performance(train_ds)
val_ds = configure_for_performance(val_ds)
test_ds = configure_for_performance(test_ds)
您可以參閱資料擴增教學課程,以尋找使用花卉資料集和 TensorFlow Datasets 的完整範例。
後續步驟
本教學課程說明了從磁碟載入圖片的兩種方式。首先,您瞭解如何使用 Keras 預先處理層和公用程式載入和預先處理圖片資料集。接下來,您瞭解如何使用 tf.data 從頭開始編寫輸入管線。最後,您瞭解如何從 TensorFlow Datasets 下載資料集。
您的後續步驟
- 您可以瞭解如何新增資料擴增。
- 若要進一步瞭解
tf.data,您可以參閱tf.data:建構 TensorFlow 輸入管線指南。