
|
|
|
 在 GitHub 上檢視原始碼 在 GitHub 上檢視原始碼
|
|
MoViNet (行動影片網路) 提供一系列高效率的影片分類模型,支援串流影片的推論。在本教學課程中,您將使用預先訓練的 MoViNet 模型來分類影片,特別是針對來自 UCF101 資料集的動作辨識工作。預先訓練模型是先前在較大型資料集上訓練過的已儲存網路。您可以在 Kondratyuk, D. 等人 (2021) 的論文 MoViNets: Mobile Video Networks for Efficient Video Recognition 中找到關於 MoViNet 的更多詳細資訊。在本教學課程中,您將:
- 瞭解如何下載預先訓練的 MoViNet 模型
- 透過凍結 MoViNet 模型的卷積基底,使用具有新分類器的新預先訓練模型建立新模型
- 將分類器標頭取代為新資料集的標籤數量
- 在 UCF101 資料集上執行遷移學習
本教學課程中下載的模型來自 official/projects/movinet。此存放區包含 TF Hub 在 TensorFlow 2 SavedModel 格式中使用的 MoViNet 模型集合。
本遷移學習教學課程是 TensorFlow 影片教學課程系列的第三部分。以下是其他三個教學課程:
- 載入影片資料:本教學課程說明本文件中使用的許多程式碼;尤其是,如何透過
FrameGenerator類別預先處理和載入資料會在此處更詳細地說明。 - 建構適用於影片分類的 3D CNN 模型。請注意,本教學課程使用 (2+1)D CNN,其會分解 3D 資料的空間和時間層面;如果您使用的是 MRI 掃描等立體資料,請考慮使用 3D CNN 而非 (2+1)D CNN。
- 用於串流動作辨識的 MoViNet:熟悉 TF Hub 上提供的 MoViNet 模型。
設定
首先安裝並匯入一些必要的程式庫,包括:remotezip 以檢查 ZIP 檔案的內容、tqdm 以使用進度列、OpenCV 以處理影片檔案 (確保 opencv-python 和 opencv-python-headless 的版本相同),以及 TensorFlow 模型 (tf-models-official) 以下載預先訓練的 MoViNet 模型。TensorFlow 模型套件是使用 TensorFlow 高階 API 的模型集合。
pip install remotezip tqdm opencv-python==4.5.2.52 opencv-python-headless==4.5.2.52 tf-models-official
import tqdm
import random
import pathlib
import itertools
import collections

import cv2
import numpy as np
import remotezip as rz
import seaborn as sns
import matplotlib.pyplot as plt

import keras
import tensorflow as tf
import tensorflow_hub as hub
from tensorflow.keras import layers
from tensorflow.keras.optimizers import Adam
from tensorflow.keras.losses import SparseCategoricalCrossentropy

# Import the MoViNet model from TensorFlow Models (tf-models-official) for the MoViNet model
from official.projects.movinet.modeling import movinet
from official.projects.movinet.modeling import movinet_model
載入資料
以下隱藏的儲存格定義了協助程式函式,以從 UCF-101 資料集下載資料切片,並將其載入 tf.data.Dataset。在載入影片資料教學課程中,詳細逐步說明了此程式碼。
隱藏區塊結尾的 FrameGenerator 類別是此處最重要的公用程式。它會建立可將資料饋送至 TensorFlow 資料管線的可迭代物件。具體來說,此類別包含一個 Python 產生器,可載入影片影格及其編碼標籤。產生器 (__call__) 函式會產生 frames_from_video_file 產生的影格陣列,以及與影格集相關聯的標籤的單熱編碼向量。
URL = 'https://storage.googleapis.com/thumos14_files/UCF101_videos.zip'
download_dir = pathlib.Path('./UCF101_subset/')
subset_paths = download_ufc_101_subset(URL,
                        num_classes = 10,
                        splits = {"train": 30, "test": 20},
                        download_dir = download_dir)
建立訓練和測試資料集
batch_size = 8
num_frames = 8

output_signature = (tf.TensorSpec(shape = (None, None, None, 3), dtype = tf.float32),
                    tf.TensorSpec(shape = (), dtype = tf.int16))

train_ds = tf.data.Dataset.from_generator(FrameGenerator(subset_paths['train'], num_frames, training = True),
                                          output_signature = output_signature)
train_ds = train_ds.batch(batch_size)

test_ds = tf.data.Dataset.from_generator(FrameGenerator(subset_paths['test'], num_frames),
                                         output_signature = output_signature)
test_ds = test_ds.batch(batch_size)
此處產生的標籤代表類別的編碼。例如,'ApplyEyeMakeup' 會對應到整數。查看訓練資料的標籤,以確保資料集已充分隨機排序。
for frames, labels in train_ds.take(10):
  print(labels)
查看資料的形狀。
print(f"Shape: {frames.shape}")
print(f"Label: {labels.shape}")
什麼是 MoViNet?
如先前所述,MoViNet 是用於串流影片或線上推論的影片分類模型,適用於動作辨識等工作。考慮使用 MoViNet 來分類您的影片資料以進行動作辨識。
以 2D 影格為基礎的分類器效率高且易於在整個影片或串流影格上執行。由於它們無法將時間背景納入考量,因此準確度有限,且可能在影格之間產生不一致的輸出。
簡單的 3D CNN 使用雙向時間背景,可提高準確度和時間一致性。這些網路可能需要更多資源,而且由於它們會查看未來,因此無法用於串流資料。
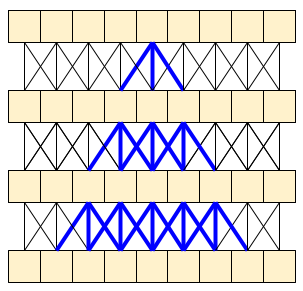
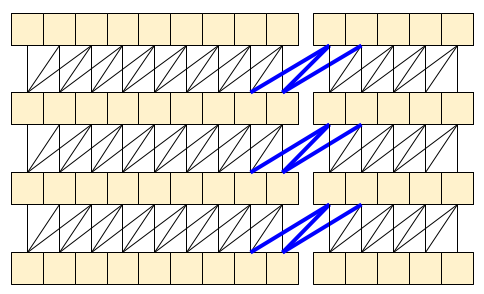
MoViNet 架構使用沿時間軸「因果關係」的 3D 卷積 (類似於具有 padding="causal" 的 layers.Conv1D)。這提供了一些方法的優點,主要是它允許有效率的串流。
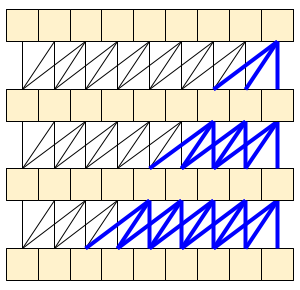
因果關係卷積可確保時間 t 的輸出僅使用到時間 t 的輸入來計算。為了示範這如何提高串流效率,請從您可能熟悉的更簡單範例開始:RNN。RNN 會隨時間推移傳遞狀態。
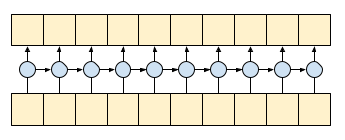
gru = layers.GRU(units=4, return_sequences=True, return_state=True)

inputs = tf.random.normal(shape=[1, 10, 8]) # (batch, sequence, channels)

result, state = gru(inputs) # Run it all at once
透過設定 RNN 的 return_sequences=True 引數,您可以要求它傳回計算結束時的狀態。這可讓您暫停,然後從上次中斷的地方繼續,以獲得完全相同的結果。
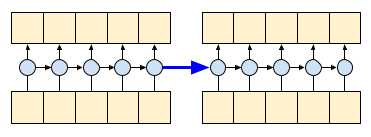
first_half, state = gru(inputs[:, :5, :])   # run the first half, and capture the state
second_half, _ = gru(inputs[:,5:, :], initial_state=state)  # Use the state to continue where you left off.

print(np.allclose(result[:, :5,:], first_half))
print(np.allclose(result[:, 5:,:], second_half))
如果謹慎處理,因果關係卷積也可以相同的方式使用。Le Paine 等人在 Fast Wavenet Generation Algorithm 中使用了此技術。在 MoVinet 論文中,state 稱為「串流緩衝區」。
透過向前傳遞這一小部分狀態,您可以避免重新計算上方顯示的整個感受野。
下載預先訓練的 MoViNet 模型
在本節中,您將:
- 您可以使用 TensorFlow 模型中
official/projects/movinet中提供的開放原始碼建立 MoViNet 模型。 - 載入預先訓練的權重。
- 凍結卷積基底,或最終分類器標頭以外的所有其他層,以加速微調。
若要建構模型,您可以從 a0 組態開始,因為在與其他模型進行基準測試時,它是訓練速度最快的模型。查看 TensorFlow Model Garden 上提供的 MoViNet 模型,以找出可能適用於您使用案例的模型。
model_id = 'a0'
resolution = 224

tf.keras.backend.clear_session()

backbone = movinet.Movinet(model_id=model_id)
backbone.trainable = False

# Set num_classes=600 to load the pre-trained weights from the original model
model = movinet_model.MovinetClassifier(backbone=backbone, num_classes=600)
model.build([None, None, None, None, 3])

# Load pre-trained weights
!wget https://storage.googleapis.com/tf_model_garden/vision/movinet/movinet_a0_base.tar.gz -O movinet_a0_base.tar.gz -q
!tar -xvf movinet_a0_base.tar.gz

checkpoint_dir = f'movinet_{model_id}_base'
checkpoint_path = tf.train.latest_checkpoint(checkpoint_dir)
checkpoint = tf.train.Checkpoint(model=model)
status = checkpoint.restore(checkpoint_path)
status.assert_existing_objects_matched()
若要建構分類器,請建立一個函式,以資料集中的骨幹和類別數量為引數。 build_classifier 函式會採用骨幹和資料集中的類別數量來建構分類器。在此案例中,新的分類器將採用 num_classes 輸出 (針對此 UCF101 子集的 10 個類別)。
def build_classifier(batch_size, num_frames, resolution, backbone, num_classes):
  """Builds a classifier on top of a backbone model."""
  model = movinet_model.MovinetClassifier(
      backbone=backbone,
      num_classes=num_classes)
  model.build([batch_size, num_frames, resolution, resolution, 3])

  return model
model = build_classifier(batch_size, num_frames, resolution, backbone, 10)
在本教學課程中,選擇 tf.keras.optimizers.Adam 最佳化工具和 tf.keras.losses.SparseCategoricalCrossentropy 損失函數。使用 metrics 引數,以檢視模型效能在每個步驟的準確度。
num_epochs = 2

loss_obj = tf.keras.losses.SparseCategoricalCrossentropy(from_logits=True)

optimizer = tf.keras.optimizers.Adam(learning_rate = 0.001)

model.compile(loss=loss_obj, optimizer=optimizer, metrics=['accuracy'])
訓練模型。在兩個 epoch 後,觀察到訓練集和測試集的損失都很低,且準確度很高。
results = model.fit(train_ds,
                    validation_data=test_ds,
                    epochs=num_epochs,
                    validation_freq=1,
                    verbose=1)
評估模型
模型在訓練資料集上獲得了高準確度。接下來,使用 Keras Model.evaluate 在測試集上評估它。
model.evaluate(test_ds, return_dict=True)
若要進一步視覺化模型效能,請使用混淆矩陣。混淆矩陣可讓您評估分類模型超出準確度的效能。若要針對此多類別分類問題建構混淆矩陣,請取得測試集中的實際值和預測值。
def get_actual_predicted_labels(dataset):
  """
    Create a list of actual ground truth values and the predictions from the model.

    Args:
      dataset: An iterable data structure, such as a TensorFlow Dataset, with features and labels.

    Return:
      Ground truth and predicted values for a particular dataset.
  """
  actual = [labels for _, labels in dataset.unbatch()]
  predicted = model.predict(dataset)

  actual = tf.stack(actual, axis=0)
  predicted = tf.concat(predicted, axis=0)
  predicted = tf.argmax(predicted, axis=1)

  return actual, predicted
def plot_confusion_matrix(actual, predicted, labels, ds_type):
  cm = tf.math.confusion_matrix(actual, predicted)
  ax = sns.heatmap(cm, annot=True, fmt='g')
  sns.set(rc={'figure.figsize':(12, 12)})
  sns.set(font_scale=1.4)
  ax.set_title('Confusion matrix of action recognition for ' + ds_type)
  ax.set_xlabel('Predicted Action')
  ax.set_ylabel('Actual Action')
  plt.xticks(rotation=90)
  plt.yticks(rotation=0)
  ax.xaxis.set_ticklabels(labels)
  ax.yaxis.set_ticklabels(labels)
fg = FrameGenerator(subset_paths['train'], num_frames, training = True)
label_names = list(fg.class_ids_for_name.keys())
actual, predicted = get_actual_predicted_labels(test_ds)
plot_confusion_matrix(actual, predicted, label_names, 'test')
後續步驟
現在您已熟悉 MoViNet 模型,以及如何運用各種 TensorFlow API (例如,用於遷移學習),請嘗試將本教學課程中的程式碼與您自己的資料集搭配使用。資料不一定要僅限於影片資料。立體資料 (例如 MRI 掃描) 也可以與 3D CNN 搭配使用。Brain MRI-based 3D Convolutional Neural Networks for Classification of Schizophrenia and Controls 中提及的 NUSDAT 和 IMH 資料集可能是 MRI 資料的兩個來源。
特別是,使用本教學課程和其他影片資料和分類教學課程中使用的 FrameGenerator 類別,將有助於您將資料載入模型中。
若要深入瞭解如何在 TensorFlow 中使用影片資料,請查看下列教學課程: