
|
|
|
 在 GitHub 上檢視原始碼 在 GitHub 上檢視原始碼
|
|
本教學課程示範如何建構及訓練名為 pix2pix 的條件式生成對抗網路 (cGAN),此網路會學習從輸入圖片到輸出圖片的對應關係,如 Isola 等人 (2017) 的 使用條件式對抗網路進行影像對影像轉換 中所述。pix2pix 並非特定應用程式專用,可應用於各種工作,包括從標籤地圖合成相片、從黑白圖片產生彩色相片、將 Google 地圖相片轉換為空拍圖片,甚至將草圖轉換為相片。
在本範例中,您的網路將使用 CMP Facade Database 產生建築物外觀圖片,此資料庫由 Center for Machine Perception 在 Czech Technical University in Prague 提供。為了簡潔起見,您將使用 pix2pix 作者建立的此資料集 預先處理副本。
在 pix2pix cGAN 中,您以輸入圖片為條件,並產生對應的輸出圖片。cGAN 最初是在 Conditional Generative Adversarial Nets (Mirza 和 Osindero,2014) 中提出
您的網路架構將包含
- 具有以 U-Net 為基礎的架構的產生器。
- 由卷積 PatchGAN 分類器 (在 pix2pix 論文 中提出) 代表的判別器。
請注意,在單一 V100 GPU 上,每個 epoch 可能需要約 15 秒。
以下是一些在 facade 資料集上訓練 200 個 epoch (8 萬個步驟) 後,pix2pix cGAN 產生的輸出範例。
匯入 TensorFlow 和其他程式庫
import tensorflow as tf

import os
import pathlib
import time
import datetime

from matplotlib import pyplot as plt
from IPython import display
載入資料集
下載 CMP Facade Database 資料 (30MB)。其他資料集可在此 處 以相同格式取得。在 Colab 中,您可以從下拉式選單中選取其他資料集。請注意,其他一些資料集明顯較大 (edges2handbags 大小為 8GB)。
dataset_name = "facades"
_URL = f'http://efrosgans.eecs.berkeley.edu/pix2pix/datasets/{dataset_name}.tar.gz'

path_to_zip = tf.keras.utils.get_file(
    fname=f"{dataset_name}.tar.gz",
    origin=_URL,
    extract=True)

path_to_zip  = pathlib.Path(path_to_zip)

PATH = path_to_zip.parent/dataset_name
Downloading data from http://efrosgans.eecs.berkeley.edu/pix2pix/datasets/facades.tar.gz
30168306/30168306 ━━━━━━━━━━━━━━━━━━━━ 11s 0us/step
list(PATH.parent.iterdir())
[PosixPath('/home/kbuilder/.keras/datasets/Red_sunflower'),
 PosixPath('/home/kbuilder/.keras/datasets/fashion-mnist'),
 PosixPath('/home/kbuilder/.keras/datasets/mnist.npz'),
 PosixPath('/home/kbuilder/.keras/datasets/HIGGS.csv.gz'),
 PosixPath('/home/kbuilder/.keras/datasets/facades.tar.gz'),
 PosixPath('/home/kbuilder/.keras/datasets/facades'),
 PosixPath('/home/kbuilder/.keras/datasets/flower_photos.tar'),
 PosixPath('/home/kbuilder/.keras/datasets/flower_photos')]
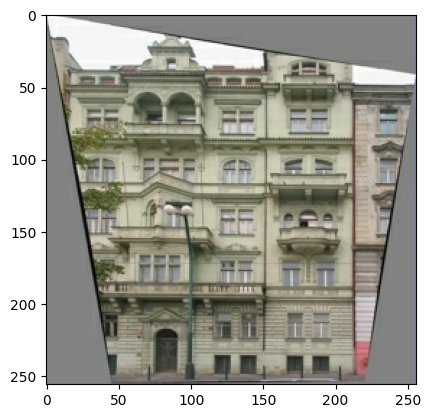
每個原始圖片的大小為 256 x 512,其中包含兩個 256 x 256 圖片
sample_image = tf.io.read_file(str(PATH / 'train/1.jpg'))
sample_image = tf.io.decode_jpeg(sample_image)
print(sample_image.shape)
(256, 512, 3)
plt.figure()
plt.imshow(sample_image)
<matplotlib.image.AxesImage at 0x7f2d3a277550>
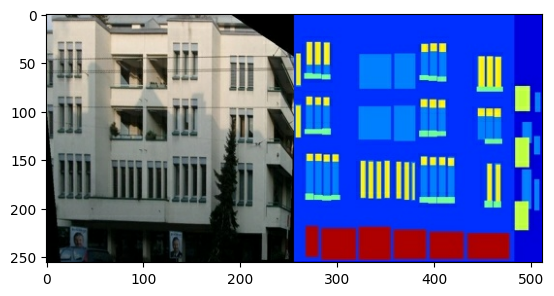
您需要將真實建築物外觀圖片與建築標籤圖片分開,所有圖片的大小均為 256 x 256。
定義載入圖片檔案並輸出兩個圖片張量的函式
def load(image_file):
  # Read and decode an image file to a uint8 tensor
  image = tf.io.read_file(image_file)
  image = tf.io.decode_jpeg(image)

  # Split each image tensor into two tensors:
  # - one with a real building facade image
  # - one with an architecture label image
  w = tf.shape(image)[1]
  w = w // 2
  input_image = image[:, w:, :]
  real_image = image[:, :w, :]

  # Convert both images to float32 tensors
  input_image = tf.cast(input_image, tf.float32)
  real_image = tf.cast(real_image, tf.float32)

  return input_image, real_image
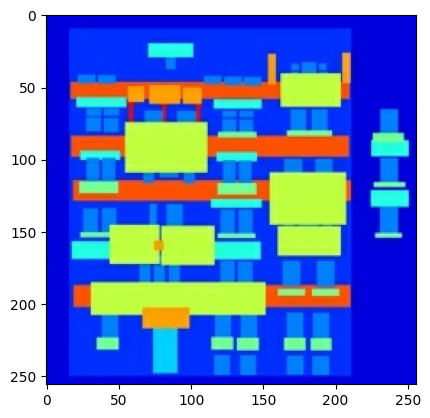
繪製輸入 (建築標籤圖片) 和真實 (建築物外觀相片) 圖片的範例
inp, re = load(str(PATH / 'train/100.jpg'))
# Casting to int for matplotlib to display the images
plt.figure()
plt.imshow(inp / 255.0)
plt.figure()
plt.imshow(re / 255.0)
<matplotlib.image.AxesImage at 0x7f2d380249d0>
如 pix2pix 論文 中所述,您需要套用隨機抖動和鏡射來預先處理訓練集。
定義數個函式,這些函式會執行下列操作:
- 將每個
256 x 256圖片調整大小為較大的高度和寬度 -286 x 286。 - 隨機將其裁剪回
256 x 256。 - 隨機水平翻轉圖片,即從左到右 (隨機鏡射)。
- 將圖片正規化為
[-1, 1]範圍。
# The facade training set consist of 400 images
BUFFER_SIZE = 400
# The batch size of 1 produced better results for the U-Net in the original pix2pix experiment
BATCH_SIZE = 1
# Each image is 256x256 in size
IMG_WIDTH = 256
IMG_HEIGHT = 256
def resize(input_image, real_image, height, width):
  input_image = tf.image.resize(input_image, [height, width],
                                method=tf.image.ResizeMethod.NEAREST_NEIGHBOR)
  real_image = tf.image.resize(real_image, [height, width],
                               method=tf.image.ResizeMethod.NEAREST_NEIGHBOR)

  return input_image, real_image
def random_crop(input_image, real_image):
  stacked_image = tf.stack([input_image, real_image], axis=0)
  cropped_image = tf.image.random_crop(
      stacked_image, size=[2, IMG_HEIGHT, IMG_WIDTH, 3])

  return cropped_image[0], cropped_image[1]
# Normalizing the images to [-1, 1]
def normalize(input_image, real_image):
  input_image = (input_image / 127.5) - 1
  real_image = (real_image / 127.5) - 1

  return input_image, real_image
@tf.function()
def random_jitter(input_image, real_image):
  # Resizing to 286x286
  input_image, real_image = resize(input_image, real_image, 286, 286)

  # Random cropping back to 256x256
  input_image, real_image = random_crop(input_image, real_image)

  if tf.random.uniform(()) > 0.5:
    # Random mirroring
    input_image = tf.image.flip_left_right(input_image)
    real_image = tf.image.flip_left_right(real_image)

  return input_image, real_image
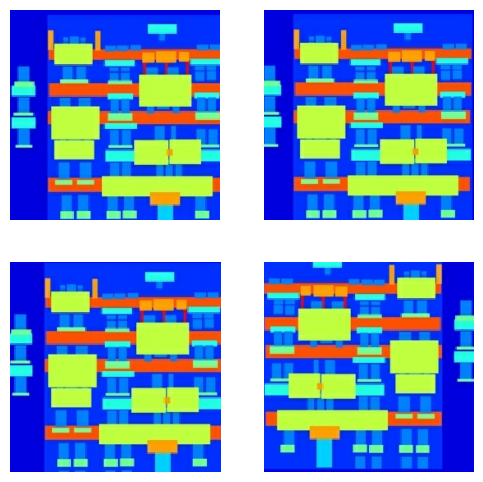
您可以檢查一些預先處理的輸出
plt.figure(figsize=(6, 6))
for i in range(4):
  rj_inp, rj_re = random_jitter(inp, re)
  plt.subplot(2, 2, i + 1)
  plt.imshow(rj_inp / 255.0)
  plt.axis('off')
plt.show()
在確認載入和預先處理運作正常後,讓我們定義幾個輔助函式,以載入和預先處理訓練和測試集
def load_image_train(image_file):
  input_image, real_image = load(image_file)
  input_image, real_image = random_jitter(input_image, real_image)
  input_image, real_image = normalize(input_image, real_image)

  return input_image, real_image
def load_image_test(image_file):
  input_image, real_image = load(image_file)
  input_image, real_image = resize(input_image, real_image,
                                   IMG_HEIGHT, IMG_WIDTH)
  input_image, real_image = normalize(input_image, real_image)

  return input_image, real_image
使用 tf.data 建構輸入管線
train_dataset = tf.data.Dataset.list_files(str(PATH / 'train/*.jpg'))
train_dataset = train_dataset.map(load_image_train,
                                  num_parallel_calls=tf.data.AUTOTUNE)
train_dataset = train_dataset.shuffle(BUFFER_SIZE)
train_dataset = train_dataset.batch(BATCH_SIZE)
try:
  test_dataset = tf.data.Dataset.list_files(str(PATH / 'test/*.jpg'))
except tf.errors.InvalidArgumentError:
  test_dataset = tf.data.Dataset.list_files(str(PATH / 'val/*.jpg'))
test_dataset = test_dataset.map(load_image_test)
test_dataset = test_dataset.batch(BATCH_SIZE)
建構產生器
您的 pix2pix cGAN 的產生器是修改過的 U-Net。U-Net 由編碼器 (降採樣器) 和解碼器 (升採樣器) 組成。(您可以在 圖片分 segmentation 教學課程和 U-Net 專案網站上找到更多相關資訊。)
- 編碼器中的每個區塊都是:卷積 -> 批次正規化 -> Leaky ReLU
- 解碼器中的每個區塊都是:轉置卷積 -> 批次正規化 -> Dropout (套用至前 3 個區塊) -> ReLU
- 編碼器和解碼器之間存在跳躍連線 (如 U-Net 中所示)。
定義降採樣器 (編碼器)
OUTPUT_CHANNELS = 3
def downsample(filters, size, apply_batchnorm=True):
  initializer = tf.random_normal_initializer(0., 0.02)

  result = tf.keras.Sequential()
  result.add(
      tf.keras.layers.Conv2D(filters, size, strides=2, padding='same',
                             kernel_initializer=initializer, use_bias=False))

  if apply_batchnorm:
    result.add(tf.keras.layers.BatchNormalization())

  result.add(tf.keras.layers.LeakyReLU())

  return result
down_model = downsample(3, 4)
down_result = down_model(tf.expand_dims(inp, 0))
print (down_result.shape)
(1, 128, 128, 3)
定義升採樣器 (解碼器)
def upsample(filters, size, apply_dropout=False):
  initializer = tf.random_normal_initializer(0., 0.02)

  result = tf.keras.Sequential()
  result.add(
    tf.keras.layers.Conv2DTranspose(filters, size, strides=2,
                                    padding='same',
                                    kernel_initializer=initializer,
                                    use_bias=False))

  result.add(tf.keras.layers.BatchNormalization())

  if apply_dropout:
      result.add(tf.keras.layers.Dropout(0.5))

  result.add(tf.keras.layers.ReLU())

  return result
up_model = upsample(3, 4)
up_result = up_model(down_result)
print (up_result.shape)
(1, 256, 256, 3)
使用降採樣器和升採樣器定義產生器
def Generator():
  inputs = tf.keras.layers.Input(shape=[256, 256, 3])

  down_stack = [
    downsample(64, 4, apply_batchnorm=False),  # (batch_size, 128, 128, 64)
    downsample(128, 4),  # (batch_size, 64, 64, 128)
    downsample(256, 4),  # (batch_size, 32, 32, 256)
    downsample(512, 4),  # (batch_size, 16, 16, 512)
    downsample(512, 4),  # (batch_size, 8, 8, 512)
    downsample(512, 4),  # (batch_size, 4, 4, 512)
    downsample(512, 4),  # (batch_size, 2, 2, 512)
    downsample(512, 4),  # (batch_size, 1, 1, 512)
  ]

  up_stack = [
    upsample(512, 4, apply_dropout=True),  # (batch_size, 2, 2, 1024)
    upsample(512, 4, apply_dropout=True),  # (batch_size, 4, 4, 1024)
    upsample(512, 4, apply_dropout=True),  # (batch_size, 8, 8, 1024)
    upsample(512, 4),  # (batch_size, 16, 16, 1024)
    upsample(256, 4),  # (batch_size, 32, 32, 512)
    upsample(128, 4),  # (batch_size, 64, 64, 256)
    upsample(64, 4),  # (batch_size, 128, 128, 128)
  ]

  initializer = tf.random_normal_initializer(0., 0.02)
  last = tf.keras.layers.Conv2DTranspose(OUTPUT_CHANNELS, 4,
                                         strides=2,
                                         padding='same',
                                         kernel_initializer=initializer,
                                         activation='tanh')  # (batch_size, 256, 256, 3)

  x = inputs

  # Downsampling through the model
  skips = []
  for down in down_stack:
    x = down(x)
    skips.append(x)

  skips = reversed(skips[:-1])

  # Upsampling and establishing the skip connections
  for up, skip in zip(up_stack, skips):
    x = up(x)
    x = tf.keras.layers.Concatenate()([x, skip])

  x = last(x)

  return tf.keras.Model(inputs=inputs, outputs=x)
視覺化產生器模型架構
generator = Generator()
tf.keras.utils.plot_model(generator, show_shapes=True, dpi=64)

測試產生器
gen_output = generator(inp[tf.newaxis, ...], training=False)
plt.imshow(gen_output[0, ...])
Clipping input data to the valid range for imshow with RGB data ([0..1] for floats or [0..255] for integers).
<matplotlib.image.AxesImage at 0x7f2e4b7c56d0>
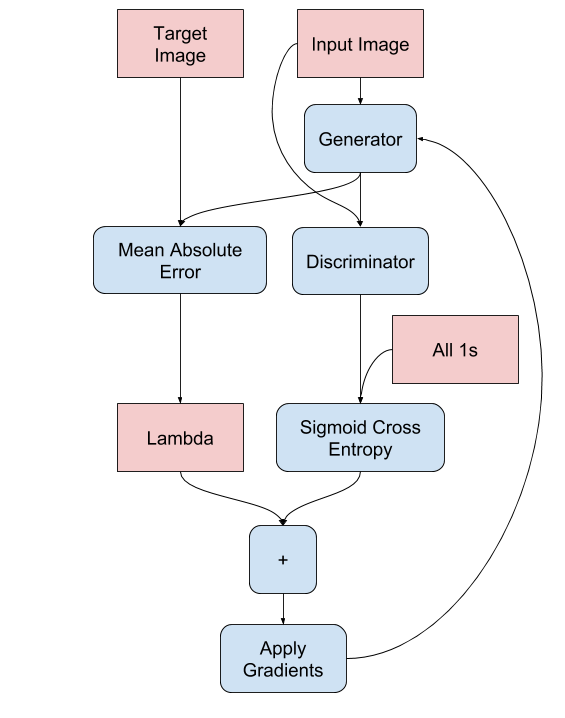
定義產生器損失
GAN 會學習適應資料的損失,而 cGAN 會學習結構化損失,這種損失會懲罰與網路輸出和目標圖片不同的可能結構,如 pix2pix 論文 中所述。
- 產生器損失是產生的圖片的 Sigmoid 交叉熵損失,以及一組 1。
- pix2pix 論文也提及 L1 損失,這是產生圖片和目標圖片之間的 MAE (平均絕對誤差)。
- 這可讓產生圖片在結構上變得與目標圖片相似。
- 計算總產生器損失的公式為
gan_loss + LAMBDA * l1_loss,其中LAMBDA = 100。此值由論文作者決定。
LAMBDA = 100
loss_object = tf.keras.losses.BinaryCrossentropy(from_logits=True)
def generator_loss(disc_generated_output, gen_output, target):
  gan_loss = loss_object(tf.ones_like(disc_generated_output), disc_generated_output)

  # Mean absolute error
  l1_loss = tf.reduce_mean(tf.abs(target - gen_output))

  total_gen_loss = gan_loss + (LAMBDA * l1_loss)

  return total_gen_loss, gan_loss, l1_loss
產生器的訓練程序如下
建構判別器
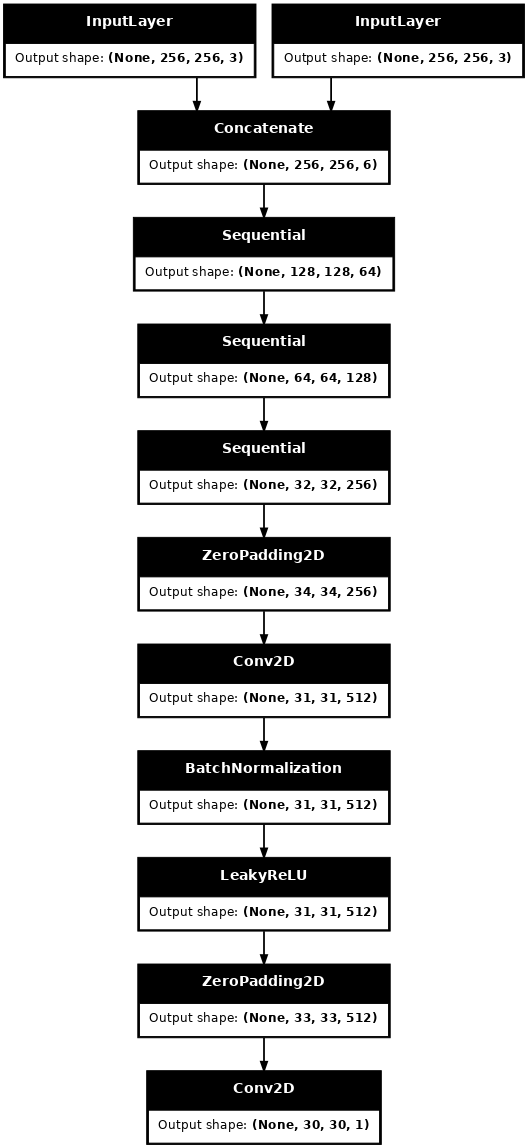
pix2pix cGAN 中的判別器是卷積 PatchGAN 分類器,它會嘗試分類每個圖片區塊是否為真實,如 pix2pix 論文 中所述。
- 判別器中的每個區塊都是:卷積 -> 批次正規化 -> Leaky ReLU。
- 最後一層之後的輸出形狀為
(batch_size, 30, 30, 1)。 - 輸出的每個
30 x 30圖片區塊會分類輸入圖片的70 x 70部分。 - 判別器接收 2 個輸入
- 輸入圖片和目標圖片,它應將其分類為真實。
- 輸入圖片和產生圖片 (產生器的輸出),它應將其分類為虛假。
- 使用
tf.concat([inp, tar], axis=-1)將這 2 個輸入串連在一起。
讓我們定義判別器
def Discriminator():
  initializer = tf.random_normal_initializer(0., 0.02)

  inp = tf.keras.layers.Input(shape=[256, 256, 3], name='input_image')
  tar = tf.keras.layers.Input(shape=[256, 256, 3], name='target_image')

  x = tf.keras.layers.concatenate([inp, tar])  # (batch_size, 256, 256, channels*2)

  down1 = downsample(64, 4, False)(x)  # (batch_size, 128, 128, 64)
  down2 = downsample(128, 4)(down1)  # (batch_size, 64, 64, 128)
  down3 = downsample(256, 4)(down2)  # (batch_size, 32, 32, 256)

  zero_pad1 = tf.keras.layers.ZeroPadding2D()(down3)  # (batch_size, 34, 34, 256)
  conv = tf.keras.layers.Conv2D(512, 4, strides=1,
                                kernel_initializer=initializer,
                                use_bias=False)(zero_pad1)  # (batch_size, 31, 31, 512)

  batchnorm1 = tf.keras.layers.BatchNormalization()(conv)

  leaky_relu = tf.keras.layers.LeakyReLU()(batchnorm1)

  zero_pad2 = tf.keras.layers.ZeroPadding2D()(leaky_relu)  # (batch_size, 33, 33, 512)

  last = tf.keras.layers.Conv2D(1, 4, strides=1,
                                kernel_initializer=initializer)(zero_pad2)  # (batch_size, 30, 30, 1)

  return tf.keras.Model(inputs=[inp, tar], outputs=last)
視覺化判別器模型架構
discriminator = Discriminator()
tf.keras.utils.plot_model(discriminator, show_shapes=True, dpi=64)
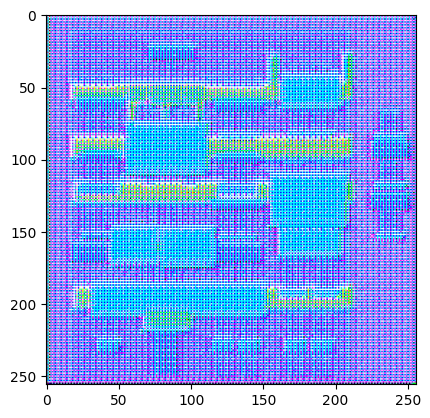
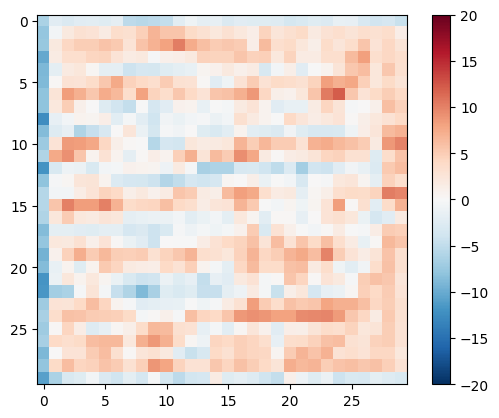
測試判別器
disc_out = discriminator([inp[tf.newaxis, ...], gen_output], training=False)
plt.imshow(disc_out[0, ..., -1], vmin=-20, vmax=20, cmap='RdBu_r')
plt.colorbar()
<matplotlib.colorbar.Colorbar at 0x7f2e4b77af10>
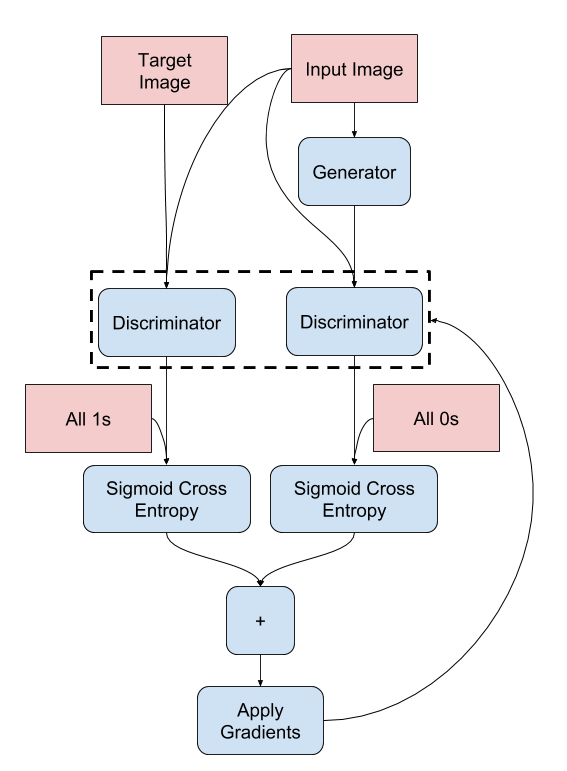
定義判別器損失
discriminator_loss函式採用 2 個輸入:真實圖片和產生圖片。real_loss是 真實圖片和一組 1 (因為這些是真實圖片) 的 Sigmoid 交叉熵損失。generated_loss是產生圖片和一組 0 (因為這些是虛假圖片) 的 Sigmoid 交叉熵損失。total_loss是real_loss和generated_loss的總和。
def discriminator_loss(disc_real_output, disc_generated_output):
  real_loss = loss_object(tf.ones_like(disc_real_output), disc_real_output)

  generated_loss = loss_object(tf.zeros_like(disc_generated_output), disc_generated_output)

  total_disc_loss = real_loss + generated_loss

  return total_disc_loss
判別器的訓練程序如下所示。
若要深入瞭解架構和超參數,您可以參考 pix2pix 論文。
定義最佳化工具和檢查點儲存工具
generator_optimizer = tf.keras.optimizers.Adam(2e-4, beta_1=0.5)
discriminator_optimizer = tf.keras.optimizers.Adam(2e-4, beta_1=0.5)
checkpoint_dir = './training_checkpoints'
checkpoint_prefix = os.path.join(checkpoint_dir, "ckpt")
checkpoint = tf.train.Checkpoint(generator_optimizer=generator_optimizer,
                                 discriminator_optimizer=discriminator_optimizer,
                                 generator=generator,
                                 discriminator=discriminator)
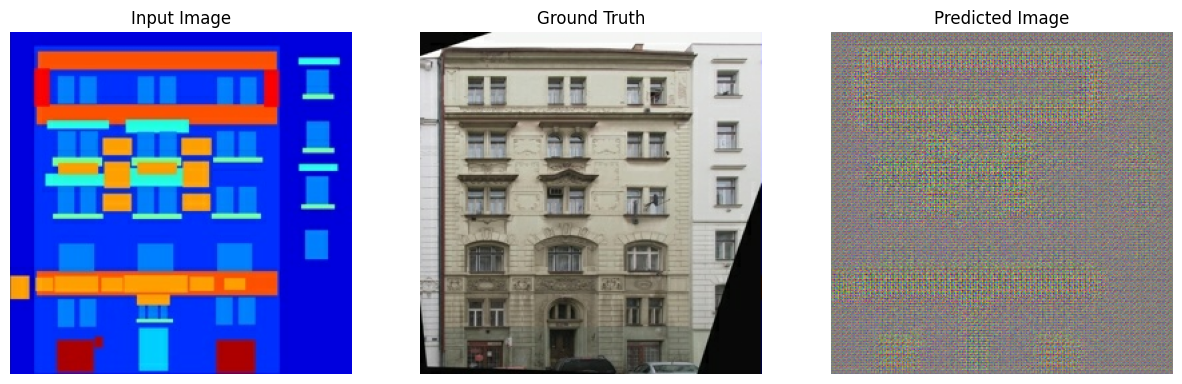
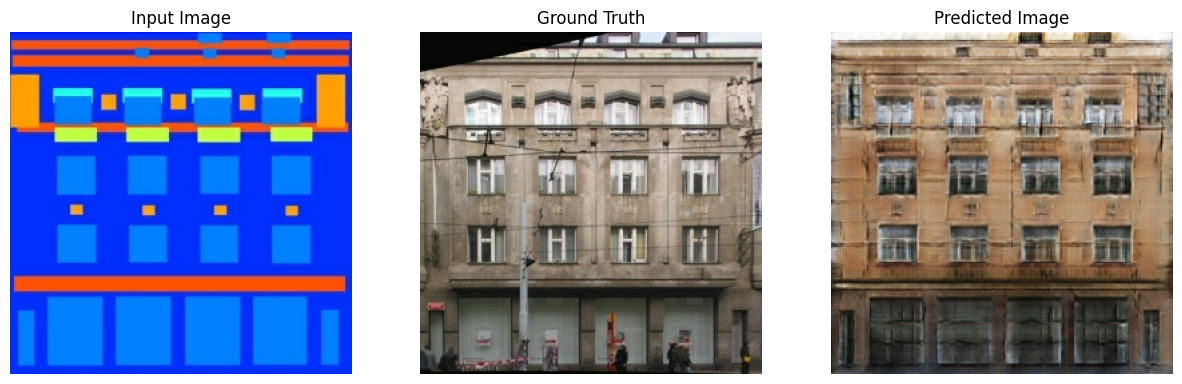
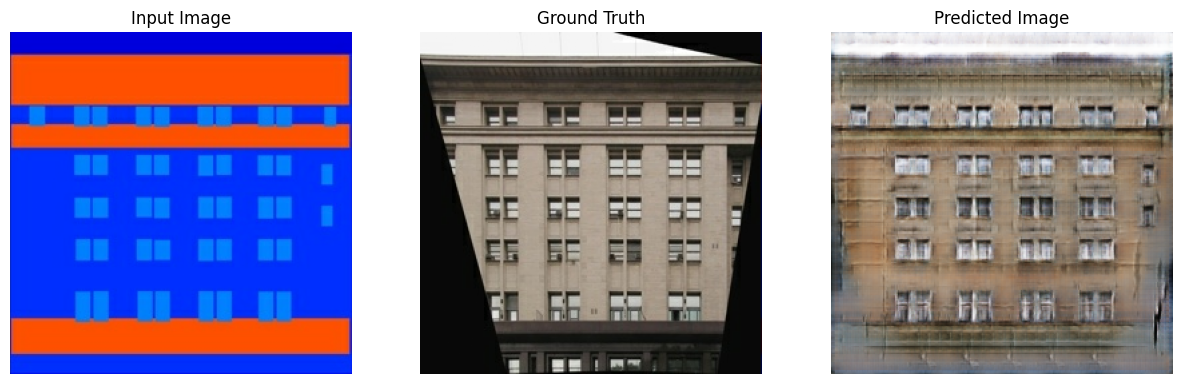
產生圖片
編寫函式以在訓練期間繪製一些圖片。
- 將測試集中的圖片傳遞至產生器。
- 然後,產生器會將輸入圖片轉換為輸出。
- 最後一個步驟是繪製預測結果,瞧!
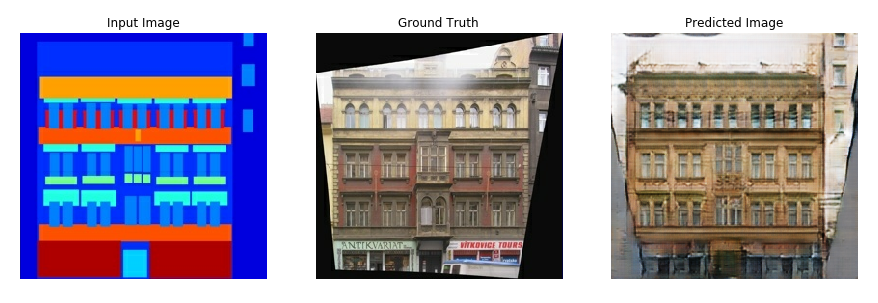
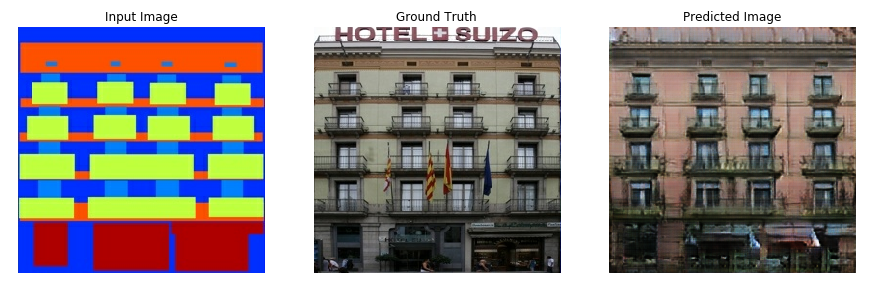
def generate_images(model, test_input, tar):
  prediction = model(test_input, training=True)
  plt.figure(figsize=(15, 15))

  display_list = [test_input[0], tar[0], prediction[0]]
  title = ['Input Image', 'Ground Truth', 'Predicted Image']

  for i in range(3):
    plt.subplot(1, 3, i+1)
    plt.title(title[i])
    # Getting the pixel values in the [0, 1] range to plot.
    plt.imshow(display_list[i] * 0.5 + 0.5)
    plt.axis('off')
  plt.show()
測試函式
for example_input, example_target in test_dataset.take(1):
  generate_images(generator, example_input, example_target)
2024-03-19 04:15:30.212279: W tensorflow/core/framework/local_rendezvous.cc:404] Local rendezvous is aborting with status: OUT_OF_RANGE: End of sequence
訓練
- 針對每個範例輸入產生輸出。
- 判別器接收
input_image和產生圖片作為第一個輸入。第二個輸入是input_image和target_image。 - 接下來,計算產生器和判別器損失。
- 然後,計算損失相對於產生器和判別器變數 (輸入) 的梯度,並將這些梯度套用至最佳化工具。
- 最後,將損失記錄到 TensorBoard。
log_dir="logs/"

summary_writer = tf.summary.create_file_writer(
  log_dir + "fit/" + datetime.datetime.now().strftime("%Y%m%d-%H%M%S"))
@tf.function
def train_step(input_image, target, step):
  with tf.GradientTape() as gen_tape, tf.GradientTape() as disc_tape:
    gen_output = generator(input_image, training=True)

    disc_real_output = discriminator([input_image, target], training=True)
    disc_generated_output = discriminator([input_image, gen_output], training=True)

    gen_total_loss, gen_gan_loss, gen_l1_loss = generator_loss(disc_generated_output, gen_output, target)
    disc_loss = discriminator_loss(disc_real_output, disc_generated_output)

  generator_gradients = gen_tape.gradient(gen_total_loss,
                                          generator.trainable_variables)
  discriminator_gradients = disc_tape.gradient(disc_loss,
                                               discriminator.trainable_variables)

  generator_optimizer.apply_gradients(zip(generator_gradients,
                                          generator.trainable_variables))
  discriminator_optimizer.apply_gradients(zip(discriminator_gradients,
                                              discriminator.trainable_variables))

  with summary_writer.as_default():
    tf.summary.scalar('gen_total_loss', gen_total_loss, step=step//1000)
    tf.summary.scalar('gen_gan_loss', gen_gan_loss, step=step//1000)
    tf.summary.scalar('gen_l1_loss', gen_l1_loss, step=step//1000)
    tf.summary.scalar('disc_loss', disc_loss, step=step//1000)
實際訓練迴圈。由於本教學課程可以在多個資料集上執行,且資料集的大小差異很大,因此訓練迴圈設定為以步驟而非 epoch 運作。
- 反覆運算步驟數。
- 每 10 個步驟列印一個點 (
.)。 - 每 1k 個步驟:清除顯示畫面並執行
generate_images以顯示進度。 - 每 5k 個步驟:儲存檢查點。
def fit(train_ds, test_ds, steps):
  example_input, example_target = next(iter(test_ds.take(1)))
  start = time.time()

  for step, (input_image, target) in train_ds.repeat().take(steps).enumerate():
    if (step) % 1000 == 0:
      display.clear_output(wait=True)

      if step != 0:
        print(f'Time taken for 1000 steps: {time.time()-start:.2f} sec\n')

      start = time.time()

      generate_images(generator, example_input, example_target)
      print(f"Step: {step//1000}k")

    train_step(input_image, target, step)

    # Training step
    if (step+1) % 10 == 0:
      print('.', end='', flush=True)


    # Save (checkpoint) the model every 5k steps
    if (step + 1) % 5000 == 0:
      checkpoint.save(file_prefix=checkpoint_prefix)
此訓練迴圈會儲存您可以在 TensorBoard 中檢視的記錄,以監控訓練進度。
如果您在本地電腦上工作,您可以啟動個別的 TensorBoard 程序。在筆記本中工作時,請在開始訓練前啟動檢視器,以便使用 TensorBoard 進行監控。
啟動 TensorBoard 檢視器 (抱歉,這不會顯示在 tensorflow.org 上)
%load_ext tensorboard
%tensorboard --logdir {log_dir}
您可以在 TensorBoard.dev 上檢視本筆記本先前執行的結果。
最後,執行訓練迴圈
fit(train_dataset, test_dataset, steps=40000)
Time taken for 1000 steps: 115.74 sec
Step: 39k
....................................................................................................
2024-03-19 05:33:08.148154: W tensorflow/core/framework/local_rendezvous.cc:404] Local rendezvous is aborting with status: OUT_OF_RANGE: End of sequence
與簡單的分類或迴歸模型相比,在訓練 GAN (或像 pix2pix 這樣的 cGAN) 時,解讀記錄更加微妙。需要注意的事項
- 檢查產生器和判別器模型是否都沒有「獲勝」。如果
gen_gan_loss或disc_loss其中一個變得非常低,則表示此模型正在主導另一個模型,而您並未成功訓練組合模型。 - 值
log(2) = 0.69是這些損失的良好參考點,因為它表示困惑度為 2 - 判別器平均而言,對這兩個選項的確定性相同。 - 對於
disc_loss,低於0.69的值表示判別器在真實圖片和產生圖片的組合集上表現優於隨機。 - 對於
gen_gan_loss,低於0.69的值表示產生器在欺騙判別器方面表現優於隨機。 - 隨著訓練進度,
gen_l1_loss應會下降。
還原最新的檢查點並測試網路
ls {checkpoint_dir}
checkpoint          ckpt-5.data-00000-of-00001
ckpt-1.data-00000-of-00001  ckpt-5.index
ckpt-1.index            ckpt-6.data-00000-of-00001
ckpt-2.data-00000-of-00001  ckpt-6.index
ckpt-2.index            ckpt-7.data-00000-of-00001
ckpt-3.data-00000-of-00001  ckpt-7.index
ckpt-3.index            ckpt-8.data-00000-of-00001
ckpt-4.data-00000-of-00001  ckpt-8.index
ckpt-4.index
# Restoring the latest checkpoint in checkpoint_dir
checkpoint.restore(tf.train.latest_checkpoint(checkpoint_dir))
<tensorflow.python.checkpoint.checkpoint.CheckpointLoadStatus at 0x7f2cec068ee0>
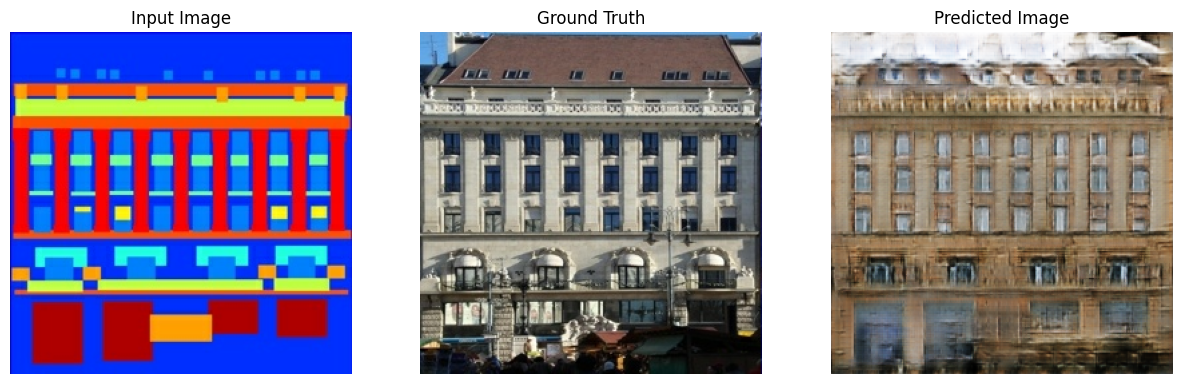
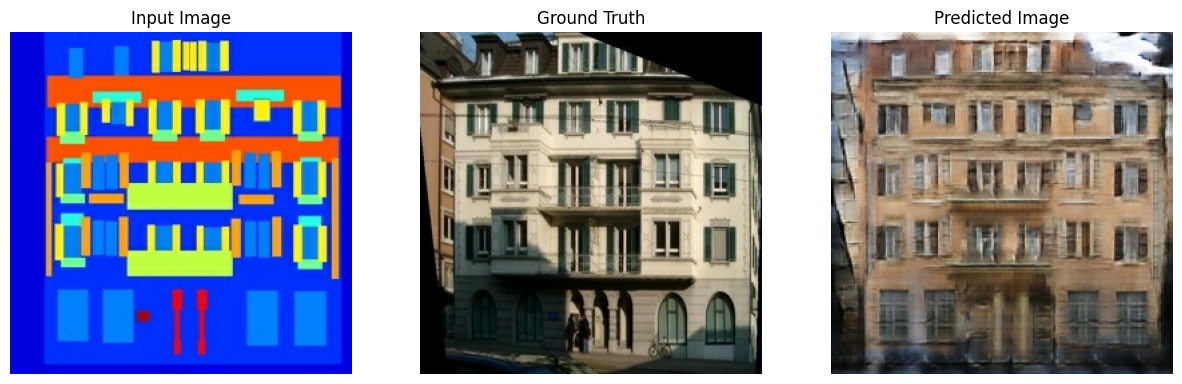
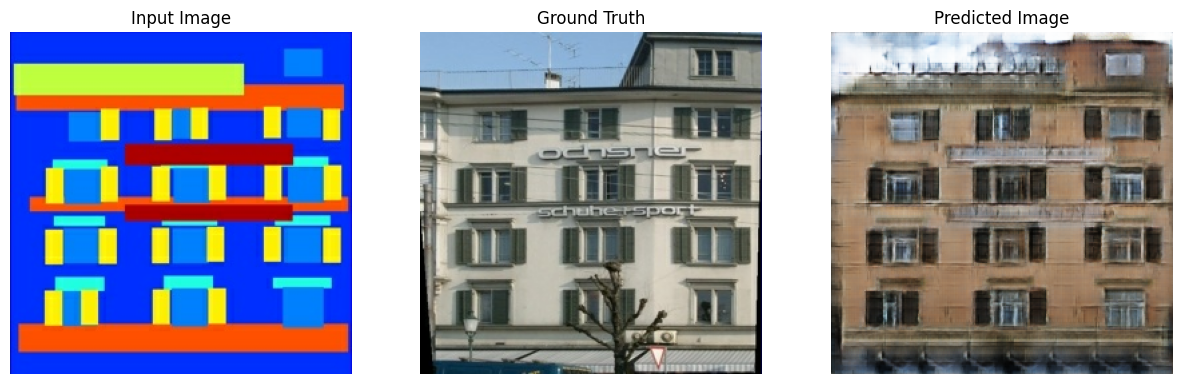
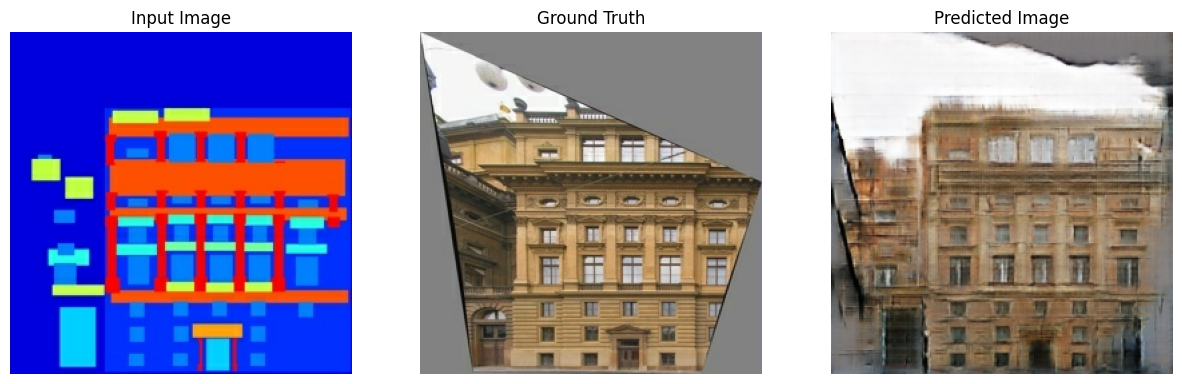
使用測試集產生一些圖片
# Run the trained model on a few examples from the test set
for inp, tar in test_dataset.take(5):
  generate_images(generator, inp, tar)
2024-03-19 05:33:11.669305: W tensorflow/core/framework/local_rendezvous.cc:404] Local rendezvous is aborting with status: OUT_OF_RANGE: End of sequence