
|
|
|
 在 GitHub 上檢視原始碼 在 GitHub 上檢視原始碼
|
|
本教學課程包含 DeepDream 的最簡實作,如 Alexander Mordvintsev 的這篇部落格文章所述。
DeepDream 是一項實驗,旨在視覺化神經網路學習到的模式。就像孩子觀看雲朵並試圖解讀隨機形狀一樣,DeepDream 過度解讀並增強其在圖片中看到的模式。
它的運作方式是將圖片傳遞到網路中,然後計算圖片相對於特定層級啟動的梯度。接著修改圖片以增加這些啟動,進而增強網路看到的模式,並產生如夢似幻的圖片。這個過程被稱為「Inceptionism」(參考 InceptionNet 和電影《全面啟動》)。
讓我們示範如何讓神經網路「作夢」並增強其在圖片中看到的超現實模式。
import tensorflow as tf
2023-11-16 03:41:19.358323: E external/local_xla/xla/stream_executor/cuda/cuda_dnn.cc:9261] Unable to register cuDNN factory: Attempting to register factory for plugin cuDNN when one has already been registered
2023-11-16 03:41:19.358367: E external/local_xla/xla/stream_executor/cuda/cuda_fft.cc:607] Unable to register cuFFT factory: Attempting to register factory for plugin cuFFT when one has already been registered
2023-11-16 03:41:19.359861: E external/local_xla/xla/stream_executor/cuda/cuda_blas.cc:1515] Unable to register cuBLAS factory: Attempting to register factory for plugin cuBLAS when one has already been registered
import numpy as np

import matplotlib as mpl

import IPython.display as display
import PIL.Image
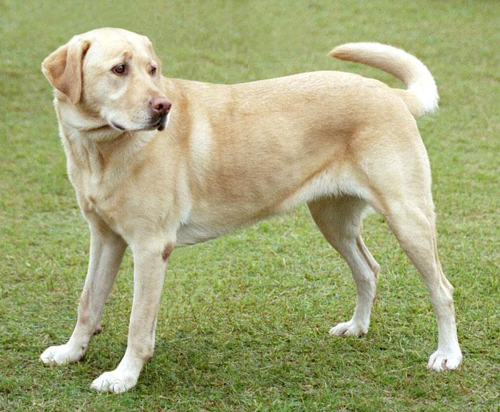
選擇要「夢化」的圖片
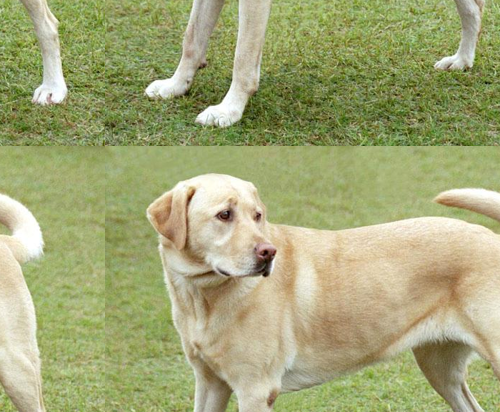
在本教學課程中,我們將使用拉布拉多犬的圖片。
url = 'https://storage.googleapis.com/download.tensorflow.org/example_images/YellowLabradorLooking_new.jpg'
# Download an image and read it into a NumPy array.
def download(url, max_dim=None):
  name = url.split('/')[-1]
  image_path = tf.keras.utils.get_file(name, origin=url)
  img = PIL.Image.open(image_path)
  if max_dim:
    img.thumbnail((max_dim, max_dim))
  return np.array(img)

# Normalize an image
def deprocess(img):
  img = 255*(img + 1.0)/2.0
  return tf.cast(img, tf.uint8)

# Display an image
def show(img):
  display.display(PIL.Image.fromarray(np.array(img)))


# Downsizing the image makes it easier to work with.
original_img = download(url, max_dim=500)
show(original_img)
display.display(display.HTML('Image cc-by: <a "href=https://commons.wikimedia.org/wiki/File:Felis_catus-cat_on_snow.jpg">Von.grzanka</a>'))
準備特徵擷取模型
下載並準備預先訓練的圖片分類模型。您將使用 InceptionV3,它與 DeepDream 中最初使用的模型類似。請注意,任何 預先訓練的模型都適用,但如果您變更模型,則必須調整下方的層級名稱。
base_model = tf.keras.applications.InceptionV3(include_top=False, weights='imagenet')
Downloading data from https://storage.googleapis.com/tensorflow/keras-applications/inception_v3/inception_v3_weights_tf_dim_ordering_tf_kernels_notop.h5
87910968/87910968 [==============================] - 0s 0us/step
DeepDream 的概念是選擇一個或多個層級,並最大化「損失」,使圖片越來越「激發」這些層級。納入的特徵複雜度取決於您選擇的層級,也就是說,較低的層級會產生筆觸或簡單的模式,而較深的層級則會在圖片中產生複雜的特徵,甚至整個物件。
InceptionV3 架構相當龐大(如需模型架構圖,請參閱 TensorFlow 的 研究存放庫)。對於 DeepDream,感興趣的層級是卷積串聯的層級。InceptionV3 中有 11 個這類層級,名稱為 'mixed0' 到 'mixed10'。使用不同的層級會產生不同的如夢似幻圖片。較深的層級會回應較高層級的特徵 (例如眼睛和臉部),而較早的層級則會回應較簡單的特徵 (例如邊緣、形狀和紋理)。您可以隨意試驗下方選取的層級,但請記住,較深的層級 (索引較高的層級) 需要較長的訓練時間,因為梯度計算更深入。
# Maximize the activations of these layers
names = ['mixed3', 'mixed5']
layers = [base_model.get_layer(name).output for name in names]

# Create the feature extraction model
dream_model = tf.keras.Model(inputs=base_model.input, outputs=layers)
計算損失
損失是所選層級中啟動的總和。每個層級都會對損失進行正規化,以便較大層級的貢獻不會超過較小層級。一般來說,損失是您希望透過梯度下降最小化的數量。在 DeepDream 中,您將透過梯度上升最大化此損失。
def calc_loss(img, model):
  # Pass forward the image through the model to retrieve the activations.
  # Converts the image into a batch of size 1.
  img_batch = tf.expand_dims(img, axis=0)
  layer_activations = model(img_batch)
  if len(layer_activations) == 1:
    layer_activations = [layer_activations]

  losses = []
  for act in layer_activations:
    loss = tf.math.reduce_mean(act)
    losses.append(loss)

  return  tf.reduce_sum(losses)
梯度上升
計算出所選層級的損失後,剩下的就是計算相對於圖片的梯度,並將其加到原始圖片中。
將梯度加到圖片中會增強網路看到的模式。在每個步驟中,您都將建立一個圖片,讓該圖片越來越激發網路中特定層級的啟動。
下方執行此操作的方法會包裝在 tf.function 中以提升效能。它使用 input_signature 以確保不會針對不同的圖片大小或 steps/step_size 值重新追蹤函式。詳情請參閱具體函式指南。
class DeepDream(tf.Module):
  def __init__(self, model):
    self.model = model

  @tf.function(
      input_signature=(
        tf.TensorSpec(shape=[None,None,3], dtype=tf.float32),
        tf.TensorSpec(shape=[], dtype=tf.int32),
        tf.TensorSpec(shape=[], dtype=tf.float32),)
  )
  def __call__(self, img, steps, step_size):
      print("Tracing")
      loss = tf.constant(0.0)
      for n in tf.range(steps):
        with tf.GradientTape() as tape:
          # This needs gradients relative to `img`
          # `GradientTape` only watches `tf.Variable`s by default
          tape.watch(img)
          loss = calc_loss(img, self.model)

        # Calculate the gradient of the loss with respect to the pixels of the input image.
        gradients = tape.gradient(loss, img)

        # Normalize the gradients.
        gradients /= tf.math.reduce_std(gradients) + 1e-8

        # In gradient ascent, the "loss" is maximized so that the input image increasingly "excites" the layers.
        # You can update the image by directly adding the gradients (because they're the same shape!)
        img = img + gradients*step_size
        img = tf.clip_by_value(img, -1, 1)

      return loss, img
deepdream = DeepDream(dream_model)
主要迴圈
def run_deep_dream_simple(img, steps=100, step_size=0.01):
  # Convert from uint8 to the range expected by the model.
  img = tf.keras.applications.inception_v3.preprocess_input(img)
  img = tf.convert_to_tensor(img)
  step_size = tf.convert_to_tensor(step_size)
  steps_remaining = steps
  step = 0
  while steps_remaining:
    if steps_remaining>100:
      run_steps = tf.constant(100)
    else:
      run_steps = tf.constant(steps_remaining)
    steps_remaining -= run_steps
    step += run_steps

    loss, img = deepdream(img, run_steps, tf.constant(step_size))

    display.clear_output(wait=True)
    show(deprocess(img))
    print ("Step {}, loss {}".format(step, loss))


  result = deprocess(img)
  display.clear_output(wait=True)
  show(result)

  return result
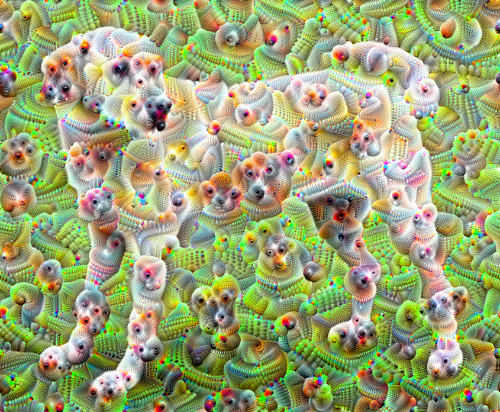
dream_img = run_deep_dream_simple(img=original_img,
                                  steps=100, step_size=0.01)
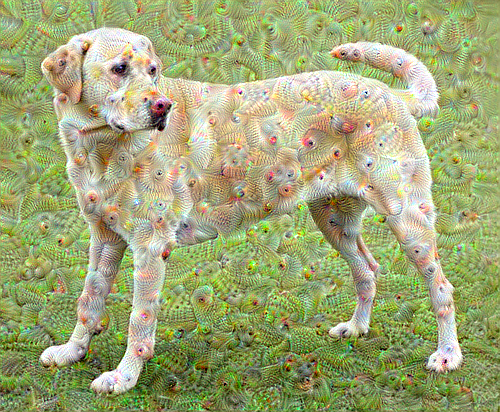
提高一個八度
還不錯,但第一次嘗試有一些問題
- 輸出有雜訊 (這可以使用
tf.image.total_variation損失來解決)。 - 圖片解析度低。
- 模式看起來都以相同的粒度發生。
解決所有這些問題的一種方法是在不同的比例套用梯度上升。這將允許在較小比例產生的模式併入較大比例的模式中,並填入額外的細節。
若要執行此操作,您可以執行先前的梯度上升方法,然後增加圖片的大小 (稱為八度),並針對多個八度重複此過程。
import time
start = time.time()

OCTAVE_SCALE = 1.30

img = tf.constant(np.array(original_img))
base_shape = tf.shape(img)[:-1]
float_base_shape = tf.cast(base_shape, tf.float32)

for n in range(-2, 3):
  new_shape = tf.cast(float_base_shape*(OCTAVE_SCALE**n), tf.int32)

  img = tf.image.resize(img, new_shape).numpy()

  img = run_deep_dream_simple(img=img, steps=50, step_size=0.01)

display.clear_output(wait=True)
img = tf.image.resize(img, base_shape)
img = tf.image.convert_image_dtype(img/255.0, dtype=tf.uint8)
show(img)

end = time.time()
end-start
16.497364282608032
選用:使用圖磚放大
需要考慮的一件事是,隨著圖片大小增加,執行梯度計算所需的時間和記憶體也會增加。上述八度實作不適用於非常大的圖片或許多八度。
為了避免這個問題,您可以將圖片分割成圖磚,並計算每個圖磚的梯度。
在每次圖磚計算之前對圖片套用隨機偏移可防止出現圖磚接縫。
從實作隨機偏移開始
def random_roll(img, maxroll):
  # Randomly shift the image to avoid tiled boundaries.
  shift = tf.random.uniform(shape=[2], minval=-maxroll, maxval=maxroll, dtype=tf.int32)
  img_rolled = tf.roll(img, shift=shift, axis=[0,1])
  return shift, img_rolled
shift, img_rolled = random_roll(np.array(original_img), 512)
show(img_rolled)
以下是先前定義的 deepdream 函式的圖磚等效函式
class TiledGradients(tf.Module):
  def __init__(self, model):
    self.model = model

  @tf.function(
      input_signature=(
        tf.TensorSpec(shape=[None,None,3], dtype=tf.float32),
        tf.TensorSpec(shape=[2], dtype=tf.int32),
        tf.TensorSpec(shape=[], dtype=tf.int32),)
  )
  def __call__(self, img, img_size, tile_size=512):
    shift, img_rolled = random_roll(img, tile_size)

    # Initialize the image gradients to zero.
    gradients = tf.zeros_like(img_rolled)

    # Skip the last tile, unless there's only one tile.
    xs = tf.range(0, img_size[1], tile_size)[:-1]
    if not tf.cast(len(xs), bool):
      xs = tf.constant([0])
    ys = tf.range(0, img_size[0], tile_size)[:-1]
    if not tf.cast(len(ys), bool):
      ys = tf.constant([0])

    for x in xs:
      for y in ys:
        # Calculate the gradients for this tile.
        with tf.GradientTape() as tape:
          # This needs gradients relative to `img_rolled`.
          # `GradientTape` only watches `tf.Variable`s by default.
          tape.watch(img_rolled)

          # Extract a tile out of the image.
          img_tile = img_rolled[y:y+tile_size, x:x+tile_size]
          loss = calc_loss(img_tile, self.model)

        # Update the image gradients for this tile.
        gradients = gradients + tape.gradient(loss, img_rolled)

    # Undo the random shift applied to the image and its gradients.
    gradients = tf.roll(gradients, shift=-shift, axis=[0,1])

    # Normalize the gradients.
    gradients /= tf.math.reduce_std(gradients) + 1e-8

    return gradients
get_tiled_gradients = TiledGradients(dream_model)
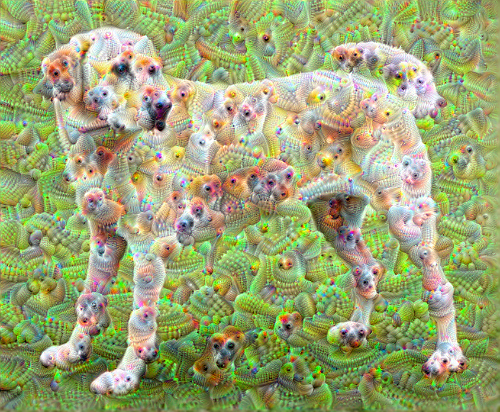
將這些組合在一起即可獲得可擴充、感知八度的 deepdream 實作
def run_deep_dream_with_octaves(img, steps_per_octave=100, step_size=0.01,
                                octaves=range(-2,3), octave_scale=1.3):
  base_shape = tf.shape(img)
  img = tf.keras.utils.img_to_array(img)
  img = tf.keras.applications.inception_v3.preprocess_input(img)

  initial_shape = img.shape[:-1]
  img = tf.image.resize(img, initial_shape)
  for octave in octaves:
    # Scale the image based on the octave
    new_size = tf.cast(tf.convert_to_tensor(base_shape[:-1]), tf.float32)*(octave_scale**octave)
    new_size = tf.cast(new_size, tf.int32)
    img = tf.image.resize(img, new_size)

    for step in range(steps_per_octave):
      gradients = get_tiled_gradients(img, new_size)
      img = img + gradients*step_size
      img = tf.clip_by_value(img, -1, 1)

      if step % 10 == 0:
        display.clear_output(wait=True)
        show(deprocess(img))
        print ("Octave {}, Step {}".format(octave, step))

  result = deprocess(img)
  return result
img = run_deep_dream_with_octaves(img=original_img, step_size=0.01)

display.clear_output(wait=True)
img = tf.image.resize(img, base_shape)
img = tf.image.convert_image_dtype(img/255.0, dtype=tf.uint8)
show(img)
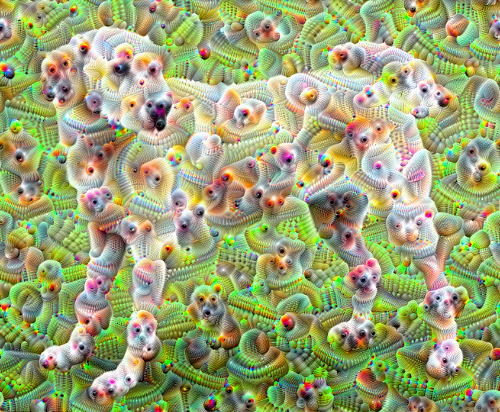
好多了!您可以試驗八度音階數、八度音階比例和啟動的層級,以變更 DeepDream 化的圖片外觀。
讀者可能也會對 TensorFlow Lucid 感興趣,它擴展了本教學課程中介紹的概念,以視覺化和解譯神經網路。