
|
|
|
 在 GitHub 上檢視原始碼 在 GitHub 上檢視原始碼
|
|
這個筆記本示範如何使用條件 GAN 進行非成對圖片到圖片的翻譯,如Unpaired Image-to-Image Translation using Cycle-Consistent Adversarial Networks中所述,又稱為 CycleGAN。本文提出一種方法,可以擷取一個圖片網域的特徵,並找出如何將這些特徵翻譯成另一個圖片網域,所有步驟都在沒有任何成對訓練範例的情況下完成。
這個筆記本假設您已熟悉 Pix2Pix,您可以在 Pix2Pix 教學課程中瞭解相關資訊。CycleGAN 的程式碼與 Pix2Pix 類似,主要差異在於額外的損失函數,以及使用非成對訓練資料。
CycleGAN 使用循環一致性損失,無需成對資料即可進行訓練。換句話說,它可以從一個網域翻譯到另一個網域,而無需來源網域和目標網域之間的一對一對應。
這開啟了執行許多有趣工作的可能性,例如相片增強、圖片色彩化、風格轉換等等。您只需要來源和目標資料集 (只是一個圖片目錄)。
設定輸入管道
安裝 tensorflow_examples 套件,以便匯入產生器和鑑別器。
pip install git+https://github.com/tensorflow/examples.git
import tensorflow as tf
import tensorflow_datasets as tfds
from tensorflow_examples.models.pix2pix import pix2pix

import os
import time
import matplotlib.pyplot as plt
from IPython.display import clear_output

AUTOTUNE = tf.data.AUTOTUNE
輸入管道
本教學課程訓練模型,將馬匹圖片翻譯成斑馬圖片。您可以在這裡找到這個資料集和類似的資料集。
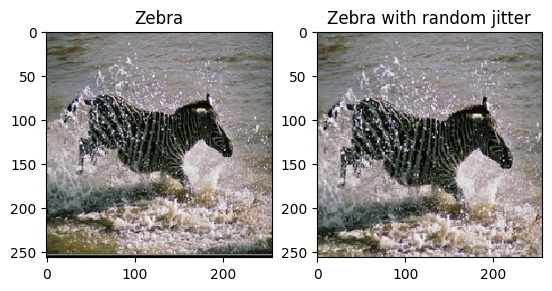
如論文中所述,將隨機抖動和鏡像套用至訓練資料集。這些是一些可避免過度擬合的圖片擴增技術。
這與 pix2pix 中的做法類似
- 在隨機抖動中,圖片會調整大小為
286 x 286,然後隨機裁剪為256 x 256。 - 在隨機鏡像中,圖片會隨機水平翻轉,即從左到右。
dataset, metadata = tfds.load('cycle_gan/horse2zebra',
                              with_info=True, as_supervised=True)

train_horses, train_zebras = dataset['trainA'], dataset['trainB']
test_horses, test_zebras = dataset['testA'], dataset['testB']
BUFFER_SIZE = 1000
BATCH_SIZE = 1
IMG_WIDTH = 256
IMG_HEIGHT = 256
def random_crop(image):
  cropped_image = tf.image.random_crop(
      image, size=[IMG_HEIGHT, IMG_WIDTH, 3])

  return cropped_image
# normalizing the images to [-1, 1]
def normalize(image):
  image = tf.cast(image, tf.float32)
  image = (image / 127.5) - 1
  return image
def random_jitter(image):
  # resizing to 286 x 286 x 3
  image = tf.image.resize(image, [286, 286],
                          method=tf.image.ResizeMethod.NEAREST_NEIGHBOR)

  # randomly cropping to 256 x 256 x 3
  image = random_crop(image)

  # random mirroring
  image = tf.image.random_flip_left_right(image)

  return image
def preprocess_image_train(image, label):
  image = random_jitter(image)
  image = normalize(image)
  return image
def preprocess_image_test(image, label):
  image = normalize(image)
  return image
train_horses = train_horses.cache().map(
    preprocess_image_train, num_parallel_calls=AUTOTUNE).shuffle(
    BUFFER_SIZE).batch(BATCH_SIZE)

train_zebras = train_zebras.cache().map(
    preprocess_image_train, num_parallel_calls=AUTOTUNE).shuffle(
    BUFFER_SIZE).batch(BATCH_SIZE)

test_horses = test_horses.map(
    preprocess_image_test, num_parallel_calls=AUTOTUNE).cache().shuffle(
    BUFFER_SIZE).batch(BATCH_SIZE)

test_zebras = test_zebras.map(
    preprocess_image_test, num_parallel_calls=AUTOTUNE).cache().shuffle(
    BUFFER_SIZE).batch(BATCH_SIZE)
sample_horse = next(iter(train_horses))
sample_zebra = next(iter(train_zebras))
2024-03-19 02:45:59.442295: W tensorflow/core/kernels/data/cache_dataset_ops.cc:858] The calling iterator did not fully read the dataset being cached. In order to avoid unexpected truncation of the dataset, the partially cached contents of the dataset  will be discarded. This can happen if you have an input pipeline similar to `dataset.cache().take(k).repeat()`. You should use `dataset.take(k).cache().repeat()` instead.
2024-03-19 02:46:00.402346: W tensorflow/core/kernels/data/cache_dataset_ops.cc:858] The calling iterator did not fully read the dataset being cached. In order to avoid unexpected truncation of the dataset, the partially cached contents of the dataset  will be discarded. This can happen if you have an input pipeline similar to `dataset.cache().take(k).repeat()`. You should use `dataset.take(k).cache().repeat()` instead.
plt.subplot(121)
plt.title('Horse')
plt.imshow(sample_horse[0] * 0.5 + 0.5)

plt.subplot(122)
plt.title('Horse with random jitter')
plt.imshow(random_jitter(sample_horse[0]) * 0.5 + 0.5)
<matplotlib.image.AxesImage at 0x7fae57fed8b0>

plt.subplot(121)
plt.title('Zebra')
plt.imshow(sample_zebra[0] * 0.5 + 0.5)

plt.subplot(122)
plt.title('Zebra with random jitter')
plt.imshow(random_jitter(sample_zebra[0]) * 0.5 + 0.5)
<matplotlib.image.AxesImage at 0x7fae401c0ac0>
匯入並重複使用 Pix2Pix 模型
透過已安裝的 tensorflow_examples 套件,匯入 Pix2Pix 中使用的產生器和鑑別器。
本教學課程中使用的模型架構與 pix2pix 中使用的架構非常相似。部分差異如下:
- CycleGAN 使用執行個體正規化,而非批次正規化。
- CycleGAN 論文使用修改後的
resnet型產生器。本教學課程基於簡化的考量,使用修改後的unet產生器。
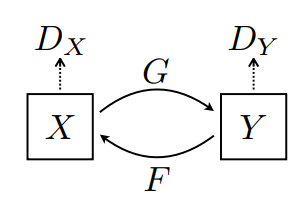
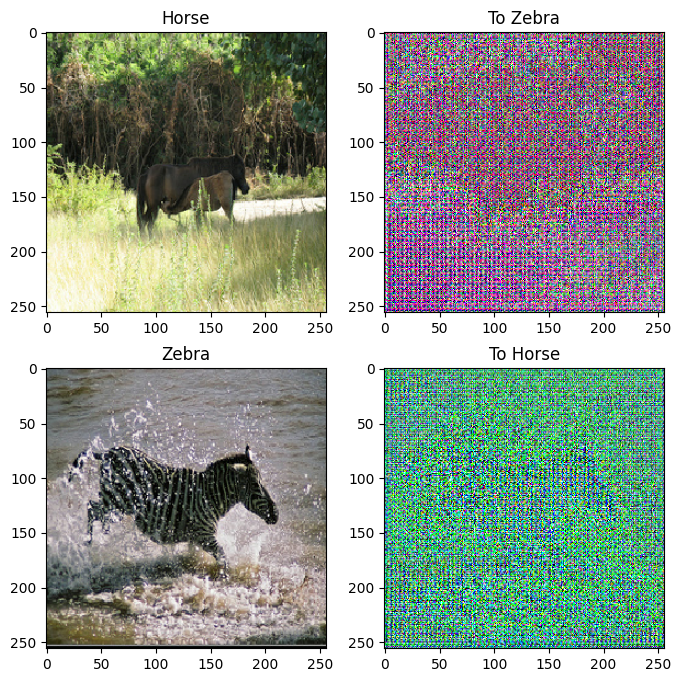
這裡訓練了 2 個產生器 (G 和 F) 和 2 個鑑別器 (X 和 Y)。
- 產生器
G學習將圖片X轉換為圖片Y。 \((G: X -> Y)\) - 產生器
F學習將圖片Y轉換為圖片X。 \((F: Y -> X)\) - 鑑別器
D_X學習區分圖片X和產生的圖片X(F(Y))。 - 鑑別器
D_Y學習區分圖片Y和產生的圖片Y(G(X))。
OUTPUT_CHANNELS = 3

generator_g = pix2pix.unet_generator(OUTPUT_CHANNELS, norm_type='instancenorm')
generator_f = pix2pix.unet_generator(OUTPUT_CHANNELS, norm_type='instancenorm')

discriminator_x = pix2pix.discriminator(norm_type='instancenorm', target=False)
discriminator_y = pix2pix.discriminator(norm_type='instancenorm', target=False)
to_zebra = generator_g(sample_horse)
to_horse = generator_f(sample_zebra)
plt.figure(figsize=(8, 8))
contrast = 8

imgs = [sample_horse, to_zebra, sample_zebra, to_horse]
title = ['Horse', 'To Zebra', 'Zebra', 'To Horse']

for i in range(len(imgs)):
  plt.subplot(2, 2, i+1)
  plt.title(title[i])
  if i % 2 == 0:
    plt.imshow(imgs[i][0] * 0.5 + 0.5)
  else:
    plt.imshow(imgs[i][0] * 0.5 * contrast + 0.5)
plt.show()
WARNING:matplotlib.image:Clipping input data to the valid range for imshow with RGB data ([0..1] for floats or [0..255] for integers).
WARNING:matplotlib.image:Clipping input data to the valid range for imshow with RGB data ([0..1] for floats or [0..255] for integers).
plt.figure(figsize=(8, 8))

plt.subplot(121)
plt.title('Is a real zebra?')
plt.imshow(discriminator_y(sample_zebra)[0, ..., -1], cmap='RdBu_r')

plt.subplot(122)
plt.title('Is a real horse?')
plt.imshow(discriminator_x(sample_horse)[0, ..., -1], cmap='RdBu_r')

plt.show()

損失函數
在 CycleGAN 中,沒有成對資料可供訓練,因此無法保證輸入 x 和目標 y 配對在訓練期間有意義。因此,為了強制網路學習正確的對應,作者提出了循環一致性損失。
鑑別器損失和產生器損失與 pix2pix 中使用的損失類似。
LAMBDA = 10
loss_obj = tf.keras.losses.BinaryCrossentropy(from_logits=True)
def discriminator_loss(real, generated):
  real_loss = loss_obj(tf.ones_like(real), real)

  generated_loss = loss_obj(tf.zeros_like(generated), generated)

  total_disc_loss = real_loss + generated_loss

  return total_disc_loss * 0.5
def generator_loss(generated):
  return loss_obj(tf.ones_like(generated), generated)
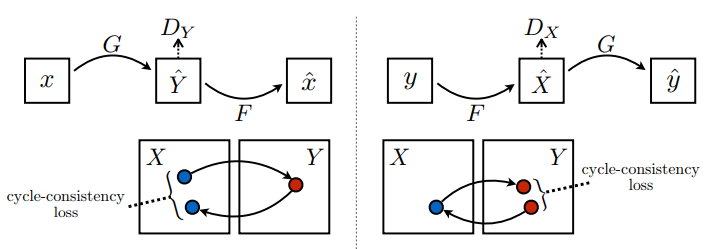
循環一致性表示結果應接近原始輸入。例如,如果將句子從英文翻譯成法文,然後再從法文翻譯回英文,則結果句子應與原始句子相同。
在循環一致性損失中,
- 圖片 \(X\) 透過產生器 \(G\) 傳遞,產生圖片 \(\hat{Y}\)。
- 產生的圖片 \(\hat{Y}\) 透過產生器 \(F\) 傳遞,產生循環圖片 \(\hat{X}\)。
- 在 \(X\) 和 \(\hat{X}\) 之間計算平均絕對誤差。
\[forward\ cycle\ consistency\ loss: X -> G(X) -> F(G(X)) \sim \hat{X}\]
\[backward\ cycle\ consistency\ loss: Y -> F(Y) -> G(F(Y)) \sim \hat{Y}\]
def calc_cycle_loss(real_image, cycled_image):
  loss1 = tf.reduce_mean(tf.abs(real_image - cycled_image))

  return LAMBDA * loss1
如上所示,產生器 \(G\) 負責將圖片 \(X\) 翻譯成圖片 \(Y\)。身分損失表示,如果您將圖片 \(Y\) 饋送至產生器 \(G\),則應產生真實圖片 \(Y\) 或接近圖片 \(Y\) 的內容。
如果您在馬匹上執行斑馬到馬匹模型,或在斑馬上執行馬匹到斑馬模型,則不應大幅修改圖片,因為圖片已包含目標類別。
\[Identity\ loss = |G(Y) - Y| + |F(X) - X|\]
def identity_loss(real_image, same_image):
  loss = tf.reduce_mean(tf.abs(real_image - same_image))
  return LAMBDA * 0.5 * loss
初始化所有產生器和鑑別器的最佳化工具。
generator_g_optimizer = tf.keras.optimizers.Adam(2e-4, beta_1=0.5)
generator_f_optimizer = tf.keras.optimizers.Adam(2e-4, beta_1=0.5)

discriminator_x_optimizer = tf.keras.optimizers.Adam(2e-4, beta_1=0.5)
discriminator_y_optimizer = tf.keras.optimizers.Adam(2e-4, beta_1=0.5)
檢查點
checkpoint_path = "./checkpoints/train"

ckpt = tf.train.Checkpoint(generator_g=generator_g,
                           generator_f=generator_f,
                           discriminator_x=discriminator_x,
                           discriminator_y=discriminator_y,
                           generator_g_optimizer=generator_g_optimizer,
                           generator_f_optimizer=generator_f_optimizer,
                           discriminator_x_optimizer=discriminator_x_optimizer,
                           discriminator_y_optimizer=discriminator_y_optimizer)

ckpt_manager = tf.train.CheckpointManager(ckpt, checkpoint_path, max_to_keep=5)

# if a checkpoint exists, restore the latest checkpoint.
if ckpt_manager.latest_checkpoint:
  ckpt.restore(ckpt_manager.latest_checkpoint)
  print ('Latest checkpoint restored!!')
訓練
EPOCHS = 10
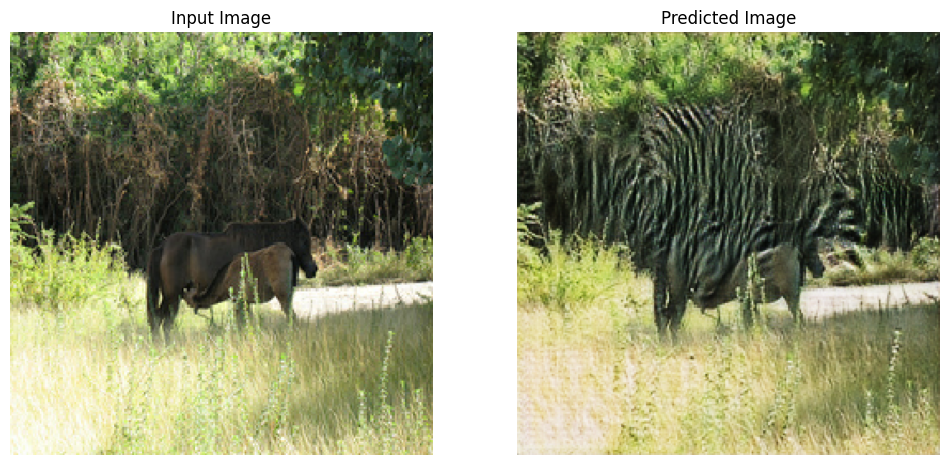
def generate_images(model, test_input):
  prediction = model(test_input)

  plt.figure(figsize=(12, 12))

  display_list = [test_input[0], prediction[0]]
  title = ['Input Image', 'Predicted Image']

  for i in range(2):
    plt.subplot(1, 2, i+1)
    plt.title(title[i])
    # getting the pixel values between [0, 1] to plot it.
    plt.imshow(display_list[i] * 0.5 + 0.5)
    plt.axis('off')
  plt.show()
即使訓練迴圈看起來很複雜,但它包含四個基本步驟:
- 取得預測。
- 計算損失。
- 使用反向傳播計算梯度。
- 將梯度套用至最佳化工具。
@tf.function
def train_step(real_x, real_y):
  # persistent is set to True because the tape is used more than
  # once to calculate the gradients.
  with tf.GradientTape(persistent=True) as tape:
    # Generator G translates X -> Y
    # Generator F translates Y -> X.

    fake_y = generator_g(real_x, training=True)
    cycled_x = generator_f(fake_y, training=True)

    fake_x = generator_f(real_y, training=True)
    cycled_y = generator_g(fake_x, training=True)

    # same_x and same_y are used for identity loss.
    same_x = generator_f(real_x, training=True)
    same_y = generator_g(real_y, training=True)

    disc_real_x = discriminator_x(real_x, training=True)
    disc_real_y = discriminator_y(real_y, training=True)

    disc_fake_x = discriminator_x(fake_x, training=True)
    disc_fake_y = discriminator_y(fake_y, training=True)

    # calculate the loss
    gen_g_loss = generator_loss(disc_fake_y)
    gen_f_loss = generator_loss(disc_fake_x)

    total_cycle_loss = calc_cycle_loss(real_x, cycled_x) + calc_cycle_loss(real_y, cycled_y)

    # Total generator loss = adversarial loss + cycle loss
    total_gen_g_loss = gen_g_loss + total_cycle_loss + identity_loss(real_y, same_y)
    total_gen_f_loss = gen_f_loss + total_cycle_loss + identity_loss(real_x, same_x)

    disc_x_loss = discriminator_loss(disc_real_x, disc_fake_x)
    disc_y_loss = discriminator_loss(disc_real_y, disc_fake_y)

  # Calculate the gradients for generator and discriminator
  generator_g_gradients = tape.gradient(total_gen_g_loss,
                                        generator_g.trainable_variables)
  generator_f_gradients = tape.gradient(total_gen_f_loss,
                                        generator_f.trainable_variables)

  discriminator_x_gradients = tape.gradient(disc_x_loss,
                                            discriminator_x.trainable_variables)
  discriminator_y_gradients = tape.gradient(disc_y_loss,
                                            discriminator_y.trainable_variables)

  # Apply the gradients to the optimizer
  generator_g_optimizer.apply_gradients(zip(generator_g_gradients,
                                            generator_g.trainable_variables))

  generator_f_optimizer.apply_gradients(zip(generator_f_gradients,
                                            generator_f.trainable_variables))

  discriminator_x_optimizer.apply_gradients(zip(discriminator_x_gradients,
                                                discriminator_x.trainable_variables))

  discriminator_y_optimizer.apply_gradients(zip(discriminator_y_gradients,
                                                discriminator_y.trainable_variables))
for epoch in range(EPOCHS):
  start = time.time()

  n = 0
  for image_x, image_y in tf.data.Dataset.zip((train_horses, train_zebras)):
    train_step(image_x, image_y)
    if n % 10 == 0:
      print ('.', end='')
    n += 1

  clear_output(wait=True)
  # Using a consistent image (sample_horse) so that the progress of the model
  # is clearly visible.
  generate_images(generator_g, sample_horse)

  if (epoch + 1) % 5 == 0:
    ckpt_save_path = ckpt_manager.save()
    print ('Saving checkpoint for epoch {} at {}'.format(epoch+1,
                                                         ckpt_save_path))

  print ('Time taken for epoch {} is {} sec\n'.format(epoch + 1,
                                                      time.time()-start))
Saving checkpoint for epoch 10 at ./checkpoints/train/ckpt-2
Time taken for epoch 10 is 521.8745064735413 sec
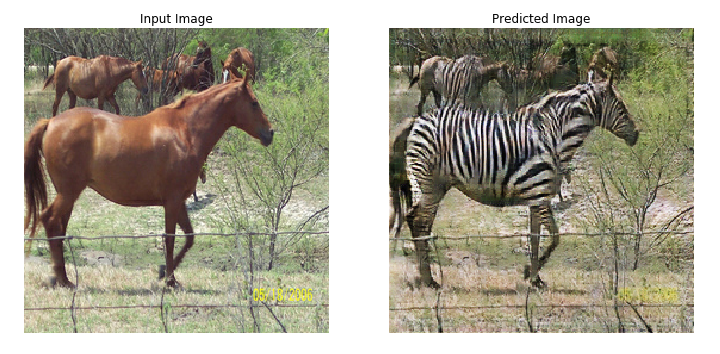
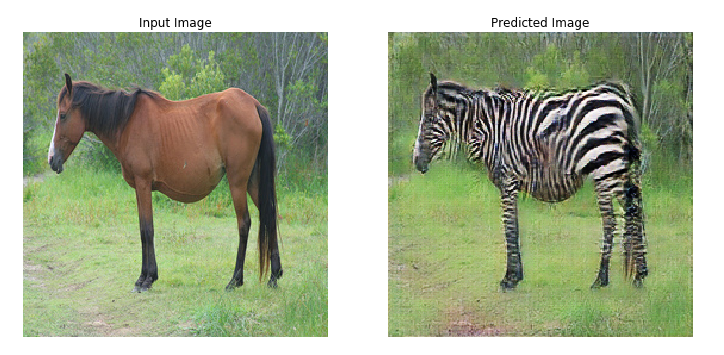
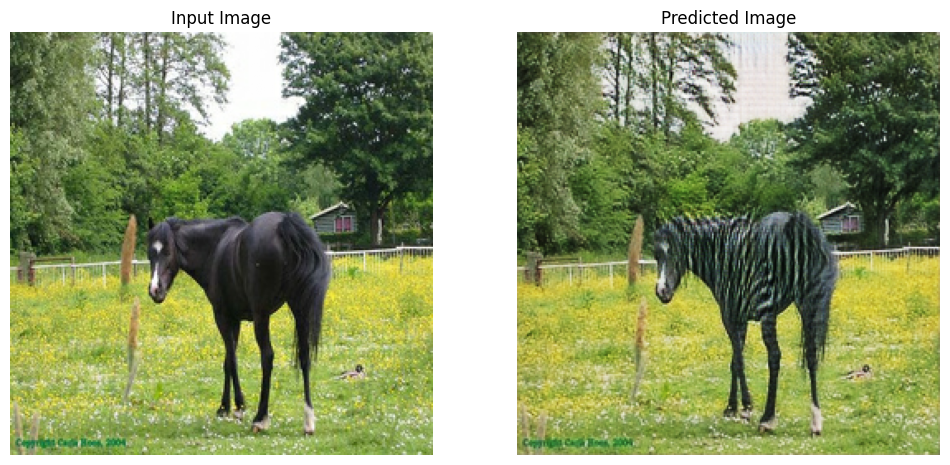
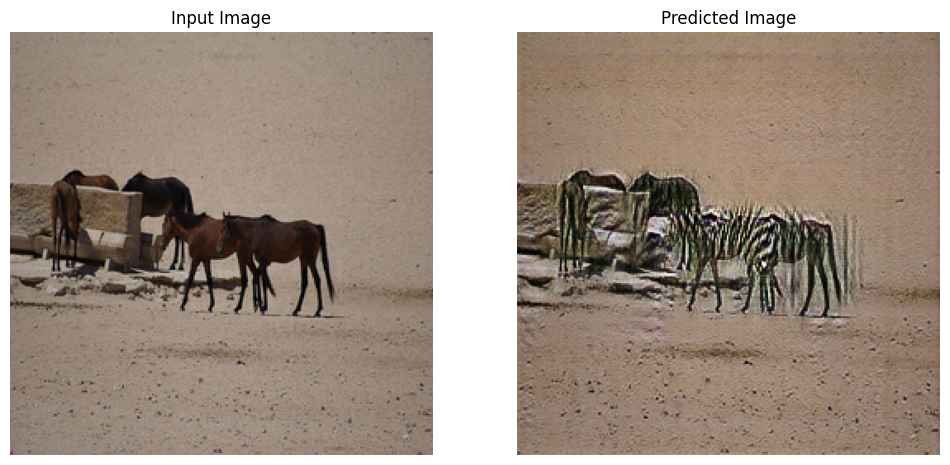
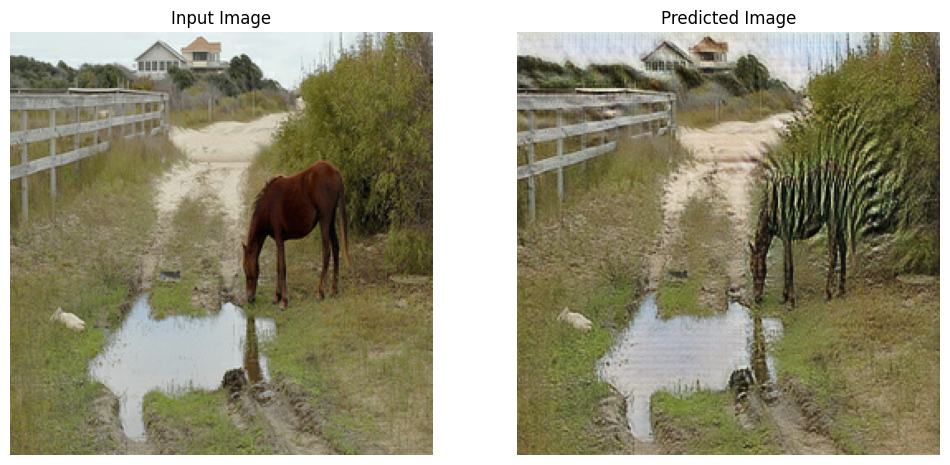
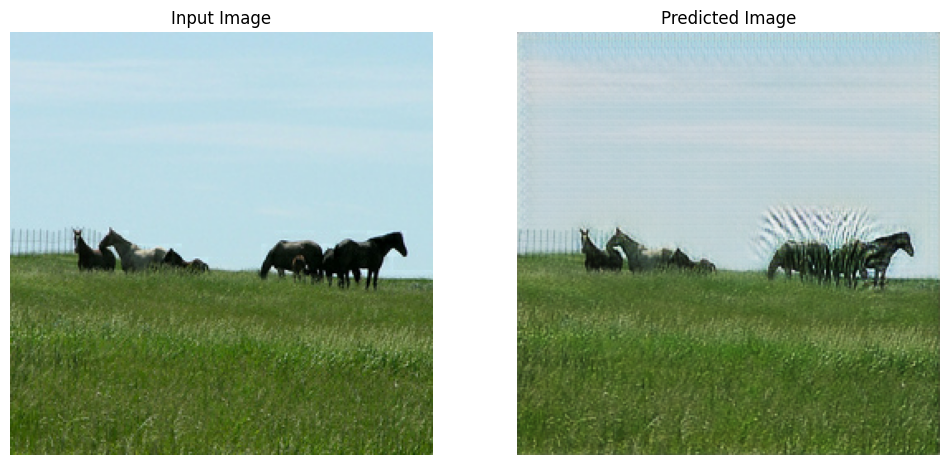
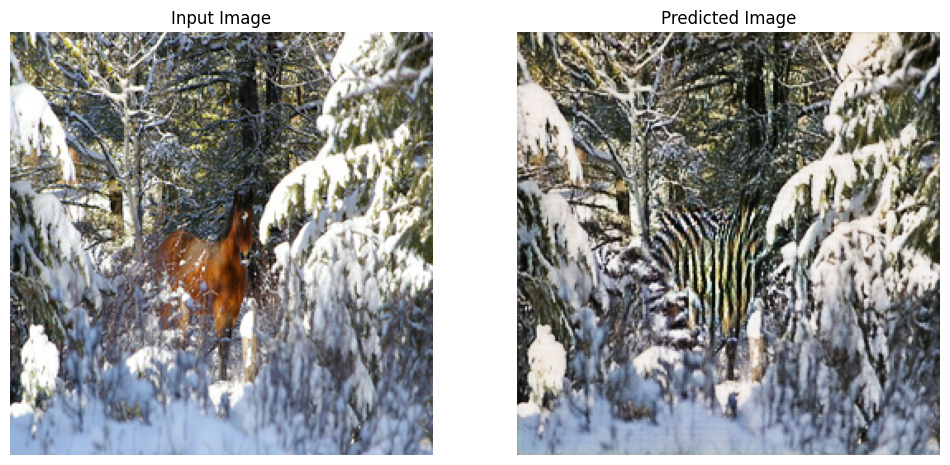
使用測試資料集產生
# Run the trained model on the test dataset
for inp in test_horses.take(5):
  generate_images(generator_g, inp)
2024-03-19 04:13:15.372734: W tensorflow/core/framework/local_rendezvous.cc:404] Local rendezvous is aborting with status: OUT_OF_RANGE: End of sequence
後續步驟
本教學課程說明如何從 Pix2Pix 教學課程中實作的產生器和鑑別器開始,實作 CycleGAN。接下來,您可以嘗試使用 TensorFlow Datasets 中的其他資料集。
您也可以訓練更多週期來改善結果,或者您可以實作論文中使用的修改後 ResNet 產生器,而非此處使用的 U-Net 產生器。