
|
|
|
 在 GitHub 上檢視原始碼 在 GitHub 上檢視原始碼
|
|
本教學課程使用快速梯度符號法 (FGSM) 攻擊來建立對抗範例,如 Goodfellow等人在Explaining and Harnessing Adversarial Examples中所述。這是最初且最受歡迎的欺騙神經網路的攻擊之一。
什麼是對抗範例?
對抗範例是專門建立的輸入,目的是混淆神經網路,導致給定輸入的錯誤分類。這些惡名昭彰的輸入與人眼難以區分,但會導致網路無法識別圖片的內容。此類攻擊有多種類型,但是,此處的重點是快速梯度符號法攻擊,這是一種白箱攻擊,其目標是確保錯誤分類。白箱攻擊是指攻擊者可以完全存取被攻擊的模型。下面顯示的最著名的對抗圖片範例之一取自上述論文。
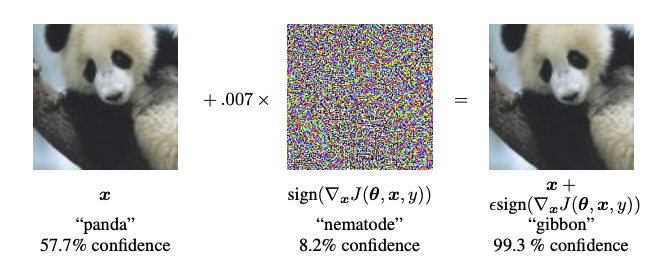
在此範例中,從熊貓的圖片開始,攻擊者會對原始圖片新增小的擾動 (失真),這會導致模型將此圖片標記為長臂猿,並具有高度信心。新增這些擾動的過程如下所述。
快速梯度符號法
快速梯度符號法透過使用神經網路的梯度來建立對抗範例。對於輸入圖片,該方法使用損失相對於輸入圖片的梯度來建立新的圖片,以最大化損失。此新圖片稱為對抗圖片。這可以使用以下運算式來概括
\[adv\_x = x + \epsilon*\text{sign}(\nabla_xJ(\theta, x, y))\]
其中
- adv_x:對抗圖片。
- x:原始輸入圖片。
- y:原始輸入標籤。
- \(\epsilon\):確保擾動很小的乘數。
- \(\theta\):模型參數。
- \(J\):損失。
這裡一個有趣的屬性是,梯度是相對於輸入圖片取得的。這樣做是因為目標是建立一個最大化損失的圖片。實現此目標的一種方法是找出圖片中每個像素對損失值的貢獻程度,並相應地新增擾動。這項工作的速度非常快,因為透過使用鏈式法則並找到所需的梯度,很容易找到每個輸入像素對損失的貢獻。因此,梯度是相對於圖片取得的。此外,由於模型不再接受訓練 (因此梯度不是相對於可訓練變數取得的,即可訓練模型參數),因此模型參數保持不變。唯一目標是欺騙已經訓練好的模型。
因此,讓我們嘗試欺騙預先訓練的模型。在本教學課程中,模型是 MobileNetV2 模型,在 ImageNet 上預先訓練。
import tensorflow as tf
import matplotlib as mpl
import matplotlib.pyplot as plt

mpl.rcParams['figure.figsize'] = (8, 8)
mpl.rcParams['axes.grid'] = False
2023-11-16 03:39:24.939379: E external/local_xla/xla/stream_executor/cuda/cuda_dnn.cc:9261] Unable to register cuDNN factory: Attempting to register factory for plugin cuDNN when one has already been registered
2023-11-16 03:39:24.939428: E external/local_xla/xla/stream_executor/cuda/cuda_fft.cc:607] Unable to register cuFFT factory: Attempting to register factory for plugin cuFFT when one has already been registered
2023-11-16 03:39:24.941090: E external/local_xla/xla/stream_executor/cuda/cuda_blas.cc:1515] Unable to register cuBLAS factory: Attempting to register factory for plugin cuBLAS when one has already been registered
讓我們載入預先訓練的 MobileNetV2 模型和 ImageNet 類別名稱。
pretrained_model = tf.keras.applications.MobileNetV2(include_top=True,
                                                     weights='imagenet')
pretrained_model.trainable = False

# ImageNet labels
decode_predictions = tf.keras.applications.mobilenet_v2.decode_predictions
Downloading data from https://storage.googleapis.com/tensorflow/keras-applications/mobilenet_v2/mobilenet_v2_weights_tf_dim_ordering_tf_kernels_1.0_224.h5
14536120/14536120 [==============================] - 0s 0us/step
# Helper function to preprocess the image so that it can be inputted in MobileNetV2
def preprocess(image):
  image = tf.cast(image, tf.float32)
  image = tf.image.resize(image, (224, 224))
  image = tf.keras.applications.mobilenet_v2.preprocess_input(image)
  image = image[None, ...]
  return image

# Helper function to extract labels from probability vector
def get_imagenet_label(probs):
  return decode_predictions(probs, top=1)[0][0]
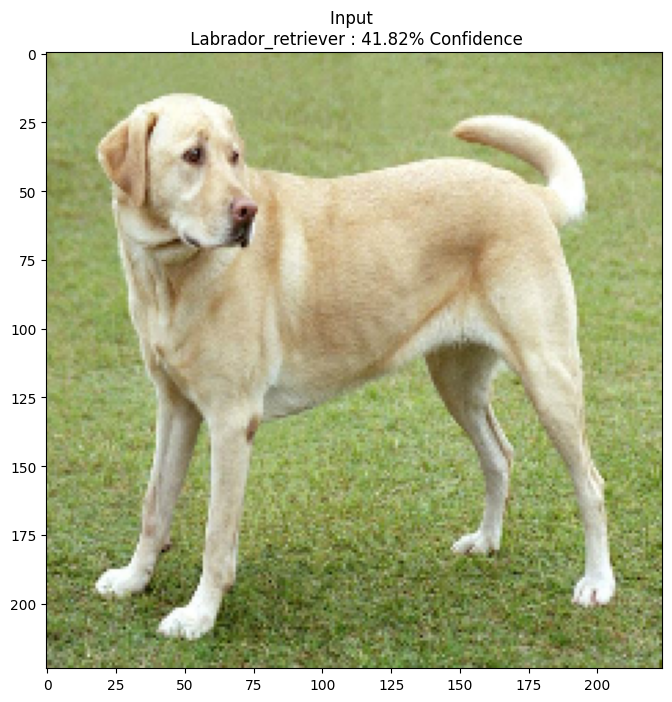
原始圖片
讓我們使用 Mirko 提供的 拉布拉多犬 範例圖片 (採用 CC-BY-SA 3.0 授權條款,來自維基媒體共享資源),並從中建立對抗範例。第一步是預先處理它,以便可以將其作為輸入饋送到 MobileNetV2 模型。
image_path = tf.keras.utils.get_file('YellowLabradorLooking_new.jpg', 'https://storage.googleapis.com/download.tensorflow.org/example_images/YellowLabradorLooking_new.jpg')
image_raw = tf.io.read_file(image_path)
image = tf.image.decode_image(image_raw)

image = preprocess(image)
image_probs = pretrained_model.predict(image)
1/1 [==============================] - 2s 2s/step
讓我們看看圖片。
plt.figure()
plt.imshow(image[0] * 0.5 + 0.5)  # To change [-1, 1] to [0,1]
_, image_class, class_confidence = get_imagenet_label(image_probs)
plt.title('{} : {:.2f}% Confidence'.format(image_class, class_confidence*100))
plt.show()

建立對抗圖片
實作快速梯度符號法
第一步是建立擾動,這些擾動將用於扭曲原始圖片,從而產生對抗圖片。如前所述,對於此任務,梯度是相對於圖片取得的。
loss_object = tf.keras.losses.CategoricalCrossentropy()

def create_adversarial_pattern(input_image, input_label):
  with tf.GradientTape() as tape:
    tape.watch(input_image)
    prediction = pretrained_model(input_image)
    loss = loss_object(input_label, prediction)

  # Get the gradients of the loss w.r.t to the input image.
  gradient = tape.gradient(loss, input_image)
  # Get the sign of the gradients to create the perturbation
  signed_grad = tf.sign(gradient)
  return signed_grad
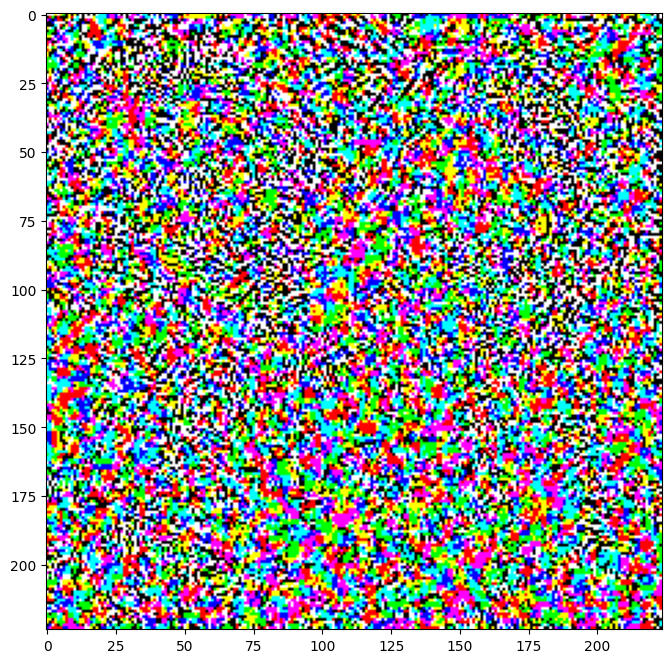
產生的擾動也可以視覺化。
# Get the input label of the image.
labrador_retriever_index = 208
label = tf.one_hot(labrador_retriever_index, image_probs.shape[-1])
label = tf.reshape(label, (1, image_probs.shape[-1]))

perturbations = create_adversarial_pattern(image, label)
plt.imshow(perturbations[0] * 0.5 + 0.5);  # To change [-1, 1] to [0,1]
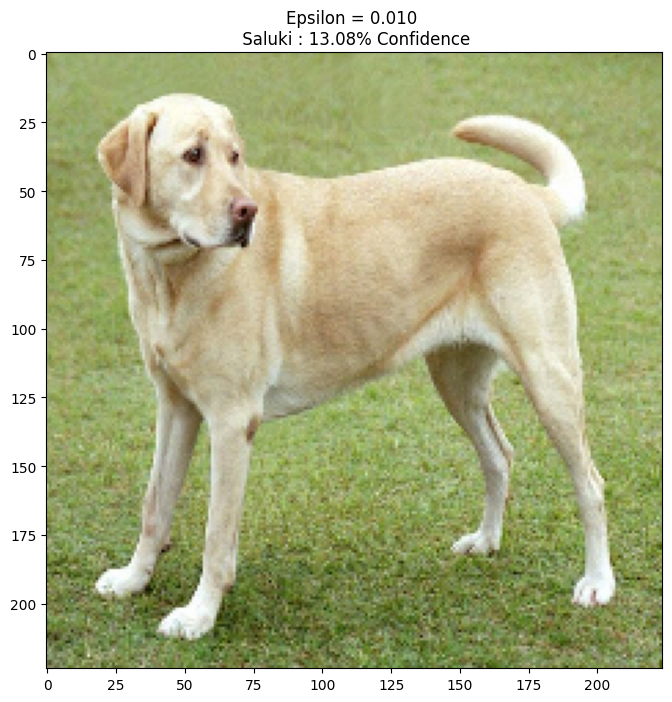
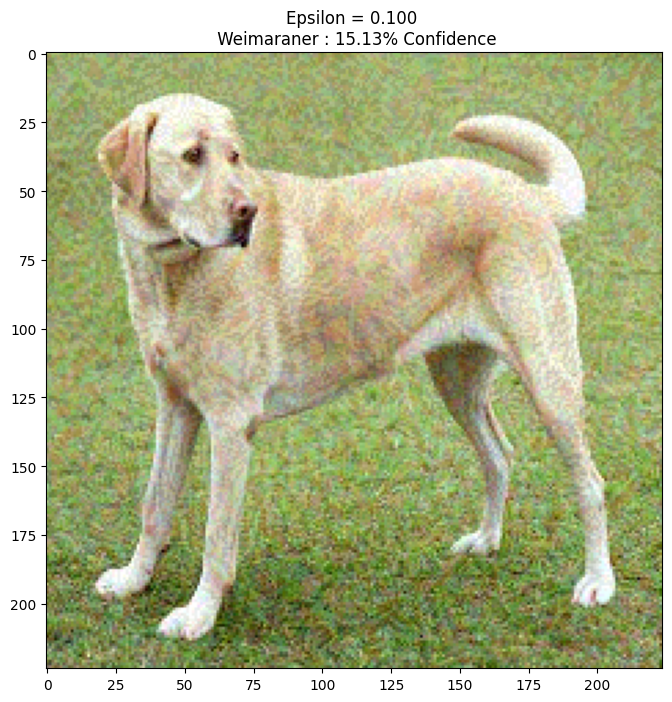
讓我們針對不同的 epsilon 值試試看,並觀察產生的圖片。您會注意到,隨著 epsilon 值的增加,欺騙網路變得更容易。但是,這是一種權衡,會導致擾動變得更容易識別。
def display_images(image, description):
  _, label, confidence = get_imagenet_label(pretrained_model.predict(image))
  plt.figure()
  plt.imshow(image[0]*0.5+0.5)
  plt.title('{} \n {} : {:.2f}% Confidence'.format(description,
                                                   label, confidence*100))
  plt.show()
epsilons = [0, 0.01, 0.1, 0.15]
descriptions = [('Epsilon = {:0.3f}'.format(eps) if eps else 'Input')
                for eps in epsilons]

for i, eps in enumerate(epsilons):
  adv_x = image + eps*perturbations
  adv_x = tf.clip_by_value(adv_x, -1, 1)
  display_images(adv_x, descriptions[i])
1/1 [==============================] - 0s 46ms/step
1/1 [==============================] - 0s 45ms/step
1/1 [==============================] - 0s 45ms/step
1/1 [==============================] - 0s 46ms/step

後續步驟
現在您已經了解了對抗攻擊,請在不同的資料集和不同的架構上嘗試一下。您也可以建立和訓練自己的模型,然後嘗試使用相同的方法來欺騙它。您也可以嘗試查看預測的信賴度如何隨著 epsilon 的變化而變化。
儘管本教學課程中展示的攻擊功能強大,但它只是對抗攻擊研究的開始,從那時起,有多篇論文創造了更強大的攻擊。除了對抗攻擊之外,研究還促成了防禦的創建,其目的是創建穩健的機器學習模型。您可以查看這篇 調查論文,以獲取對抗攻擊和防禦的完整清單。
對於更多對抗攻擊和防禦的實作,您可能想查看對抗範例程式庫 CleverHans。