
|
|
|
 在 GitHub 上檢視 在 GitHub 上檢視
|
|
|
YAMNet 是一個預先訓練的深度神經網路,可以預測來自 521 個類別的音訊事件,例如笑聲、狗吠聲或警笛聲。
在本教學課程中,您將學習如何:
- 載入和使用 YAMNet 模型進行推論。
- 使用 YAMNet 嵌入建構新模型,以分類貓和狗的聲音。
- 評估和匯出您的模型。
匯入 TensorFlow 和其他函式庫
首先安裝 TensorFlow I/O,這將讓您更輕鬆地從磁碟載入音訊檔案。
pip install -q "tensorflow==2.11.*"# tensorflow_io 0.28 is compatible with TensorFlow 2.11pip install -q "tensorflow_io==0.28.*"
import os

from IPython import display
import matplotlib.pyplot as plt
import numpy as np
import pandas as pd

import tensorflow as tf
import tensorflow_hub as hub
import tensorflow_io as tfio
2024-07-13 06:10:49.836959: W tensorflow/compiler/xla/stream_executor/platform/default/dso_loader.cc:64] Could not load dynamic library 'libcudart.so.11.0'; dlerror: libcudart.so.11.0: cannot open shared object file: No such file or directory
2024-07-13 06:10:50.499328: W tensorflow/compiler/xla/stream_executor/platform/default/dso_loader.cc:64] Could not load dynamic library 'libnvinfer.so.7'; dlerror: libnvinfer.so.7: cannot open shared object file: No such file or directory
2024-07-13 06:10:50.499422: W tensorflow/compiler/xla/stream_executor/platform/default/dso_loader.cc:64] Could not load dynamic library 'libnvinfer_plugin.so.7'; dlerror: libnvinfer_plugin.so.7: cannot open shared object file: No such file or directory
2024-07-13 06:10:50.499432: W tensorflow/compiler/tf2tensorrt/utils/py_utils.cc:38] TF-TRT Warning: Cannot dlopen some TensorRT libraries. If you would like to use Nvidia GPU with TensorRT, please make sure the missing libraries mentioned above are installed properly.
關於 YAMNet
YAMNet 是一個預先訓練的神經網路,採用 MobileNetV1 深度可分離卷積架構。它可以使用音訊波形作為輸入,並針對 AudioSet 語料庫中的 521 個音訊事件中的每一個事件進行獨立預測。
在內部,模型會從音訊訊號中擷取「影格」,並處理這些影格的批次。此版本的模型使用 0.96 秒長的影格,並每隔 0.48 秒擷取一個影格。
模型接受 1-D float32 張量或 NumPy 陣列,其中包含任意長度的波形,表示為範圍 [-1.0, +1.0] 內的單聲道 (單聲道) 16 kHz 樣本。本教學課程包含程式碼,可協助您將 WAV 檔案轉換為支援的格式。
模型會傳回 3 個輸出,包括類別分數、嵌入 (您將用於遷移學習) 和對數梅爾頻譜圖。您可以在此處找到更多詳細資訊。
YAMNet 的一種特定用途是作為高階特徵擷取器 - 1,024 維嵌入輸出。您將使用基本 (YAMNet) 模型的輸入特徵,並將其饋送到您較淺的模型中,該模型由一個隱藏的 tf.keras.layers.Dense 層組成。然後,您將在少量資料上訓練網路,以進行音訊分類,而無需大量標記資料和端對端訓練。(這類似於使用 TensorFlow Hub 進行圖像分類的遷移學習,以取得更多資訊。)
首先,您將測試模型並查看分類音訊的結果。然後,您將建構資料預處理管線。
從 TensorFlow Hub 載入 YAMNet
您將使用來自 Tensorflow Hub 的預先訓練 YAMNet,從聲音檔案中擷取嵌入。
從 TensorFlow Hub 載入模型很簡單:選擇模型、複製其 URL,然後使用 load 函數。
yamnet_model_handle = 'https://tfhub.dev/google/yamnet/1'
yamnet_model = hub.load(yamnet_model_handle)
2024-07-13 06:10:52.598675: W tensorflow/compiler/xla/stream_executor/platform/default/dso_loader.cc:64] Could not load dynamic library 'libcudart.so.11.0'; dlerror: libcudart.so.11.0: cannot open shared object file: No such file or directory
2024-07-13 06:10:52.598775: W tensorflow/compiler/xla/stream_executor/platform/default/dso_loader.cc:64] Could not load dynamic library 'libcublas.so.11'; dlerror: libcublas.so.11: cannot open shared object file: No such file or directory
2024-07-13 06:10:52.598838: W tensorflow/compiler/xla/stream_executor/platform/default/dso_loader.cc:64] Could not load dynamic library 'libcublasLt.so.11'; dlerror: libcublasLt.so.11: cannot open shared object file: No such file or directory
2024-07-13 06:10:52.598897: W tensorflow/compiler/xla/stream_executor/platform/default/dso_loader.cc:64] Could not load dynamic library 'libcufft.so.10'; dlerror: libcufft.so.10: cannot open shared object file: No such file or directory
2024-07-13 06:10:52.655465: W tensorflow/compiler/xla/stream_executor/platform/default/dso_loader.cc:64] Could not load dynamic library 'libcusparse.so.11'; dlerror: libcusparse.so.11: cannot open shared object file: No such file or directory
2024-07-13 06:10:52.655667: W tensorflow/core/common_runtime/gpu/gpu_device.cc:1934] Cannot dlopen some GPU libraries. Please make sure the missing libraries mentioned above are installed properly if you would like to use GPU. Follow the guide at https://tensorflow.dev.org.tw/install/gpu for how to download and setup the required libraries for your platform.
Skipping registering GPU devices...
載入模型後,您可以依照YAMNet 基本用法教學課程,並下載範例 WAV 檔案以執行推論。
testing_wav_file_name = tf.keras.utils.get_file('miaow_16k.wav',
                                                'https://storage.googleapis.com/audioset/miaow_16k.wav',
                                                cache_dir='./',
                                                cache_subdir='test_data')

print(testing_wav_file_name)
Downloading data from https://storage.googleapis.com/audioset/miaow_16k.wav
215546/215546 [==============================] - 0s 0us/step
./test_data/miaow_16k.wav
您將需要一個函數來載入音訊檔案,這也將在稍後處理訓練資料時使用。(在簡易音訊辨識中深入瞭解如何讀取音訊檔案及其標籤。)
# Utility functions for loading audio files and making sure the sample rate is correct.

@tf.function
def load_wav_16k_mono(filename):
    """ Load a WAV file, convert it to a float tensor, resample to 16 kHz single-channel audio. """
    file_contents = tf.io.read_file(filename)
    wav, sample_rate = tf.audio.decode_wav(
          file_contents,
          desired_channels=1)
    wav = tf.squeeze(wav, axis=-1)
    sample_rate = tf.cast(sample_rate, dtype=tf.int64)
    wav = tfio.audio.resample(wav, rate_in=sample_rate, rate_out=16000)
    return wav
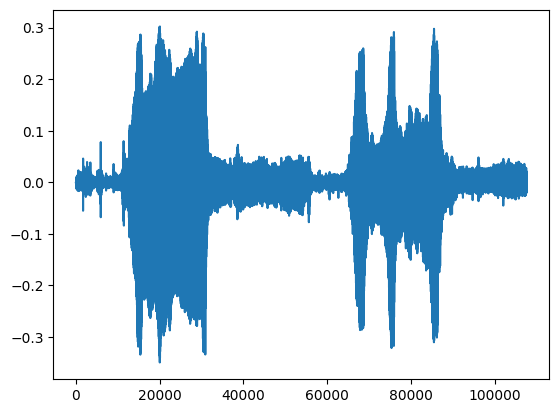
testing_wav_data = load_wav_16k_mono(testing_wav_file_name)

_ = plt.plot(testing_wav_data)

# Play the audio file.
display.Audio(testing_wav_data, rate=16000)
WARNING:tensorflow:From /tmpfs/src/tf_docs_env/lib/python3.9/site-packages/tensorflow/python/autograph/pyct/static_analysis/liveness.py:83: Analyzer.lamba_check (from tensorflow.python.autograph.pyct.static_analysis.liveness) is deprecated and will be removed after 2023-09-23.
Instructions for updating:
Lambda fuctions will be no more assumed to be used in the statement where they are used, or at least in the same block. https://github.com/tensorflow/tensorflow/issues/56089
WARNING:tensorflow:Using a while_loop for converting IO>AudioResample cause there is no registered converter for this op.
WARNING:tensorflow:Using a while_loop for converting IO>AudioResample cause there is no registered converter for this op.
載入類別對應
載入 YAMNet 能夠辨識的類別名稱非常重要。對應檔案以 CSV 格式存在於 yamnet_model.class_map_path() 中。
class_map_path = yamnet_model.class_map_path().numpy().decode('utf-8')
class_names =list(pd.read_csv(class_map_path)['display_name'])

for name in class_names[:20]:
  print(name)
print('...')
Speech
Child speech, kid speaking
Conversation
Narration, monologue
Babbling
Speech synthesizer
Shout
Bellow
Whoop
Yell
Children shouting
Screaming
Whispering
Laughter
Baby laughter
Giggle
Snicker
Belly laugh
Chuckle, chortle
Crying, sobbing
...
執行推論
YAMNet 提供影格層級類別分數 (即每個影格 521 個分數)。為了判斷片段層級預測,可以跨影格匯總每個類別的分數 (例如,使用平均值或最大值匯總)。這在下方透過 scores_np.mean(axis=0) 完成。最後,為了找到片段層級的最高分類別,您會取 521 個匯總分數的最大值。
scores, embeddings, spectrogram = yamnet_model(testing_wav_data)
class_scores = tf.reduce_mean(scores, axis=0)
top_class = tf.math.argmax(class_scores)
inferred_class = class_names[top_class]

print(f'The main sound is: {inferred_class}')
print(f'The embeddings shape: {embeddings.shape}')
The main sound is: Animal
The embeddings shape: (13, 1024)
ESC-50 資料集
ESC-50 資料集 (Piczak, 2015) 是 2,000 個五秒長環境音訊錄音的標記集合。資料集包含 50 個類別,每個類別有 40 個範例。
下載資料集並解壓縮。
_ = tf.keras.utils.get_file('esc-50.zip',
                        'https://github.com/karoldvl/ESC-50/archive/master.zip',
                        cache_dir='./',
                        cache_subdir='datasets',
                        extract=True)
Downloading data from https://github.com/karoldvl/ESC-50/archive/master.zip
   8192/Unknown - 0s 0us/step
探索資料
每個檔案的中繼資料都在 ./datasets/ESC-50-master/meta/esc50.csv 的 csv 檔案中指定
所有音訊檔案都在 ./datasets/ESC-50-master/audio/ 中
您將建立 pandas DataFrame 與對應,並使用它來更清楚地檢視資料。
esc50_csv = './datasets/ESC-50-master/meta/esc50.csv'
base_data_path = './datasets/ESC-50-master/audio/'

pd_data = pd.read_csv(esc50_csv)
pd_data.head()
篩選資料
現在資料已儲存在 DataFrame 中,套用一些轉換
- 篩選掉列,並且僅使用選取的類別 -
dog和cat。如果您想要使用任何其他類別,可以在此處選擇它們。 - 修改檔案名稱以具有完整路徑。這將使稍後載入更容易。
- 將目標變更為特定範圍內。在本範例中,
dog將保持在0,但cat將變為1,而不是其原始值5。
my_classes = ['dog', 'cat']
map_class_to_id = {'dog':0, 'cat':1}

filtered_pd = pd_data[pd_data.category.isin(my_classes)]

class_id = filtered_pd['category'].apply(lambda name: map_class_to_id[name])
filtered_pd = filtered_pd.assign(target=class_id)

full_path = filtered_pd['filename'].apply(lambda row: os.path.join(base_data_path, row))
filtered_pd = filtered_pd.assign(filename=full_path)

filtered_pd.head(10)
載入音訊檔案並擷取嵌入
在這裡,您將套用 load_wav_16k_mono 並準備模型的 WAV 資料。
從 WAV 資料擷取嵌入時,您會取得形狀為 (N, 1024) 的陣列,其中 N 是 YAMNet 找到的影格數 (每 0.48 秒音訊一個影格)。
您的模型將使用每個影格作為一個輸入。因此,您需要建立一個新欄,其中每列有一個影格。您也需要擴充標籤和 fold 欄,以正確反映這些新列。
擴充的 fold 欄會保留原始值。您無法混合影格,因為在執行分割時,您可能會在不同的分割上擁有相同音訊的部分,這會使您的驗證和測試步驟效果降低。
filenames = filtered_pd['filename']
targets = filtered_pd['target']
folds = filtered_pd['fold']

main_ds = tf.data.Dataset.from_tensor_slices((filenames, targets, folds))
main_ds.element_spec
(TensorSpec(shape=(), dtype=tf.string, name=None),
 TensorSpec(shape=(), dtype=tf.int64, name=None),
 TensorSpec(shape=(), dtype=tf.int64, name=None))
def load_wav_for_map(filename, label, fold):
  return load_wav_16k_mono(filename), label, fold

main_ds = main_ds.map(load_wav_for_map)
main_ds.element_spec
WARNING:tensorflow:Using a while_loop for converting IO>AudioResample cause there is no registered converter for this op.
WARNING:tensorflow:Using a while_loop for converting IO>AudioResample cause there is no registered converter for this op.
(TensorSpec(shape=<unknown>, dtype=tf.float32, name=None),
 TensorSpec(shape=(), dtype=tf.int64, name=None),
 TensorSpec(shape=(), dtype=tf.int64, name=None))
# applies the embedding extraction model to a wav data
def extract_embedding(wav_data, label, fold):
  ''' run YAMNet to extract embedding from the wav data '''
  scores, embeddings, spectrogram = yamnet_model(wav_data)
  num_embeddings = tf.shape(embeddings)[0]
  return (embeddings,
            tf.repeat(label, num_embeddings),
            tf.repeat(fold, num_embeddings))

# extract embedding
main_ds = main_ds.map(extract_embedding).unbatch()
main_ds.element_spec
(TensorSpec(shape=(1024,), dtype=tf.float32, name=None),
 TensorSpec(shape=(), dtype=tf.int64, name=None),
 TensorSpec(shape=(), dtype=tf.int64, name=None))
分割資料
您將使用 fold 欄將資料集分割為訓練、驗證和測試集。
ESC-50 排列成五個大小均勻的交叉驗證 fold,來自相同原始來源的片段始終在相同的 fold 中 - 在 ESC:環境聲音分類資料集論文中瞭解更多資訊。
最後一步是從資料集中移除 fold 欄,因為您在訓練期間不會使用它。
cached_ds = main_ds.cache()
train_ds = cached_ds.filter(lambda embedding, label, fold: fold < 4)
val_ds = cached_ds.filter(lambda embedding, label, fold: fold == 4)
test_ds = cached_ds.filter(lambda embedding, label, fold: fold == 5)

# remove the folds column now that it's not needed anymore
remove_fold_column = lambda embedding, label, fold: (embedding, label)

train_ds = train_ds.map(remove_fold_column)
val_ds = val_ds.map(remove_fold_column)
test_ds = test_ds.map(remove_fold_column)

train_ds = train_ds.cache().shuffle(1000).batch(32).prefetch(tf.data.AUTOTUNE)
val_ds = val_ds.cache().batch(32).prefetch(tf.data.AUTOTUNE)
test_ds = test_ds.cache().batch(32).prefetch(tf.data.AUTOTUNE)
建立您的模型
您已完成大部分工作!接下來,定義一個非常簡單的 Sequential 模型,其中有一個隱藏層和兩個輸出,以從聲音中辨識貓和狗。
my_model = tf.keras.Sequential([
    tf.keras.layers.Input(shape=(1024), dtype=tf.float32,
                          name='input_embedding'),
    tf.keras.layers.Dense(512, activation='relu'),
    tf.keras.layers.Dense(len(my_classes))
], name='my_model')

my_model.summary()
Model: "my_model"
_________________________________________________________________
 Layer (type)                Output Shape              Param #
=================================================================
 dense (Dense)               (None, 512)               524800

 dense_1 (Dense)             (None, 2)                 1026

=================================================================
Total params: 525,826
Trainable params: 525,826
Non-trainable params: 0
_________________________________________________________________
my_model.compile(loss=tf.keras.losses.SparseCategoricalCrossentropy(from_logits=True),
                 optimizer="adam",
                 metrics=['accuracy'])

callback = tf.keras.callbacks.EarlyStopping(monitor='loss',
                                            patience=3,
                                            restore_best_weights=True)
history = my_model.fit(train_ds,
                       epochs=20,
                       validation_data=val_ds,
                       callbacks=callback)
Epoch 1/20
15/15 [==============================] - 5s 42ms/step - loss: 1.3241 - accuracy: 0.8292 - val_loss: 0.8957 - val_accuracy: 0.8750
Epoch 2/20
15/15 [==============================] - 0s 5ms/step - loss: 0.4086 - accuracy: 0.8896 - val_loss: 0.4948 - val_accuracy: 0.8813
Epoch 3/20
15/15 [==============================] - 0s 5ms/step - loss: 0.5242 - accuracy: 0.8938 - val_loss: 0.8153 - val_accuracy: 0.8750
Epoch 4/20
15/15 [==============================] - 0s 5ms/step - loss: 0.3278 - accuracy: 0.9083 - val_loss: 0.2061 - val_accuracy: 0.9125
Epoch 5/20
15/15 [==============================] - 0s 5ms/step - loss: 0.2723 - accuracy: 0.9250 - val_loss: 0.3267 - val_accuracy: 0.8813
Epoch 6/20
15/15 [==============================] - 0s 4ms/step - loss: 0.2786 - accuracy: 0.9250 - val_loss: 0.2293 - val_accuracy: 0.9000
Epoch 7/20
15/15 [==============================] - 0s 4ms/step - loss: 0.2491 - accuracy: 0.9187 - val_loss: 0.2192 - val_accuracy: 0.8875
Epoch 8/20
15/15 [==============================] - 0s 4ms/step - loss: 0.1690 - accuracy: 0.9208 - val_loss: 0.2091 - val_accuracy: 0.9187
Epoch 9/20
15/15 [==============================] - 0s 4ms/step - loss: 0.1772 - accuracy: 0.9187 - val_loss: 0.2278 - val_accuracy: 0.9187
Epoch 10/20
15/15 [==============================] - 0s 4ms/step - loss: 0.2451 - accuracy: 0.9375 - val_loss: 0.5393 - val_accuracy: 0.8813
Epoch 11/20
15/15 [==============================] - 0s 4ms/step - loss: 0.1557 - accuracy: 0.9250 - val_loss: 0.3100 - val_accuracy: 0.8813
Epoch 12/20
15/15 [==============================] - 0s 4ms/step - loss: 0.1612 - accuracy: 0.9292 - val_loss: 0.6557 - val_accuracy: 0.8813
Epoch 13/20
15/15 [==============================] - 0s 4ms/step - loss: 0.3020 - accuracy: 0.9271 - val_loss: 0.2331 - val_accuracy: 0.9062
Epoch 14/20
15/15 [==============================] - 0s 5ms/step - loss: 0.4202 - accuracy: 0.9271 - val_loss: 0.5393 - val_accuracy: 0.9187
讓我們在測試資料上執行 evaluate 方法,以確保沒有過度擬合。
loss, accuracy = my_model.evaluate(test_ds)

print("Loss: ", loss)
print("Accuracy: ", accuracy)
5/5 [==============================] - 0s 5ms/step - loss: 0.4244 - accuracy: 0.8250
Loss:  0.4244455397129059
Accuracy:  0.824999988079071
您成功了!
測試您的模型
接下來,在先前僅使用 YAMNet 的測試中,嘗試您的模型在嵌入上的效果。
scores, embeddings, spectrogram = yamnet_model(testing_wav_data)
result = my_model(embeddings).numpy()

inferred_class = my_classes[result.mean(axis=0).argmax()]
print(f'The main sound is: {inferred_class}')
The main sound is: cat
儲存可以直接將 WAV 檔案作為輸入的模型
當您將嵌入作為輸入提供給模型時,模型會運作。
在真實世界的場景中,您會想要使用音訊資料作為直接輸入。
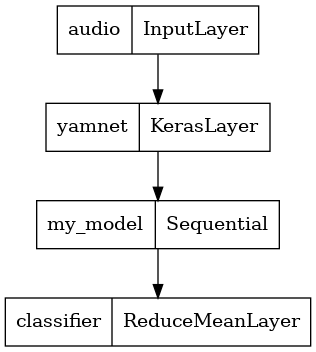
若要執行此操作,您會將 YAMNet 與您的模型結合到單一模型中,您可以匯出以供其他應用程式使用。
為了讓模型結果更易於使用,最後一層將是 reduce_mean 運算。當使用此模型進行服務時 (您將在本教學課程稍後瞭解),您將需要最後一層的名稱。如果您未定義名稱,TensorFlow 將自動定義一個增量名稱,這會使其難以測試,因為它會在您每次訓練模型時不斷變更。當使用原始 TensorFlow 運算時,您無法為其指派名稱。為了解決此問題,您將建立一個自訂層,該層會套用 reduce_mean 並將其命名為 'classifier'。
class ReduceMeanLayer(tf.keras.layers.Layer):
  def __init__(self, axis=0, **kwargs):
    super(ReduceMeanLayer, self).__init__(**kwargs)
    self.axis = axis

  def call(self, input):
    return tf.math.reduce_mean(input, axis=self.axis)
saved_model_path = './dogs_and_cats_yamnet'

input_segment = tf.keras.layers.Input(shape=(), dtype=tf.float32, name='audio')
embedding_extraction_layer = hub.KerasLayer(yamnet_model_handle,
                                            trainable=False, name='yamnet')
_, embeddings_output, _ = embedding_extraction_layer(input_segment)
serving_outputs = my_model(embeddings_output)
serving_outputs = ReduceMeanLayer(axis=0, name='classifier')(serving_outputs)
serving_model = tf.keras.Model(input_segment, serving_outputs)
serving_model.save(saved_model_path, include_optimizer=False)
WARNING:tensorflow:Compiled the loaded model, but the compiled metrics have yet to be built. `model.compile_metrics` will be empty until you train or evaluate the model.
WARNING:tensorflow:Compiled the loaded model, but the compiled metrics have yet to be built. `model.compile_metrics` will be empty until you train or evaluate the model.
WARNING:absl:Found untraced functions such as _update_step_xla while saving (showing 1 of 1). These functions will not be directly callable after loading.
INFO:tensorflow:Assets written to: ./dogs_and_cats_yamnet/assets
INFO:tensorflow:Assets written to: ./dogs_and_cats_yamnet/assets
tf.keras.utils.plot_model(serving_model)
載入您儲存的模型,以驗證它是否如預期般運作。
reloaded_model = tf.saved_model.load(saved_model_path)
最後一個測試:給定一些聲音資料,您的模型是否傳回正確的結果?
reloaded_results = reloaded_model(testing_wav_data)
cat_or_dog = my_classes[tf.math.argmax(reloaded_results)]
print(f'The main sound is: {cat_or_dog}')
The main sound is: cat
如果您想要在服務設定上試用您的新模型,您可以使用 'serving_default' 簽名。
serving_results = reloaded_model.signatures['serving_default'](testing_wav_data)
cat_or_dog = my_classes[tf.math.argmax(serving_results['classifier'])]
print(f'The main sound is: {cat_or_dog}')
The main sound is: cat
(選用) 更多測試
模型已準備就緒。
讓我們將其與測試資料集上的 YAMNet 進行比較。
test_pd = filtered_pd.loc[filtered_pd['fold'] == 5]
row = test_pd.sample(1)
filename = row['filename'].item()
print(filename)
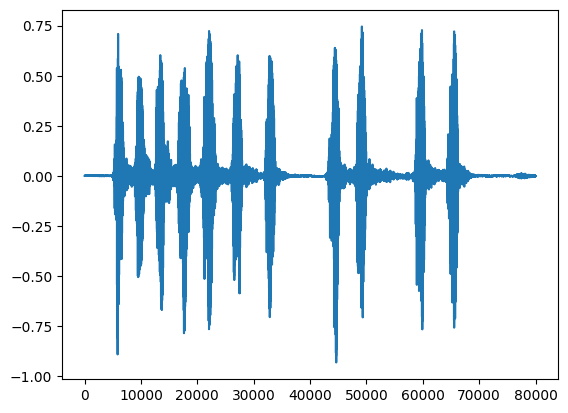
waveform = load_wav_16k_mono(filename)
print(f'Waveform values: {waveform}')
_ = plt.plot(waveform)
display.Audio(waveform, rate=16000)
./datasets/ESC-50-master/audio/5-212454-A-0.wav
WARNING:tensorflow:Using a while_loop for converting IO>AudioResample cause there is no registered converter for this op.
WARNING:tensorflow:Using a while_loop for converting IO>AudioResample cause there is no registered converter for this op.
Waveform values: [-8.8849301e-09  2.6603255e-08 -1.1731625e-08 ... -1.3478296e-03
 -1.0509168e-03 -9.1038318e-04]
# Run the model, check the output.
scores, embeddings, spectrogram = yamnet_model(waveform)
class_scores = tf.reduce_mean(scores, axis=0)
top_class = tf.math.argmax(class_scores)
inferred_class = class_names[top_class]
top_score = class_scores[top_class]
print(f'[YAMNet] The main sound is: {inferred_class} ({top_score})')

reloaded_results = reloaded_model(waveform)
your_top_class = tf.math.argmax(reloaded_results)
your_inferred_class = my_classes[your_top_class]
class_probabilities = tf.nn.softmax(reloaded_results, axis=-1)
your_top_score = class_probabilities[your_top_class]
print(f'[Your model] The main sound is: {your_inferred_class} ({your_top_score})')
[YAMNet] The main sound is: Animal (0.9570279121398926)
[Your model] The main sound is: dog (0.9999891519546509)
後續步驟
您已建立一個可以分類狗或貓聲音的模型。使用相同的想法和不同的資料集,您可以嘗試例如根據鳥鳴建立鳥類聲學辨識器。
在社群媒體上與 TensorFlow 團隊分享您的專案!