
|
|
|
 在 GitHub 上查看原始碼 在 GitHub 上查看原始碼
|
|
本教學課程示範如何預先處理 WAV 格式的音訊檔案,以及如何建構及訓練基本自動語音辨識 (ASR) 模型來辨識十個不同的字詞。您將使用 Speech Commands 資料集 (Warden, 2018) 的一部分,其中包含指令的短音訊片段 (一秒或更短),例如「down」、「go」、「left」、「no」、「right」、「stop」、「up」和「yes」。
真實世界的語音和音訊辨識系統非常複雜。但是,如同使用 MNIST 資料集進行圖片分類,本教學課程應能讓您對相關技術有基本的瞭解。
設定
匯入必要的模組和依附元件。您將使用 tf.keras.utils.audio_dataset_from_directory (在 TensorFlow 2.10 中推出),這有助於從 .wav 檔案目錄產生音訊分類資料集。在本教學課程中,您還需要 seaborn 進行視覺化。
pip install -U -q tensorflow tensorflow_datasets
import os
import pathlib

import matplotlib.pyplot as plt
import numpy as np
import seaborn as sns
import tensorflow as tf

from tensorflow.keras import layers
from tensorflow.keras import models
from IPython import display

# Set the seed value for experiment reproducibility.
seed = 42
tf.random.set_seed(seed)
np.random.seed(seed)
2024-07-13 06:07:40.179138: E external/local_xla/xla/stream_executor/cuda/cuda_fft.cc:485] Unable to register cuFFT factory: Attempting to register factory for plugin cuFFT when one has already been registered
2024-07-13 06:07:40.200347: E external/local_xla/xla/stream_executor/cuda/cuda_dnn.cc:8454] Unable to register cuDNN factory: Attempting to register factory for plugin cuDNN when one has already been registered
2024-07-13 06:07:40.206833: E external/local_xla/xla/stream_executor/cuda/cuda_blas.cc:1452] Unable to register cuBLAS factory: Attempting to register factory for plugin cuBLAS when one has already been registered
匯入迷你 Speech Commands 資料集
為了節省資料載入時間,您將使用較小版本的 Speech Commands 資料集。原始資料集包含超過 105,000 個音訊檔案,格式為 WAV (波形) 音訊檔案格式,內容是人們說出 35 個不同的字詞。此資料由 Google 收集,並以 CC BY 授權發布。
使用 tf.keras.utils.get_file 下載並解壓縮 mini_speech_commands.zip 檔案,其中包含較小的 Speech Commands 資料集
DATASET_PATH = 'data/mini_speech_commands'

data_dir = pathlib.Path(DATASET_PATH)
if not data_dir.exists():
  tf.keras.utils.get_file(
      'mini_speech_commands.zip',
      origin="http://storage.googleapis.com/download.tensorflow.org/data/mini_speech_commands.zip",
      extract=True,
      cache_dir='.', cache_subdir='data')
Downloading data from http://storage.googleapis.com/download.tensorflow.org/data/mini_speech_commands.zip
182082353/182082353 ━━━━━━━━━━━━━━━━━━━━ 1s 0us/step
資料集的音訊片段儲存在八個資料夾中,分別對應至每個語音指令:no、yes、down、go、left、up、right 和 stop
commands = np.array(tf.io.gfile.listdir(str(data_dir)))
commands = commands[(commands != 'README.md') & (commands != '.DS_Store')]
print('Commands:', commands)
Commands: ['no' 'go' 'down' 'right' 'left' 'up' 'yes' 'stop']
以這種方式分成多個目錄,您可以使用 keras.utils.audio_dataset_from_directory 輕鬆載入資料。
音訊片段長度為 1 秒或更短,取樣率為 16kHz。output_sequence_length=16000 會將較短的音訊片段填補至正好 1 秒 (並會修剪較長的音訊片段),以便輕鬆進行批次處理。
train_ds, val_ds = tf.keras.utils.audio_dataset_from_directory(
    directory=data_dir,
    batch_size=64,
    validation_split=0.2,
    seed=0,
    output_sequence_length=16000,
    subset='both')

label_names = np.array(train_ds.class_names)
print()
print("label names:", label_names)
Found 8000 files belonging to 8 classes.
Using 6400 files for training.
Using 1600 files for validation.
WARNING: All log messages before absl::InitializeLog() is called are written to STDERR
I0000 00:00:1720850867.912012  506001 cuda_executor.cc:1015] successful NUMA node read from SysFS had negative value (-1), but there must be at least one NUMA node, so returning NUMA node zero. See more at https://github.com/torvalds/linux/blob/v6.0/Documentation/ABI/testing/sysfs-bus-pci#L344-L355
I0000 00:00:1720850867.915927  506001 cuda_executor.cc:1015] successful NUMA node read from SysFS had negative value (-1), but there must be at least one NUMA node, so returning NUMA node zero. See more at https://github.com/torvalds/linux/blob/v6.0/Documentation/ABI/testing/sysfs-bus-pci#L344-L355
I0000 00:00:1720850867.919624  506001 cuda_executor.cc:1015] successful NUMA node read from SysFS had negative value (-1), but there must be at least one NUMA node, so returning NUMA node zero. See more at https://github.com/torvalds/linux/blob/v6.0/Documentation/ABI/testing/sysfs-bus-pci#L344-L355
I0000 00:00:1720850867.923325  506001 cuda_executor.cc:1015] successful NUMA node read from SysFS had negative value (-1), but there must be at least one NUMA node, so returning NUMA node zero. See more at https://github.com/torvalds/linux/blob/v6.0/Documentation/ABI/testing/sysfs-bus-pci#L344-L355
I0000 00:00:1720850867.934459  506001 cuda_executor.cc:1015] successful NUMA node read from SysFS had negative value (-1), but there must be at least one NUMA node, so returning NUMA node zero. See more at https://github.com/torvalds/linux/blob/v6.0/Documentation/ABI/testing/sysfs-bus-pci#L344-L355
I0000 00:00:1720850867.937938  506001 cuda_executor.cc:1015] successful NUMA node read from SysFS had negative value (-1), but there must be at least one NUMA node, so returning NUMA node zero. See more at https://github.com/torvalds/linux/blob/v6.0/Documentation/ABI/testing/sysfs-bus-pci#L344-L355
I0000 00:00:1720850867.941515  506001 cuda_executor.cc:1015] successful NUMA node read from SysFS had negative value (-1), but there must be at least one NUMA node, so returning NUMA node zero. See more at https://github.com/torvalds/linux/blob/v6.0/Documentation/ABI/testing/sysfs-bus-pci#L344-L355
I0000 00:00:1720850867.945048  506001 cuda_executor.cc:1015] successful NUMA node read from SysFS had negative value (-1), but there must be at least one NUMA node, so returning NUMA node zero. See more at https://github.com/torvalds/linux/blob/v6.0/Documentation/ABI/testing/sysfs-bus-pci#L344-L355
I0000 00:00:1720850867.948405  506001 cuda_executor.cc:1015] successful NUMA node read from SysFS had negative value (-1), but there must be at least one NUMA node, so returning NUMA node zero. See more at https://github.com/torvalds/linux/blob/v6.0/Documentation/ABI/testing/sysfs-bus-pci#L344-L355
I0000 00:00:1720850867.951825  506001 cuda_executor.cc:1015] successful NUMA node read from SysFS had negative value (-1), but there must be at least one NUMA node, so returning NUMA node zero. See more at https://github.com/torvalds/linux/blob/v6.0/Documentation/ABI/testing/sysfs-bus-pci#L344-L355
I0000 00:00:1720850867.955402  506001 cuda_executor.cc:1015] successful NUMA node read from SysFS had negative value (-1), but there must be at least one NUMA node, so returning NUMA node zero. See more at https://github.com/torvalds/linux/blob/v6.0/Documentation/ABI/testing/sysfs-bus-pci#L344-L355
I0000 00:00:1720850867.958967  506001 cuda_executor.cc:1015] successful NUMA node read from SysFS had negative value (-1), but there must be at least one NUMA node, so returning NUMA node zero. See more at https://github.com/torvalds/linux/blob/v6.0/Documentation/ABI/testing/sysfs-bus-pci#L344-L355
I0000 00:00:1720850869.178994  506001 cuda_executor.cc:1015] successful NUMA node read from SysFS had negative value (-1), but there must be at least one NUMA node, so returning NUMA node zero. See more at https://github.com/torvalds/linux/blob/v6.0/Documentation/ABI/testing/sysfs-bus-pci#L344-L355
I0000 00:00:1720850869.181072  506001 cuda_executor.cc:1015] successful NUMA node read from SysFS had negative value (-1), but there must be at least one NUMA node, so returning NUMA node zero. See more at https://github.com/torvalds/linux/blob/v6.0/Documentation/ABI/testing/sysfs-bus-pci#L344-L355
I0000 00:00:1720850869.183168  506001 cuda_executor.cc:1015] successful NUMA node read from SysFS had negative value (-1), but there must be at least one NUMA node, so returning NUMA node zero. See more at https://github.com/torvalds/linux/blob/v6.0/Documentation/ABI/testing/sysfs-bus-pci#L344-L355
I0000 00:00:1720850869.185306  506001 cuda_executor.cc:1015] successful NUMA node read from SysFS had negative value (-1), but there must be at least one NUMA node, so returning NUMA node zero. See more at https://github.com/torvalds/linux/blob/v6.0/Documentation/ABI/testing/sysfs-bus-pci#L344-L355
I0000 00:00:1720850869.187358  506001 cuda_executor.cc:1015] successful NUMA node read from SysFS had negative value (-1), but there must be at least one NUMA node, so returning NUMA node zero. See more at https://github.com/torvalds/linux/blob/v6.0/Documentation/ABI/testing/sysfs-bus-pci#L344-L355
I0000 00:00:1720850869.189259  506001 cuda_executor.cc:1015] successful NUMA node read from SysFS had negative value (-1), but there must be at least one NUMA node, so returning NUMA node zero. See more at https://github.com/torvalds/linux/blob/v6.0/Documentation/ABI/testing/sysfs-bus-pci#L344-L355
I0000 00:00:1720850869.191236  506001 cuda_executor.cc:1015] successful NUMA node read from SysFS had negative value (-1), but there must be at least one NUMA node, so returning NUMA node zero. See more at https://github.com/torvalds/linux/blob/v6.0/Documentation/ABI/testing/sysfs-bus-pci#L344-L355
I0000 00:00:1720850869.193176  506001 cuda_executor.cc:1015] successful NUMA node read from SysFS had negative value (-1), but there must be at least one NUMA node, so returning NUMA node zero. See more at https://github.com/torvalds/linux/blob/v6.0/Documentation/ABI/testing/sysfs-bus-pci#L344-L355
I0000 00:00:1720850869.195140  506001 cuda_executor.cc:1015] successful NUMA node read from SysFS had negative value (-1), but there must be at least one NUMA node, so returning NUMA node zero. See more at https://github.com/torvalds/linux/blob/v6.0/Documentation/ABI/testing/sysfs-bus-pci#L344-L355
I0000 00:00:1720850869.197069  506001 cuda_executor.cc:1015] successful NUMA node read from SysFS had negative value (-1), but there must be at least one NUMA node, so returning NUMA node zero. See more at https://github.com/torvalds/linux/blob/v6.0/Documentation/ABI/testing/sysfs-bus-pci#L344-L355
I0000 00:00:1720850869.199080  506001 cuda_executor.cc:1015] successful NUMA node read from SysFS had negative value (-1), but there must be at least one NUMA node, so returning NUMA node zero. See more at https://github.com/torvalds/linux/blob/v6.0/Documentation/ABI/testing/sysfs-bus-pci#L344-L355
I0000 00:00:1720850869.201029  506001 cuda_executor.cc:1015] successful NUMA node read from SysFS had negative value (-1), but there must be at least one NUMA node, so returning NUMA node zero. See more at https://github.com/torvalds/linux/blob/v6.0/Documentation/ABI/testing/sysfs-bus-pci#L344-L355
I0000 00:00:1720850869.239185  506001 cuda_executor.cc:1015] successful NUMA node read from SysFS had negative value (-1), but there must be at least one NUMA node, so returning NUMA node zero. See more at https://github.com/torvalds/linux/blob/v6.0/Documentation/ABI/testing/sysfs-bus-pci#L344-L355
I0000 00:00:1720850869.241160  506001 cuda_executor.cc:1015] successful NUMA node read from SysFS had negative value (-1), but there must be at least one NUMA node, so returning NUMA node zero. See more at https://github.com/torvalds/linux/blob/v6.0/Documentation/ABI/testing/sysfs-bus-pci#L344-L355
I0000 00:00:1720850869.243218  506001 cuda_executor.cc:1015] successful NUMA node read from SysFS had negative value (-1), but there must be at least one NUMA node, so returning NUMA node zero. See more at https://github.com/torvalds/linux/blob/v6.0/Documentation/ABI/testing/sysfs-bus-pci#L344-L355
I0000 00:00:1720850869.245211  506001 cuda_executor.cc:1015] successful NUMA node read from SysFS had negative value (-1), but there must be at least one NUMA node, so returning NUMA node zero. See more at https://github.com/torvalds/linux/blob/v6.0/Documentation/ABI/testing/sysfs-bus-pci#L344-L355
I0000 00:00:1720850869.247220  506001 cuda_executor.cc:1015] successful NUMA node read from SysFS had negative value (-1), but there must be at least one NUMA node, so returning NUMA node zero. See more at https://github.com/torvalds/linux/blob/v6.0/Documentation/ABI/testing/sysfs-bus-pci#L344-L355
I0000 00:00:1720850869.249114  506001 cuda_executor.cc:1015] successful NUMA node read from SysFS had negative value (-1), but there must be at least one NUMA node, so returning NUMA node zero. See more at https://github.com/torvalds/linux/blob/v6.0/Documentation/ABI/testing/sysfs-bus-pci#L344-L355
I0000 00:00:1720850869.251113  506001 cuda_executor.cc:1015] successful NUMA node read from SysFS had negative value (-1), but there must be at least one NUMA node, so returning NUMA node zero. See more at https://github.com/torvalds/linux/blob/v6.0/Documentation/ABI/testing/sysfs-bus-pci#L344-L355
I0000 00:00:1720850869.253028  506001 cuda_executor.cc:1015] successful NUMA node read from SysFS had negative value (-1), but there must be at least one NUMA node, so returning NUMA node zero. See more at https://github.com/torvalds/linux/blob/v6.0/Documentation/ABI/testing/sysfs-bus-pci#L344-L355
I0000 00:00:1720850869.255025  506001 cuda_executor.cc:1015] successful NUMA node read from SysFS had negative value (-1), but there must be at least one NUMA node, so returning NUMA node zero. See more at https://github.com/torvalds/linux/blob/v6.0/Documentation/ABI/testing/sysfs-bus-pci#L344-L355
I0000 00:00:1720850869.257369  506001 cuda_executor.cc:1015] successful NUMA node read from SysFS had negative value (-1), but there must be at least one NUMA node, so returning NUMA node zero. See more at https://github.com/torvalds/linux/blob/v6.0/Documentation/ABI/testing/sysfs-bus-pci#L344-L355
I0000 00:00:1720850869.259763  506001 cuda_executor.cc:1015] successful NUMA node read from SysFS had negative value (-1), but there must be at least one NUMA node, so returning NUMA node zero. See more at https://github.com/torvalds/linux/blob/v6.0/Documentation/ABI/testing/sysfs-bus-pci#L344-L355
I0000 00:00:1720850869.262122  506001 cuda_executor.cc:1015] successful NUMA node read from SysFS had negative value (-1), but there must be at least one NUMA node, so returning NUMA node zero. See more at https://github.com/torvalds/linux/blob/v6.0/Documentation/ABI/testing/sysfs-bus-pci#L344-L355
label names: ['down' 'go' 'left' 'no' 'right' 'stop' 'up' 'yes']
資料集現在包含批次的音訊片段和整數標籤。音訊片段的形狀為 (batch, samples, channels)。
train_ds.element_spec
(TensorSpec(shape=(None, 16000, None), dtype=tf.float32, name=None),
 TensorSpec(shape=(None,), dtype=tf.int32, name=None))
此資料集僅包含單聲道音訊,因此請使用 tf.squeeze 函式來捨棄額外的軸
def squeeze(audio, labels):
  audio = tf.squeeze(audio, axis=-1)
  return audio, labels

train_ds = train_ds.map(squeeze, tf.data.AUTOTUNE)
val_ds = val_ds.map(squeeze, tf.data.AUTOTUNE)
utils.audio_dataset_from_directory 函式最多只會傳回兩個分割。最好將測試集與驗證集分開。理想情況下,您會將測試集放在不同的目錄中,但在本例中,您可以使用 Dataset.shard 將驗證集分成兩半。請注意,反覆運算任何分片都會載入所有資料,且僅保留其一部分。
test_ds = val_ds.shard(num_shards=2, index=0)
val_ds = val_ds.shard(num_shards=2, index=1)
for example_audio, example_labels in train_ds.take(1):
  print(example_audio.shape)
  print(example_labels.shape)
(64, 16000)
(64,)
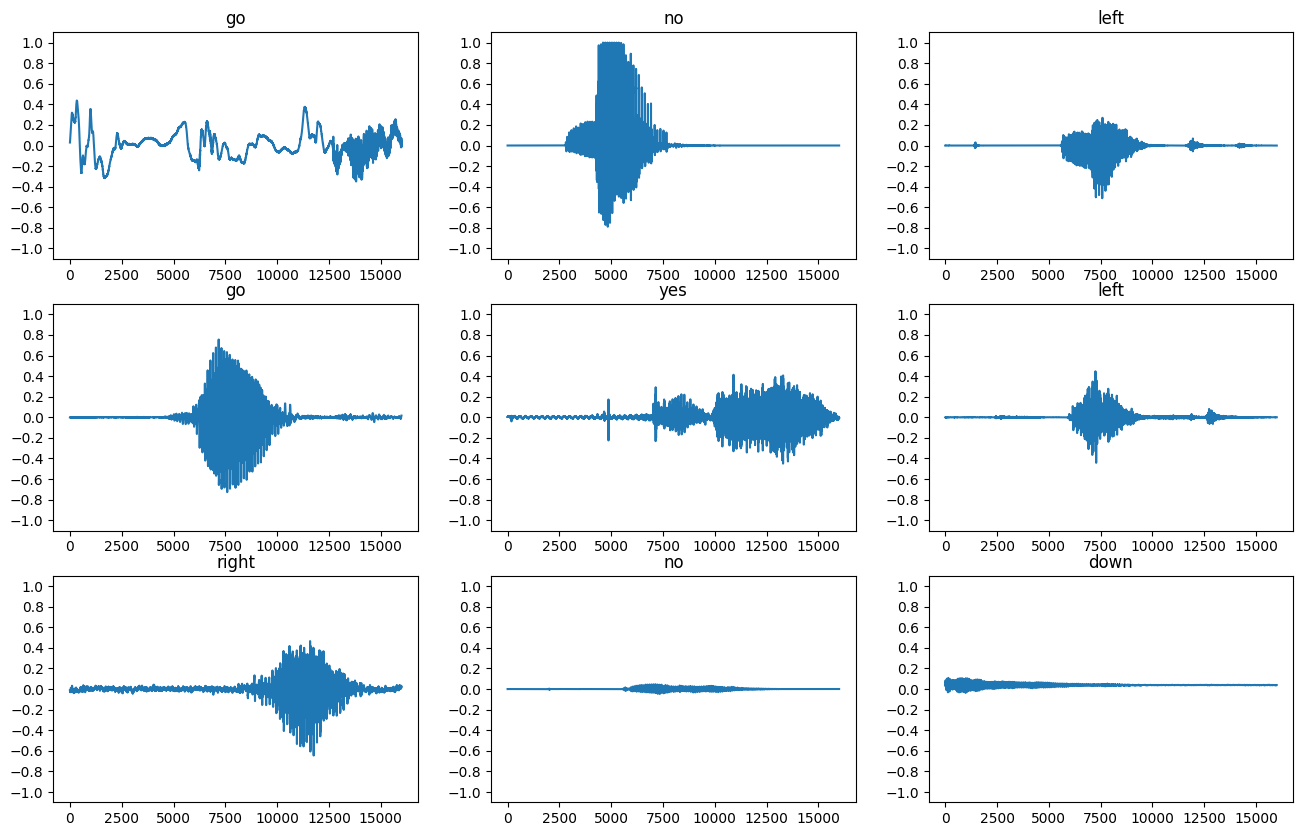
讓我們繪製一些音訊波形
label_names[[1,1,3,0]]
array(['go', 'go', 'no', 'down'], dtype='<U5')
plt.figure(figsize=(16, 10))
rows = 3
cols = 3
n = rows * cols
for i in range(n):
  plt.subplot(rows, cols, i+1)
  audio_signal = example_audio[i]
  plt.plot(audio_signal)
  plt.title(label_names[example_labels[i]])
  plt.yticks(np.arange(-1.2, 1.2, 0.2))
  plt.ylim([-1.1, 1.1])
將波形轉換為頻譜圖
資料集中的波形以時域表示。接下來,您將透過計算短時傅立葉轉換 (STFT),將波形從時域訊號轉換為時頻域訊號,以將波形轉換為頻譜圖,頻譜圖會顯示頻率隨時間的變化,並且可以表示為 2D 圖片。您將把頻譜圖圖片饋送到您的神經網路,以訓練模型。
傅立葉轉換 (tf.signal.fft) 會將訊號轉換為其組成頻率,但會遺失所有時間資訊。相較之下,STFT (tf.signal.stft) 會將訊號分割成時間視窗,並在每個視窗上執行傅立葉轉換,保留一些時間資訊,並傳回您可以對其執行標準卷積的 2D 張量。
建立公用程式函式,以將波形轉換為頻譜圖
- 波形需要長度相同,這樣當您將其轉換為頻譜圖時,結果才會具有相似的維度。這可以透過簡單地將短於一秒的音訊片段填零 (使用
tf.zeros) 來完成。 - 在呼叫
tf.signal.stft時,請選擇frame_length和frame_step參數,使產生的頻譜圖「圖片」幾乎為正方形。如需 STFT 參數選擇的詳細資訊,請參閱 Coursera 上關於音訊訊號處理和 STFT 的影片。 - STFT 會產生一個複數陣列,表示量值和相位。但是,在本教學課程中,您只會使用量值,您可以透過在
tf.signal.stft的輸出上套用tf.abs來取得量值。
def get_spectrogram(waveform):
  # Convert the waveform to a spectrogram via a STFT.
  spectrogram = tf.signal.stft(
      waveform, frame_length=255, frame_step=128)
  # Obtain the magnitude of the STFT.
  spectrogram = tf.abs(spectrogram)
  # Add a `channels` dimension, so that the spectrogram can be used
  # as image-like input data with convolution layers (which expect
  # shape (`batch_size`, `height`, `width`, `channels`).
  spectrogram = spectrogram[..., tf.newaxis]
  return spectrogram
接下來,開始探索資料。印出一個範例的張量化波形和對應頻譜圖的形狀,並播放原始音訊
for i in range(3):
  label = label_names[example_labels[i]]
  waveform = example_audio[i]
  spectrogram = get_spectrogram(waveform)

  print('Label:', label)
  print('Waveform shape:', waveform.shape)
  print('Spectrogram shape:', spectrogram.shape)
  print('Audio playback')
  display.display(display.Audio(waveform, rate=16000))
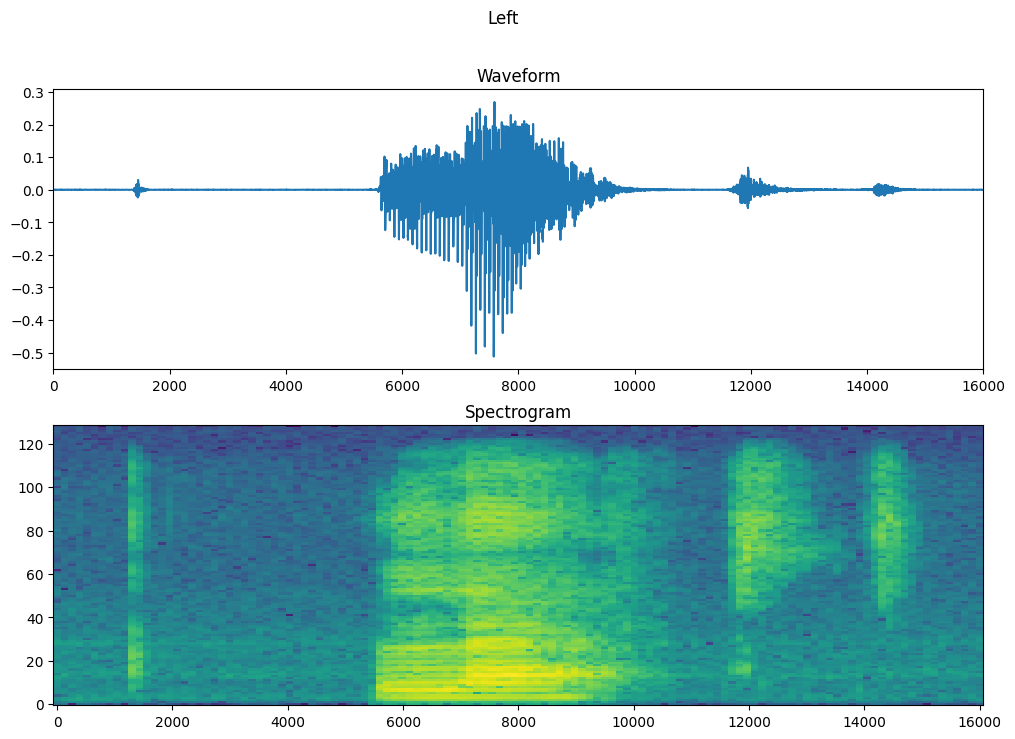
Label: go
Waveform shape: (16000,)
Spectrogram shape: (124, 129, 1)
Audio playback
Label: no
Waveform shape: (16000,)
Spectrogram shape: (124, 129, 1)
Audio playback
Label: left
Waveform shape: (16000,)
Spectrogram shape: (124, 129, 1)
Audio playback
現在,定義一個用於顯示頻譜圖的函式
def plot_spectrogram(spectrogram, ax):
  if len(spectrogram.shape) > 2:
    assert len(spectrogram.shape) == 3
    spectrogram = np.squeeze(spectrogram, axis=-1)
  # Convert the frequencies to log scale and transpose, so that the time is
  # represented on the x-axis (columns).
  # Add an epsilon to avoid taking a log of zero.
  log_spec = np.log(spectrogram.T + np.finfo(float).eps)
  height = log_spec.shape[0]
  width = log_spec.shape[1]
  X = np.linspace(0, np.size(spectrogram), num=width, dtype=int)
  Y = range(height)
  ax.pcolormesh(X, Y, log_spec)
繪製範例的波形隨時間變化的圖表,以及對應的頻譜圖 (頻率隨時間變化)
fig, axes = plt.subplots(2, figsize=(12, 8))
timescale = np.arange(waveform.shape[0])
axes[0].plot(timescale, waveform.numpy())
axes[0].set_title('Waveform')
axes[0].set_xlim([0, 16000])

plot_spectrogram(spectrogram.numpy(), axes[1])
axes[1].set_title('Spectrogram')
plt.suptitle(label.title())
plt.show()
現在,從音訊資料集建立頻譜圖資料集
def make_spec_ds(ds):
  return ds.map(
      map_func=lambda audio,label: (get_spectrogram(audio), label),
      num_parallel_calls=tf.data.AUTOTUNE)
train_spectrogram_ds = make_spec_ds(train_ds)
val_spectrogram_ds = make_spec_ds(val_ds)
test_spectrogram_ds = make_spec_ds(test_ds)
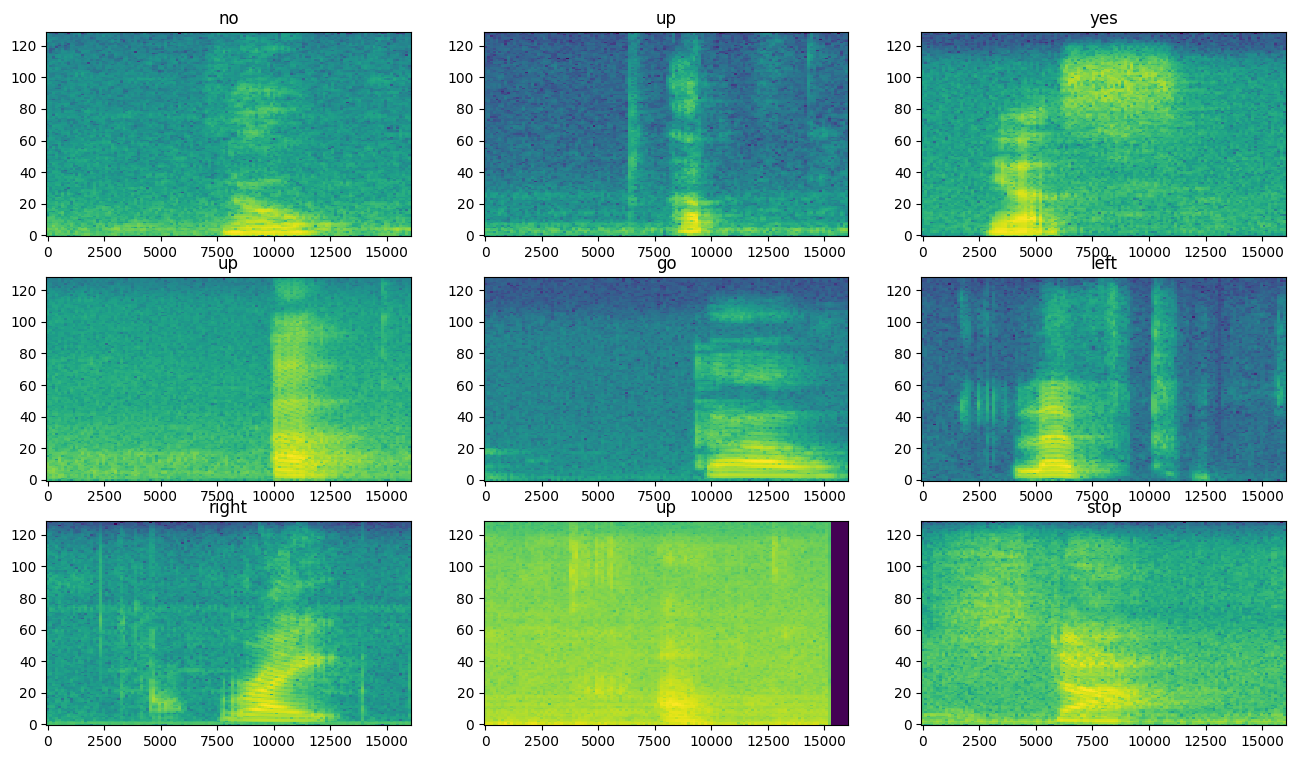
檢查資料集不同範例的頻譜圖
for example_spectrograms, example_spect_labels in train_spectrogram_ds.take(1):
  break
rows = 3
cols = 3
n = rows*cols
fig, axes = plt.subplots(rows, cols, figsize=(16, 9))

for i in range(n):
    r = i // cols
    c = i % cols
    ax = axes[r][c]
    plot_spectrogram(example_spectrograms[i].numpy(), ax)
    ax.set_title(label_names[example_spect_labels[i].numpy()])

plt.show()
建構並訓練模型
新增 Dataset.cache 和 Dataset.prefetch 運算,以減少訓練模型時的讀取延遲
train_spectrogram_ds = train_spectrogram_ds.cache().shuffle(10000).prefetch(tf.data.AUTOTUNE)
val_spectrogram_ds = val_spectrogram_ds.cache().prefetch(tf.data.AUTOTUNE)
test_spectrogram_ds = test_spectrogram_ds.cache().prefetch(tf.data.AUTOTUNE)
對於模型,您將使用簡單的卷積神經網路 (CNN),因為您已將音訊檔案轉換為頻譜圖圖片。
您的 tf.keras.Sequential 模型將使用下列 Keras 預先處理層
tf.keras.layers.Resizing:縮減取樣輸入,以加快模型訓練速度。tf.keras.layers.Normalization:根據圖片中每個像素的平均值和標準差來正規化像素。
對於 Normalization 層,必須先在訓練資料上呼叫其 adapt 方法,才能計算彙總統計資料 (即平均值和標準差)。
input_shape = example_spectrograms.shape[1:]
print('Input shape:', input_shape)
num_labels = len(label_names)

# Instantiate the `tf.keras.layers.Normalization` layer.
norm_layer = layers.Normalization()
# Fit the state of the layer to the spectrograms
# with `Normalization.adapt`.
norm_layer.adapt(data=train_spectrogram_ds.map(map_func=lambda spec, label: spec))

model = models.Sequential([
    layers.Input(shape=input_shape),
    # Downsample the input.
    layers.Resizing(32, 32),
    # Normalize.
    norm_layer,
    layers.Conv2D(32, 3, activation='relu'),
    layers.Conv2D(64, 3, activation='relu'),
    layers.MaxPooling2D(),
    layers.Dropout(0.25),
    layers.Flatten(),
    layers.Dense(128, activation='relu'),
    layers.Dropout(0.5),
    layers.Dense(num_labels),
])

model.summary()
Input shape: (124, 129, 1)
使用 Adam 最佳化工具和交叉熵損失來設定 Keras 模型
model.compile(
    optimizer=tf.keras.optimizers.Adam(),
    loss=tf.keras.losses.SparseCategoricalCrossentropy(from_logits=True),
    metrics=['accuracy'],
)
為了示範目的,訓練模型 10 個週期
EPOCHS = 10
history = model.fit(
    train_spectrogram_ds,
    validation_data=val_spectrogram_ds,
    epochs=EPOCHS,
    callbacks=tf.keras.callbacks.EarlyStopping(verbose=1, patience=2),
)
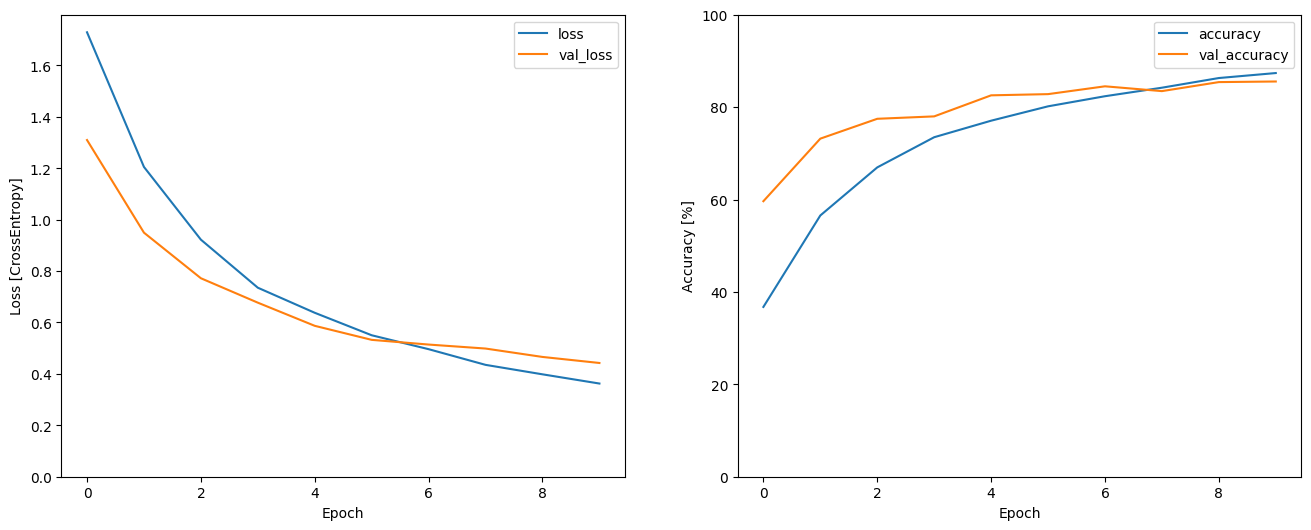
Epoch 1/10
WARNING: All log messages before absl::InitializeLog() is called are written to STDERR
I0000 00:00:1720850876.943102  506216 service.cc:146] XLA service 0x7ff53c00c2d0 initialized for platform CUDA (this does not guarantee that XLA will be used). Devices:
I0000 00:00:1720850876.943133  506216 service.cc:154]   StreamExecutor device (0): Tesla T4, Compute Capability 7.5
I0000 00:00:1720850876.943137  506216 service.cc:154]   StreamExecutor device (1): Tesla T4, Compute Capability 7.5
I0000 00:00:1720850876.943140  506216 service.cc:154]   StreamExecutor device (2): Tesla T4, Compute Capability 7.5
I0000 00:00:1720850876.943142  506216 service.cc:154]   StreamExecutor device (3): Tesla T4, Compute Capability 7.5
28/100 ━━━━━━━━━━━━━━━━━━━━ 0s 6ms/step - accuracy: 0.2050 - loss: 2.0550
I0000 00:00:1720850879.533199  506216 device_compiler.h:188] Compiled cluster using XLA!  This line is logged at most once for the lifetime of the process.
100/100 ━━━━━━━━━━━━━━━━━━━━ 5s 15ms/step - accuracy: 0.2877 - loss: 1.9045 - val_accuracy: 0.5964 - val_loss: 1.3098
Epoch 2/10
100/100 ━━━━━━━━━━━━━━━━━━━━ 1s 6ms/step - accuracy: 0.5353 - loss: 1.2888 - val_accuracy: 0.7318 - val_loss: 0.9494
Epoch 3/10
100/100 ━━━━━━━━━━━━━━━━━━━━ 1s 6ms/step - accuracy: 0.6576 - loss: 0.9511 - val_accuracy: 0.7747 - val_loss: 0.7721
Epoch 4/10
100/100 ━━━━━━━━━━━━━━━━━━━━ 1s 6ms/step - accuracy: 0.7326 - loss: 0.7459 - val_accuracy: 0.7799 - val_loss: 0.6771
Epoch 5/10
100/100 ━━━━━━━━━━━━━━━━━━━━ 1s 6ms/step - accuracy: 0.7708 - loss: 0.6354 - val_accuracy: 0.8255 - val_loss: 0.5870
Epoch 6/10
100/100 ━━━━━━━━━━━━━━━━━━━━ 1s 6ms/step - accuracy: 0.8000 - loss: 0.5556 - val_accuracy: 0.8281 - val_loss: 0.5324
Epoch 7/10
100/100 ━━━━━━━━━━━━━━━━━━━━ 1s 6ms/step - accuracy: 0.8250 - loss: 0.5008 - val_accuracy: 0.8451 - val_loss: 0.5141
Epoch 8/10
100/100 ━━━━━━━━━━━━━━━━━━━━ 1s 6ms/step - accuracy: 0.8397 - loss: 0.4387 - val_accuracy: 0.8346 - val_loss: 0.4986
Epoch 9/10
100/100 ━━━━━━━━━━━━━━━━━━━━ 1s 6ms/step - accuracy: 0.8653 - loss: 0.3894 - val_accuracy: 0.8542 - val_loss: 0.4660
Epoch 10/10
100/100 ━━━━━━━━━━━━━━━━━━━━ 1s 6ms/step - accuracy: 0.8866 - loss: 0.3403 - val_accuracy: 0.8555 - val_loss: 0.4425
讓我們繪製訓練和驗證損失曲線,以檢查您的模型在訓練期間的改進情況
metrics = history.history
plt.figure(figsize=(16,6))
plt.subplot(1,2,1)
plt.plot(history.epoch, metrics['loss'], metrics['val_loss'])
plt.legend(['loss', 'val_loss'])
plt.ylim([0, max(plt.ylim())])
plt.xlabel('Epoch')
plt.ylabel('Loss [CrossEntropy]')

plt.subplot(1,2,2)
plt.plot(history.epoch, 100*np.array(metrics['accuracy']), 100*np.array(metrics['val_accuracy']))
plt.legend(['accuracy', 'val_accuracy'])
plt.ylim([0, 100])
plt.xlabel('Epoch')
plt.ylabel('Accuracy [%]')
Text(0, 0.5, 'Accuracy [%]')
評估模型效能
在測試集上執行模型並檢查模型效能
model.evaluate(test_spectrogram_ds, return_dict=True)
13/13 ━━━━━━━━━━━━━━━━━━━━ 0s 4ms/step - accuracy: 0.8300 - loss: 0.4642
{'accuracy': 0.8353365659713745, 'loss': 0.4780646562576294}
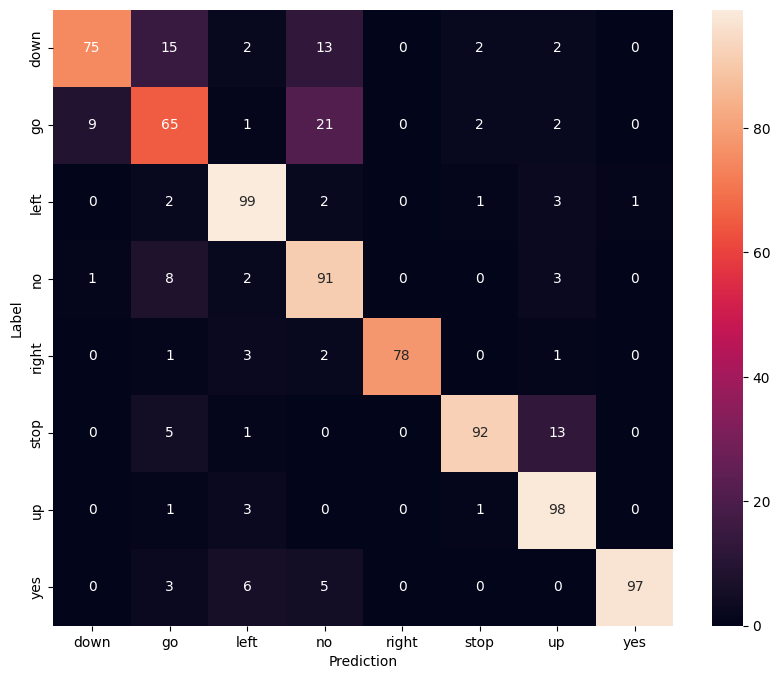
顯示混淆矩陣
使用混淆矩陣來檢查模型在測試集中對每個指令的分類效果
y_pred = model.predict(test_spectrogram_ds)
13/13 ━━━━━━━━━━━━━━━━━━━━ 0s 3ms/step
y_pred = tf.argmax(y_pred, axis=1)
y_true = tf.concat(list(test_spectrogram_ds.map(lambda s,lab: lab)), axis=0)
confusion_mtx = tf.math.confusion_matrix(y_true, y_pred)
plt.figure(figsize=(10, 8))
sns.heatmap(confusion_mtx,
            xticklabels=label_names,
            yticklabels=label_names,
            annot=True, fmt='g')
plt.xlabel('Prediction')
plt.ylabel('Label')
plt.show()
在音訊檔案上執行推論
最後,使用有人說「no」的輸入音訊檔案,驗證模型的預測輸出。您的模型效能如何?
x = data_dir/'no/01bb6a2a_nohash_0.wav'
x = tf.io.read_file(str(x))
x, sample_rate = tf.audio.decode_wav(x, desired_channels=1, desired_samples=16000,)
x = tf.squeeze(x, axis=-1)
waveform = x
x = get_spectrogram(x)
x = x[tf.newaxis,...]

prediction = model(x)
x_labels = ['no', 'yes', 'down', 'go', 'left', 'up', 'right', 'stop']
plt.bar(x_labels, tf.nn.softmax(prediction[0]))
plt.title('No')
plt.show()

display.display(display.Audio(waveform, rate=16000))
W0000 00:00:1720850888.403731  506001 gpu_timer.cc:114] Skipping the delay kernel, measurement accuracy will be reduced
W0000 00:00:1720850888.422412  506001 gpu_timer.cc:114] Skipping the delay kernel, measurement accuracy will be reduced
W0000 00:00:1720850888.423612  506001 gpu_timer.cc:114] Skipping the delay kernel, measurement accuracy will be reduced
W0000 00:00:1720850888.424744  506001 gpu_timer.cc:114] Skipping the delay kernel, measurement accuracy will be reduced
W0000 00:00:1720850888.425873  506001 gpu_timer.cc:114] Skipping the delay kernel, measurement accuracy will be reduced
W0000 00:00:1720850888.427028  506001 gpu_timer.cc:114] Skipping the delay kernel, measurement accuracy will be reduced
W0000 00:00:1720850888.428159  506001 gpu_timer.cc:114] Skipping the delay kernel, measurement accuracy will be reduced
W0000 00:00:1720850888.429287  506001 gpu_timer.cc:114] Skipping the delay kernel, measurement accuracy will be reduced
W0000 00:00:1720850888.430423  506001 gpu_timer.cc:114] Skipping the delay kernel, measurement accuracy will be reduced
W0000 00:00:1720850888.431593  506001 gpu_timer.cc:114] Skipping the delay kernel, measurement accuracy will be reduced
W0000 00:00:1720850888.432713  506001 gpu_timer.cc:114] Skipping the delay kernel, measurement accuracy will be reduced
W0000 00:00:1720850888.433841  506001 gpu_timer.cc:114] Skipping the delay kernel, measurement accuracy will be reduced
W0000 00:00:1720850888.434996  506001 gpu_timer.cc:114] Skipping the delay kernel, measurement accuracy will be reduced
W0000 00:00:1720850888.436123  506001 gpu_timer.cc:114] Skipping the delay kernel, measurement accuracy will be reduced
W0000 00:00:1720850888.437266  506001 gpu_timer.cc:114] Skipping the delay kernel, measurement accuracy will be reduced
W0000 00:00:1720850888.438467  506001 gpu_timer.cc:114] Skipping the delay kernel, measurement accuracy will be reduced
W0000 00:00:1720850888.439755  506001 gpu_timer.cc:114] Skipping the delay kernel, measurement accuracy will be reduced
W0000 00:00:1720850888.516654  506001 gpu_timer.cc:114] Skipping the delay kernel, measurement accuracy will be reduced
W0000 00:00:1720850888.517867  506001 gpu_timer.cc:114] Skipping the delay kernel, measurement accuracy will be reduced
W0000 00:00:1720850888.519048  506001 gpu_timer.cc:114] Skipping the delay kernel, measurement accuracy will be reduced
W0000 00:00:1720850888.520252  506001 gpu_timer.cc:114] Skipping the delay kernel, measurement accuracy will be reduced
W0000 00:00:1720850888.521467  506001 gpu_timer.cc:114] Skipping the delay kernel, measurement accuracy will be reduced
W0000 00:00:1720850888.522671  506001 gpu_timer.cc:114] Skipping the delay kernel, measurement accuracy will be reduced
W0000 00:00:1720850888.523861  506001 gpu_timer.cc:114] Skipping the delay kernel, measurement accuracy will be reduced
W0000 00:00:1720850888.525071  506001 gpu_timer.cc:114] Skipping the delay kernel, measurement accuracy will be reduced
W0000 00:00:1720850888.526281  506001 gpu_timer.cc:114] Skipping the delay kernel, measurement accuracy will be reduced
W0000 00:00:1720850888.527517  506001 gpu_timer.cc:114] Skipping the delay kernel, measurement accuracy will be reduced
W0000 00:00:1720850888.528740  506001 gpu_timer.cc:114] Skipping the delay kernel, measurement accuracy will be reduced
W0000 00:00:1720850888.529965  506001 gpu_timer.cc:114] Skipping the delay kernel, measurement accuracy will be reduced
W0000 00:00:1720850888.531197  506001 gpu_timer.cc:114] Skipping the delay kernel, measurement accuracy will be reduced
W0000 00:00:1720850888.532455  506001 gpu_timer.cc:114] Skipping the delay kernel, measurement accuracy will be reduced
W0000 00:00:1720850888.533705  506001 gpu_timer.cc:114] Skipping the delay kernel, measurement accuracy will be reduced
W0000 00:00:1720850888.534856  506001 gpu_timer.cc:114] Skipping the delay kernel, measurement accuracy will be reduced
W0000 00:00:1720850888.536191  506001 gpu_timer.cc:114] Skipping the delay kernel, measurement accuracy will be reduced
W0000 00:00:1720850888.542140  506001 gpu_timer.cc:114] Skipping the delay kernel, measurement accuracy will be reduced
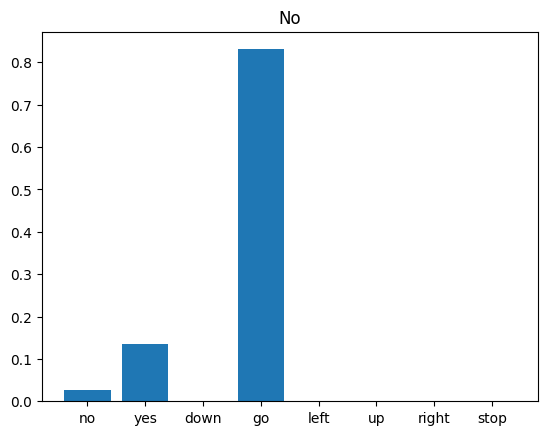
如同輸出結果所示,您的模型應已將音訊指令辨識為「no」。
匯出包含預先處理的模型
如果您必須在將資料傳遞至模型以進行推論之前套用這些預先處理步驟,則模型就不是很容易使用。因此,請建構端對端版本
class ExportModel(tf.Module):
  def __init__(self, model):
    self.model = model

    # Accept either a string-filename or a batch of waveforms.
    # YOu could add additional signatures for a single wave, or a ragged-batch.
    self.__call__.get_concrete_function(
        x=tf.TensorSpec(shape=(), dtype=tf.string))
    self.__call__.get_concrete_function(
       x=tf.TensorSpec(shape=[None, 16000], dtype=tf.float32))


  @tf.function
  def __call__(self, x):
    # If they pass a string, load the file and decode it.
    if x.dtype == tf.string:
      x = tf.io.read_file(x)
      x, _ = tf.audio.decode_wav(x, desired_channels=1, desired_samples=16000,)
      x = tf.squeeze(x, axis=-1)
      x = x[tf.newaxis, :]

    x = get_spectrogram(x)
    result = self.model(x, training=False)

    class_ids = tf.argmax(result, axis=-1)
    class_names = tf.gather(label_names, class_ids)
    return {'predictions':result,
            'class_ids': class_ids,
            'class_names': class_names}
測試執行「匯出」模型
export = ExportModel(model)
export(tf.constant(str(data_dir/'no/01bb6a2a_nohash_0.wav')))
{'predictions': <tf.Tensor: shape=(1, 8), dtype=float32, numpy=
 array([[ 1.097185 ,  2.7130916, -1.6795217,  4.521124 , -2.5609438,
         -1.7273165, -1.7834837, -2.6008315]], dtype=float32)>,
 'class_ids': <tf.Tensor: shape=(1,), dtype=int64, numpy=array([3])>,
 'class_names': <tf.Tensor: shape=(1,), dtype=string, numpy=array([b'no'], dtype=object)>}
儲存並重新載入模型,重新載入的模型會產生相同的輸出
tf.saved_model.save(export, "saved")
imported = tf.saved_model.load("saved")
imported(waveform[tf.newaxis, :])
INFO:tensorflow:Assets written to: saved/assets
INFO:tensorflow:Assets written to: saved/assets
{'class_names': <tf.Tensor: shape=(1,), dtype=string, numpy=array([b'no'], dtype=object)>,
 'predictions': <tf.Tensor: shape=(1, 8), dtype=float32, numpy=
 array([[ 1.097185 ,  2.7130916, -1.6795217,  4.521124 , -2.5609438,
         -1.7273165, -1.7834837, -2.6008315]], dtype=float32)>,
 'class_ids': <tf.Tensor: shape=(1,), dtype=int64, numpy=array([3])>}
後續步驟
本教學課程示範如何使用 TensorFlow 和 Python,執行簡易音訊分類/自動語音辨識。若要深入瞭解,請參閱下列資源
- 「使用 YAMNet 進行聲音分類」教學課程說明如何使用遷移學習進行音訊分類。
- Kaggle TensorFlow 語音辨識挑戰賽的筆記本。
- TensorFlow.js - 使用遷移學習進行音訊辨識程式碼研究室教導如何建構您自己的互動式網頁應用程式以進行音訊分類。
- arXiv 上關於音樂資訊檢索深度學習的教學課程 (Choi et al., 2017)。
- TensorFlow 也提供音訊資料準備和擴增的額外支援,以協助您進行自己的音訊專案。
- 考慮使用 librosa 程式庫進行音樂和音訊分析。