
|
|
|
 在 GitHub 上檢視原始碼 在 GitHub 上檢視原始碼
|
|
本教學課程示範如何訓練序列到序列 (seq2seq) 模型,以進行西班牙文到英文的翻譯,大致根據有效率的注意力機制類神經機器翻譯方法 (Luong et al., 2015)。
|
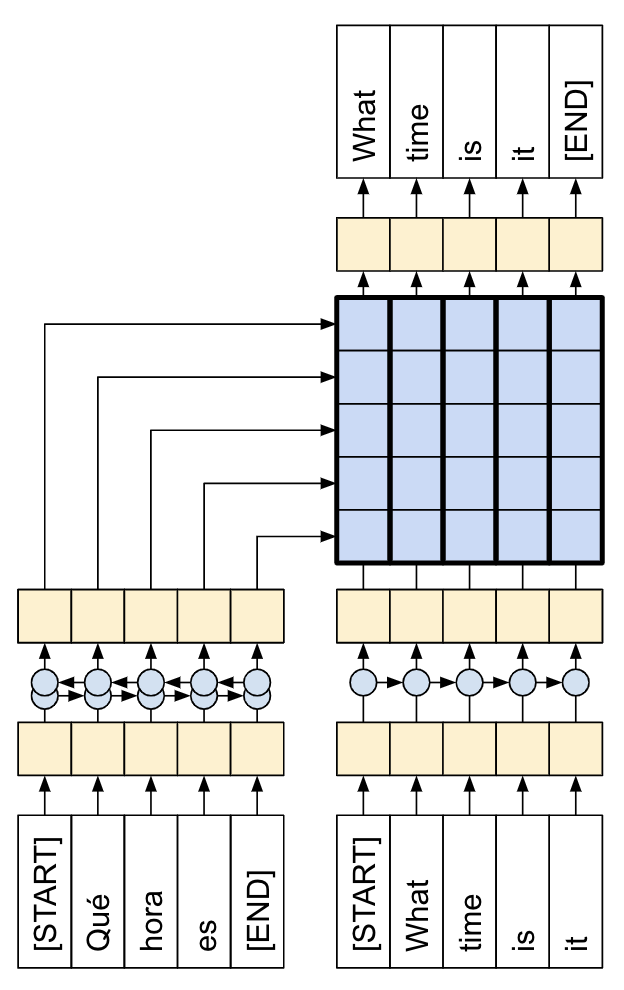
| 本教學課程:由注意力機制連接的編碼器/解碼器。 |
|---|
雖然此架構已有些過時,但它仍然是一個非常有用的專案,可深入瞭解序列到序列模型和注意力機制 (然後再繼續學習 Transformer)。
本範例假設您具備 Keras 層級以下的一些 TensorFlow 基礎知識
在本筆記本中訓練模型後,您將能夠輸入西班牙語句子,例如「¿todavia estan en casa?」,並傳回英文翻譯:「are you still at home?」
產生的模型可以匯出為 tf.saved_model,因此可用於其他 TensorFlow 環境。
翻譯品質對於玩具範例來說尚可接受,但產生的注意力機制圖可能更有趣。這顯示模型在翻譯時,輸入句子中哪些部分受到模型的關注

設定
pip install "tensorflow-text>=2.11"pip install einops
import numpy as np

import typing
from typing import Any, Tuple

import einops
import matplotlib.pyplot as plt
import matplotlib.ticker as ticker

import tensorflow as tf
import tensorflow_text as tf_text
本教學課程使用了許多低階 API,很容易搞錯形狀。此類別用於在整個教學課程中檢查形狀。
資料
本教學課程使用 Anki 提供的語言資料集。此資料集包含語言翻譯配對,格式如下
May I borrow this book? ¿Puedo tomar prestado este libro?
他們提供各種語言,但本範例使用英文-西班牙文資料集。
下載並準備資料集
為了方便起見,此資料集的副本託管在 Google Cloud 上,但您也可以下載自己的副本。下載資料集後,以下是您需要採取的步驟來準備資料
- 在每個句子中新增開始和結束符號。
- 透過移除特殊字元來清理句子。
- 建立字詞索引和反向字詞索引 (從字詞 → ID 和 ID → 字詞的字典對應)。
- 將每個句子填補到最大長度。
# Download the file
import pathlib

path_to_zip = tf.keras.utils.get_file(
    'spa-eng.zip', origin='http://storage.googleapis.com/download.tensorflow.org/data/spa-eng.zip',
    extract=True)

path_to_file = pathlib.Path(path_to_zip).parent/'spa-eng/spa.txt'
def load_data(path):
  text = path.read_text(encoding='utf-8')

  lines = text.splitlines()
  pairs = [line.split('\t') for line in lines]

  context = np.array([context for target, context in pairs])
  target = np.array([target for target, context in pairs])

  return target, context
target_raw, context_raw = load_data(path_to_file)
print(context_raw[-1])
print(target_raw[-1])
建立 tf.data 資料集
您可以從這些字串陣列建立 tf.data.Dataset 字串,有效率地隨機排序並分批處理它們
BUFFER_SIZE = len(context_raw)
BATCH_SIZE = 64

is_train = np.random.uniform(size=(len(target_raw),)) < 0.8

train_raw = (
    tf.data.Dataset
    .from_tensor_slices((context_raw[is_train], target_raw[is_train]))
    .shuffle(BUFFER_SIZE)
    .batch(BATCH_SIZE))
val_raw = (
    tf.data.Dataset
    .from_tensor_slices((context_raw[~is_train], target_raw[~is_train]))
    .shuffle(BUFFER_SIZE)
    .batch(BATCH_SIZE))
for example_context_strings, example_target_strings in train_raw.take(1):
  print(example_context_strings[:5])
  print()
  print(example_target_strings[:5])
  break
文字預先處理
本教學課程的目標之一是建構可匯出為 tf.saved_model 的模型。為了讓匯出的模型更有用,它應該採用 tf.string 輸入,並傳回 tf.string 輸出:所有文字處理都在模型內部進行。主要使用 layers.TextVectorization 層。
標準化
模型正在處理具有有限詞彙的多語言文字。因此,標準化輸入文字非常重要。
第一步是 Unicode 正規化,將帶重音符號的字元分割開來,並將相容字元取代為 ASCII 等效字元。
tensorflow_text 套件包含 Unicode 正規化運算
example_text = tf.constant('¿Todavía está en casa?')

print(example_text.numpy())
print(tf_text.normalize_utf8(example_text, 'NFKD').numpy())
Unicode 正規化將是文字標準化函式的第一步
def tf_lower_and_split_punct(text):
  # Split accented characters.
  text = tf_text.normalize_utf8(text, 'NFKD')
  text = tf.strings.lower(text)
  # Keep space, a to z, and select punctuation.
  text = tf.strings.regex_replace(text, '[^ a-z.?!,¿]', '')
  # Add spaces around punctuation.
  text = tf.strings.regex_replace(text, '[.?!,¿]', r' \0 ')
  # Strip whitespace.
  text = tf.strings.strip(text)

  text = tf.strings.join(['[START]', text, '[END]'], separator=' ')
  return text
print(example_text.numpy().decode())
print(tf_lower_and_split_punct(example_text).numpy().decode())
文字向量化
此標準化函式將封裝在 tf.keras.layers.TextVectorization 層中,這將處理詞彙擷取和輸入文字轉換為符記序列。
max_vocab_size = 5000

context_text_processor = tf.keras.layers.TextVectorization(
    standardize=tf_lower_and_split_punct,
    max_tokens=max_vocab_size,
    ragged=True)
TextVectorization 層和許多其他 Keras 預先處理層都有 adapt 方法。此方法會讀取訓練資料的一個週期,並且非常像 Model.fit。此 adapt 方法會根據資料初始化層。此處會判斷詞彙
context_text_processor.adapt(train_raw.map(lambda context, target: context))

# Here are the first 10 words from the vocabulary:
context_text_processor.get_vocabulary()[:10]
那是西班牙文 TextVectorization 層,現在建構並 .adapt() 英文層
target_text_processor = tf.keras.layers.TextVectorization(
    standardize=tf_lower_and_split_punct,
    max_tokens=max_vocab_size,
    ragged=True)

target_text_processor.adapt(train_raw.map(lambda context, target: target))
target_text_processor.get_vocabulary()[:10]
現在這些層可以將一批字串轉換為一批符記 ID
example_tokens = context_text_processor(example_context_strings)
example_tokens[:3, :]
get_vocabulary 方法可用於將符記 ID 轉換回文字
context_vocab = np.array(context_text_processor.get_vocabulary())
tokens = context_vocab[example_tokens[0].numpy()]
' '.join(tokens)
傳回的符記 ID 已填補為零。這可以輕鬆轉換為遮罩
plt.subplot(1, 2, 1)
plt.pcolormesh(example_tokens.to_tensor())
plt.title('Token IDs')

plt.subplot(1, 2, 2)
plt.pcolormesh(example_tokens.to_tensor() != 0)
plt.title('Mask')
處理資料集
以下 process_text 函式會將字串 Datasets 轉換為 0 填補的符記 ID 張量。它也會將 (context, target) 配對轉換為 ((context, target_in), target_out) 配對,以便與 keras.Model.fit 搭配訓練。keras.Model.fit 預期 (inputs, labels) 配對,輸入是 (context, target_in),而標籤是 target_out。target_in 和 target_out 之間的差異在於,它們彼此偏移一個步驟,以便在每個位置標籤都是下一個符記。
def process_text(context, target):
  context = context_text_processor(context).to_tensor()
  target = target_text_processor(target)
  targ_in = target[:,:-1].to_tensor()
  targ_out = target[:,1:].to_tensor()
  return (context, targ_in), targ_out


train_ds = train_raw.map(process_text, tf.data.AUTOTUNE)
val_ds = val_raw.map(process_text, tf.data.AUTOTUNE)
以下是每個序列的第一個序列,來自第一個批次
for (ex_context_tok, ex_tar_in), ex_tar_out in train_ds.take(1):
  print(ex_context_tok[0, :10].numpy())
  print()
  print(ex_tar_in[0, :10].numpy())
  print(ex_tar_out[0, :10].numpy())
編碼器/解碼器
以下圖表顯示模型的概觀。在兩個圖表中,編碼器都在左側,解碼器都在右側。在每個時間步,解碼器的輸出都會與編碼器的輸出結合,以預測下一個字詞。
原始 [左] 包含一些額外的連線,這些連線在本教學課程的模型 [右] 中刻意省略,因為它們通常是不必要的,而且難以實作。那些遺失的連線是
- 將狀態從編碼器的 RNN 饋送到解碼器的 RNN
- 將注意力機制輸出饋送回 RNN 的輸入。
|
|
| 來自 有效率的注意力機制類神經機器翻譯方法 的原始模型 | 本教學課程的模型 |
|---|---|
在深入探討之前,先為模型定義常數
UNITS = 256
編碼器
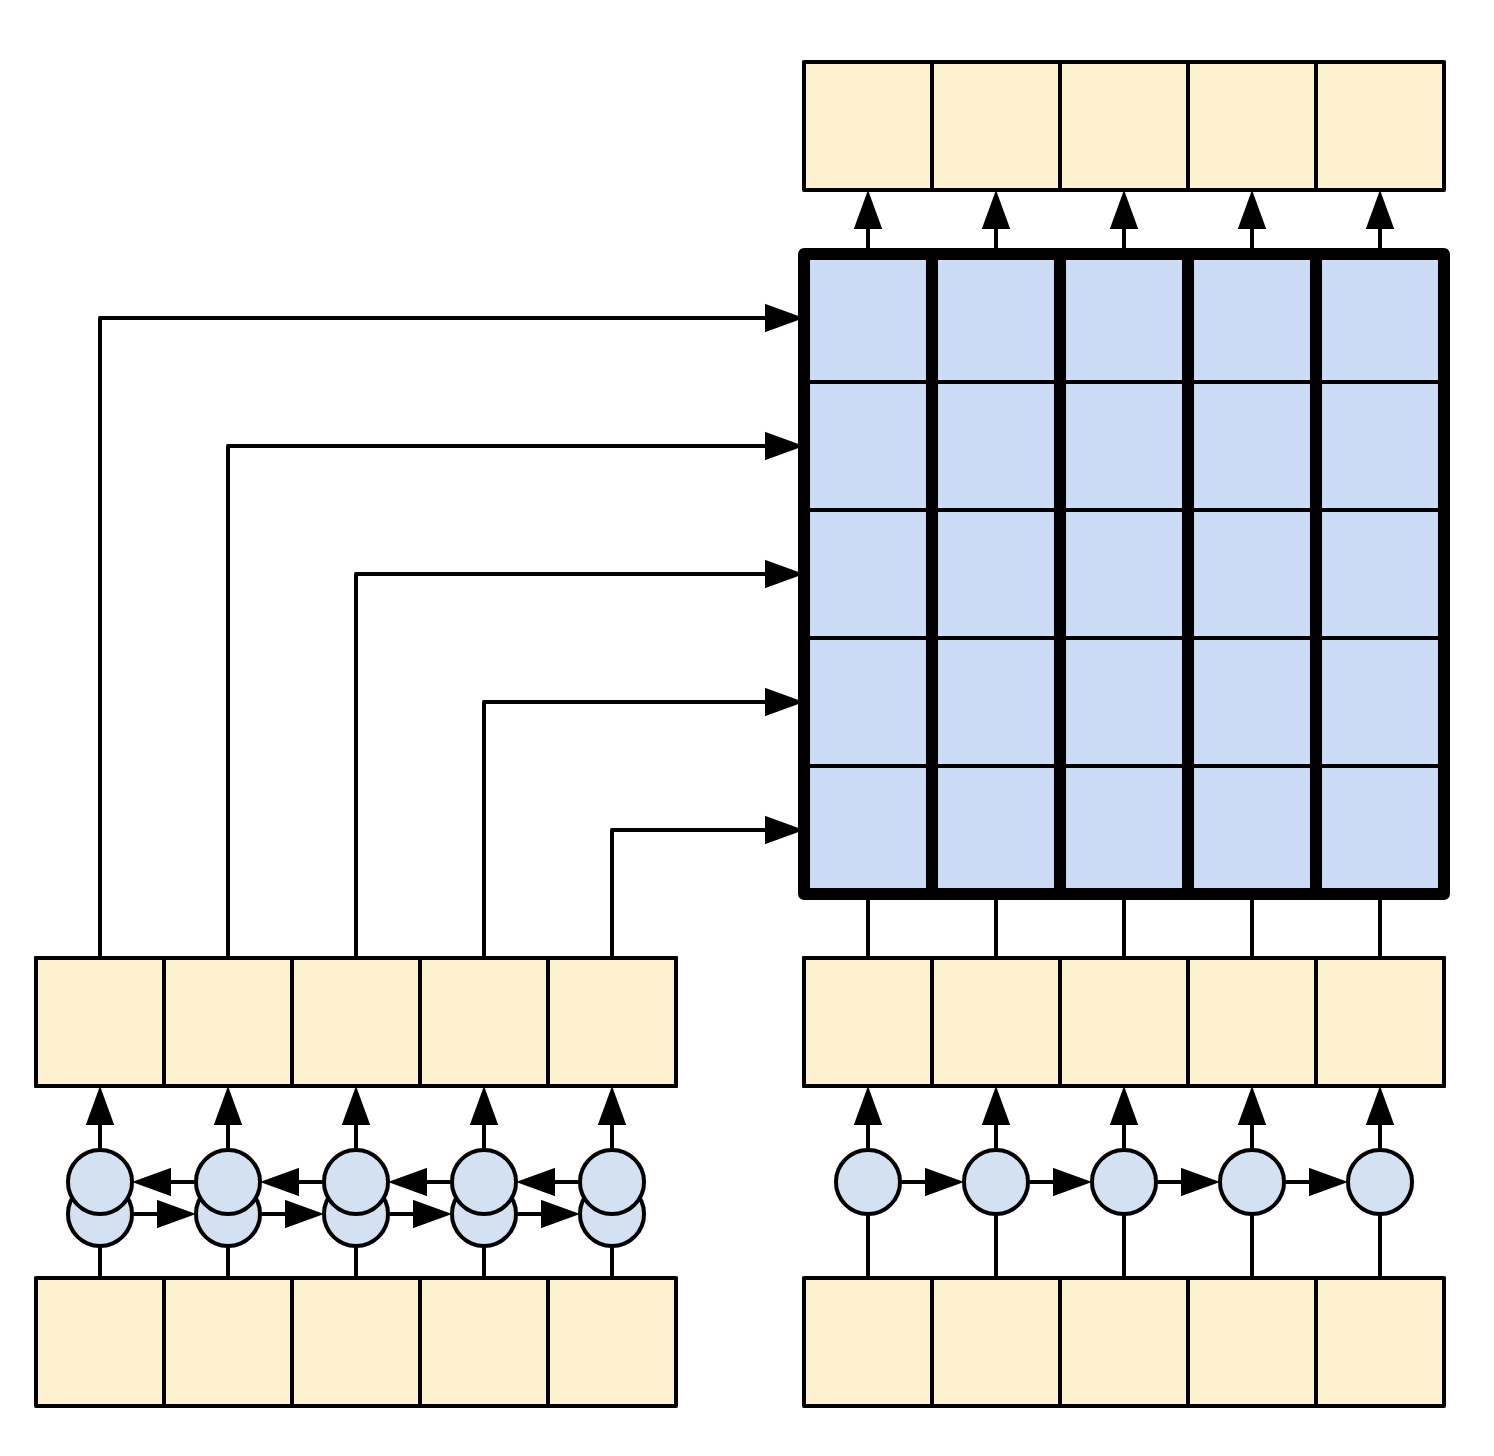
編碼器的目標是將內容序列處理成向量序列,這些向量對於解碼器在嘗試預測每個時間步的下一個輸出時很有用。由於內容序列是恆定的,因此資訊如何在編碼器中流動沒有限制,因此使用雙向 RNN 進行處理
|
| 雙向 RNN |
|---|
編碼器
- 接受符記 ID 清單 (來自
context_text_processor)。 - 查閱每個符記的嵌入向量 (使用
layers.Embedding)。 - 將嵌入處理成新的序列 (使用雙向
layers.GRU)。 - 傳回已處理的序列。這將傳遞到注意力機制標頭。
class Encoder(tf.keras.layers.Layer):
  def __init__(self, text_processor, units):
    super(Encoder, self).__init__()
    self.text_processor = text_processor
    self.vocab_size = text_processor.vocabulary_size()
    self.units = units

    # The embedding layer converts tokens to vectors
    self.embedding = tf.keras.layers.Embedding(self.vocab_size, units,
                                               mask_zero=True)

    # The RNN layer processes those vectors sequentially.
    self.rnn = tf.keras.layers.Bidirectional(
        merge_mode='sum',
        layer=tf.keras.layers.GRU(units,
                            # Return the sequence and state
                            return_sequences=True,
                            recurrent_initializer='glorot_uniform'))

  def call(self, x):
    shape_checker = ShapeChecker()
    shape_checker(x, 'batch s')

    # 2. The embedding layer looks up the embedding vector for each token.
    x = self.embedding(x)
    shape_checker(x, 'batch s units')

    # 3. The GRU processes the sequence of embeddings.
    x = self.rnn(x)
    shape_checker(x, 'batch s units')

    # 4. Returns the new sequence of embeddings.
    return x

  def convert_input(self, texts):
    texts = tf.convert_to_tensor(texts)
    if len(texts.shape) == 0:
      texts = tf.convert_to_tensor(texts)[tf.newaxis]
    context = self.text_processor(texts).to_tensor()
    context = self(context)
    return context
試用看看
# Encode the input sequence.
encoder = Encoder(context_text_processor, UNITS)
ex_context = encoder(ex_context_tok)

print(f'Context tokens, shape (batch, s): {ex_context_tok.shape}')
print(f'Encoder output, shape (batch, s, units): {ex_context.shape}')
注意力機制層
注意力機制層讓解碼器可以存取編碼器擷取的資訊。它會從整個內容序列計算向量,並將其新增至解碼器的輸出。
您可以從整個序列計算單一向量的最簡單方法是對序列取平均值 (layers.GlobalAveragePooling1D)。注意力機制層與此類似,但會計算內容序列的加權平均值。權重是從內容向量和「查詢」向量的組合計算而來。
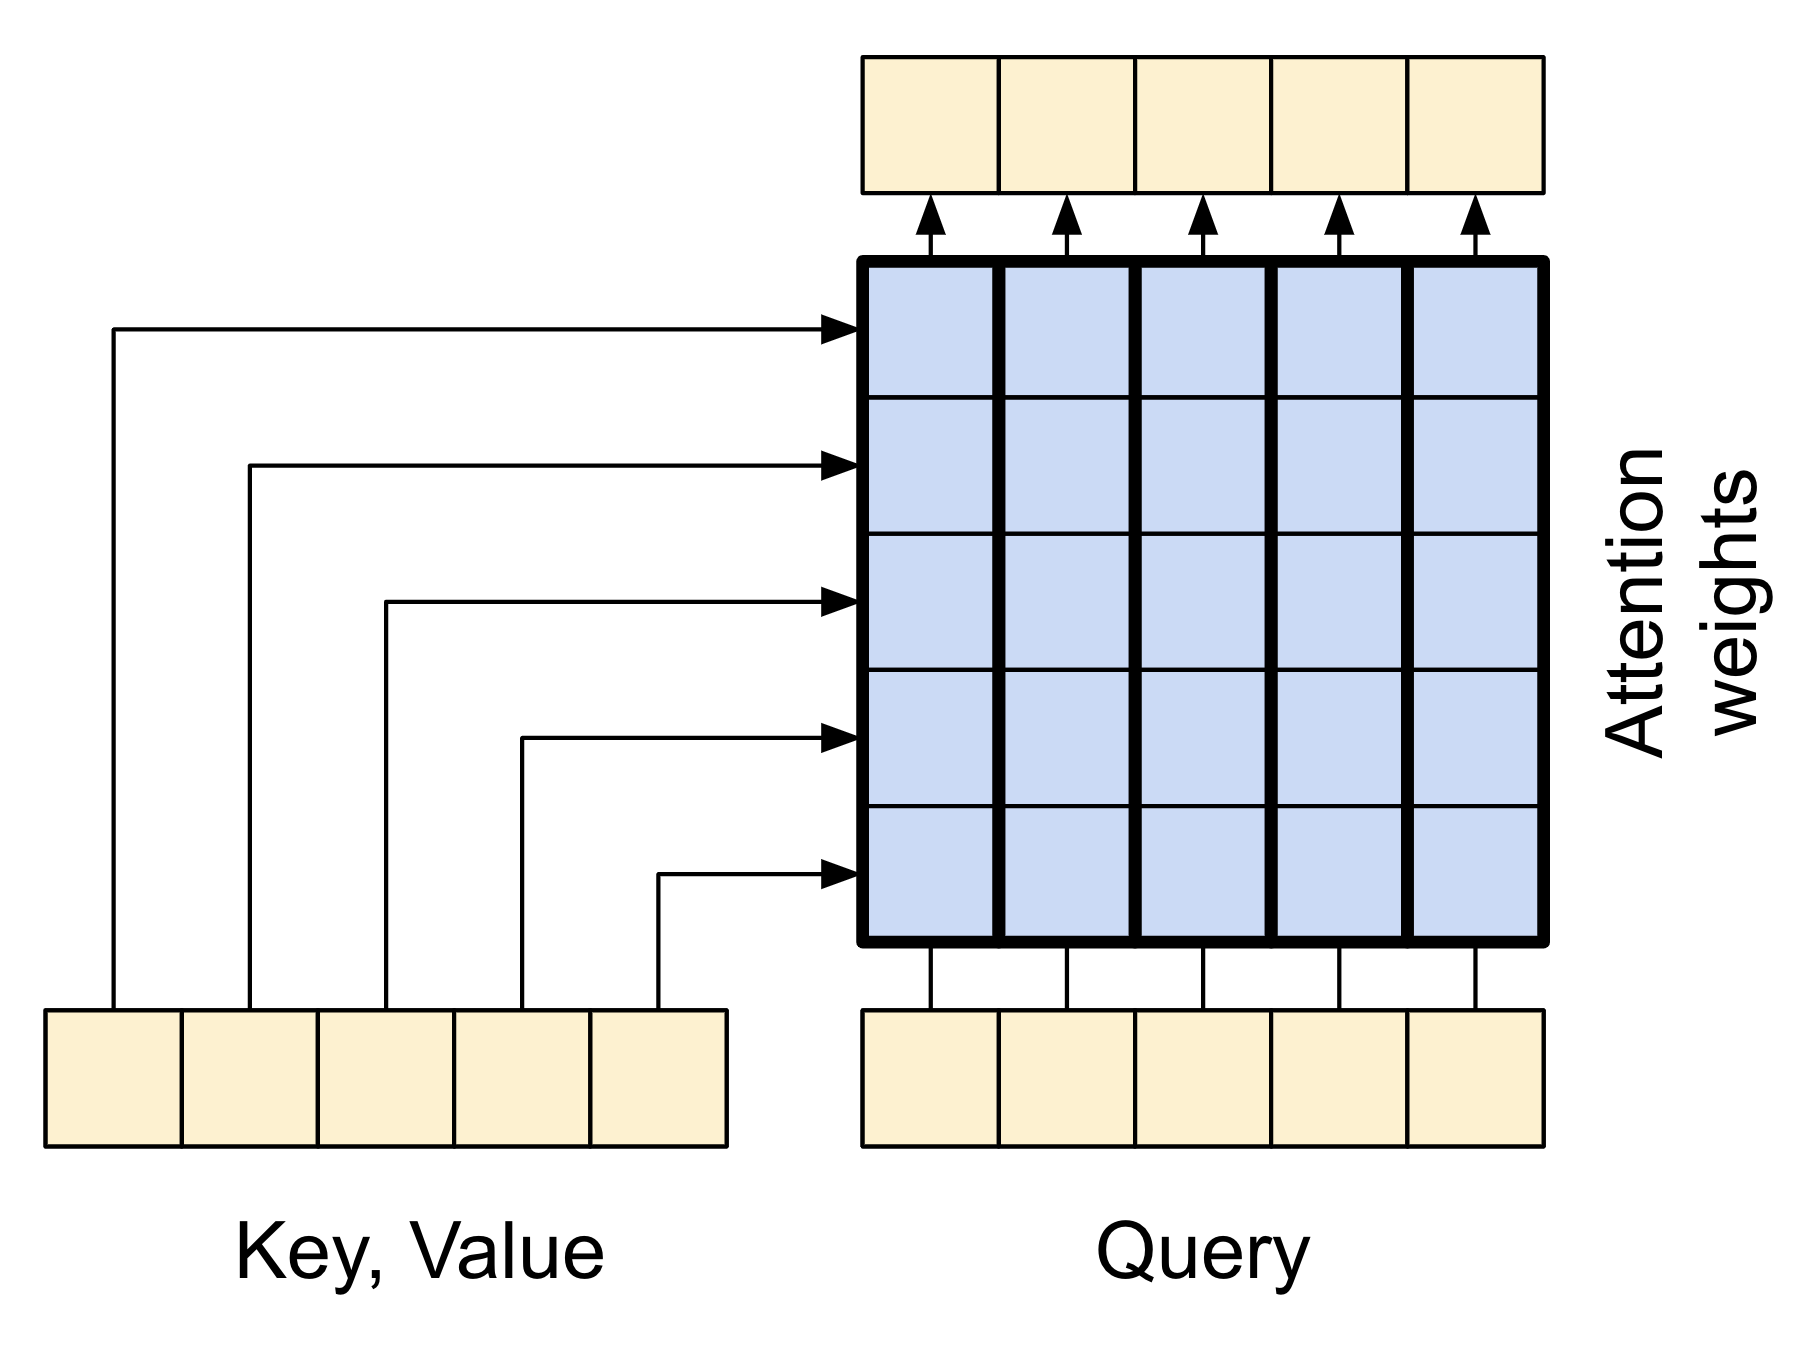
|
| 注意力機制層 |
|---|
class CrossAttention(tf.keras.layers.Layer):
  def __init__(self, units, **kwargs):
    super().__init__()
    self.mha = tf.keras.layers.MultiHeadAttention(key_dim=units, num_heads=1, **kwargs)
    self.layernorm = tf.keras.layers.LayerNormalization()
    self.add = tf.keras.layers.Add()

  def call(self, x, context):
    shape_checker = ShapeChecker()

    shape_checker(x, 'batch t units')
    shape_checker(context, 'batch s units')

    attn_output, attn_scores = self.mha(
        query=x,
        value=context,
        return_attention_scores=True)

    shape_checker(x, 'batch t units')
    shape_checker(attn_scores, 'batch heads t s')

    # Cache the attention scores for plotting later.
    attn_scores = tf.reduce_mean(attn_scores, axis=1)
    shape_checker(attn_scores, 'batch t s')
    self.last_attention_weights = attn_scores

    x = self.add([x, attn_output])
    x = self.layernorm(x)

    return x
attention_layer = CrossAttention(UNITS)

# Attend to the encoded tokens
embed = tf.keras.layers.Embedding(target_text_processor.vocabulary_size(),
                                  output_dim=UNITS, mask_zero=True)
ex_tar_embed = embed(ex_tar_in)

result = attention_layer(ex_tar_embed, ex_context)

print(f'Context sequence, shape (batch, s, units): {ex_context.shape}')
print(f'Target sequence, shape (batch, t, units): {ex_tar_embed.shape}')
print(f'Attention result, shape (batch, t, units): {result.shape}')
print(f'Attention weights, shape (batch, t, s):    {attention_layer.last_attention_weights.shape}')
注意力機制權重在內容序列上總和為 1,在目標序列中的每個位置。
attention_layer.last_attention_weights[0].numpy().sum(axis=-1)
以下是 t=0 時內容序列的注意力機制權重
attention_weights = attention_layer.last_attention_weights
mask=(ex_context_tok != 0).numpy()

plt.subplot(1, 2, 1)
plt.pcolormesh(mask*attention_weights[:, 0, :])
plt.title('Attention weights')

plt.subplot(1, 2, 2)
plt.pcolormesh(mask)
plt.title('Mask');
由於小型隨機初始化,注意力機制權重最初都接近 1/(sequence_length)。模型將學習使這些在訓練進度中變得較不均勻。
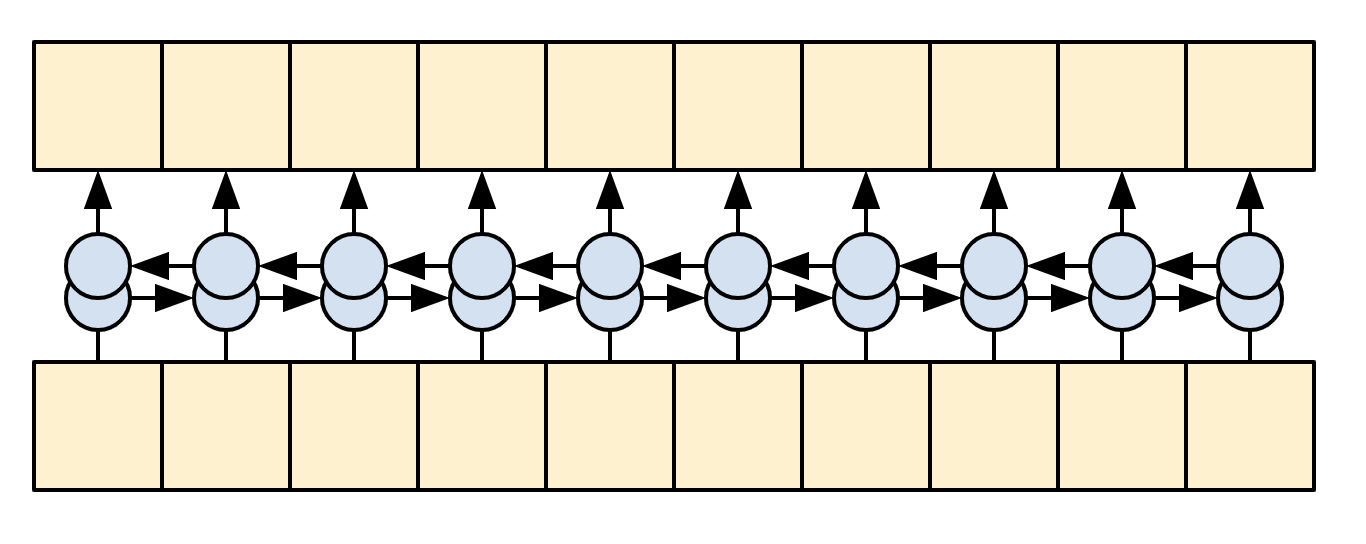
解碼器
解碼器的工作是在目標序列中的每個位置產生下一個符記的預測。
- 它會查閱目標序列中每個符記的嵌入。
- 它使用 RNN 來處理目標序列,並追蹤目前已產生的內容。
- 在注意編碼器的輸出時,它會使用 RNN 輸出作為注意力機制層的「查詢」。
- 在輸出中的每個位置,它都會預測下一個符記。
在訓練時,模型會預測每個位置的下一個字詞。因此,資訊僅在模型中單向流動非常重要。解碼器使用單向 (而非雙向) RNN 來處理目標序列。
使用此模型執行推論時,它一次產生一個字詞,這些字詞會饋送回模型。
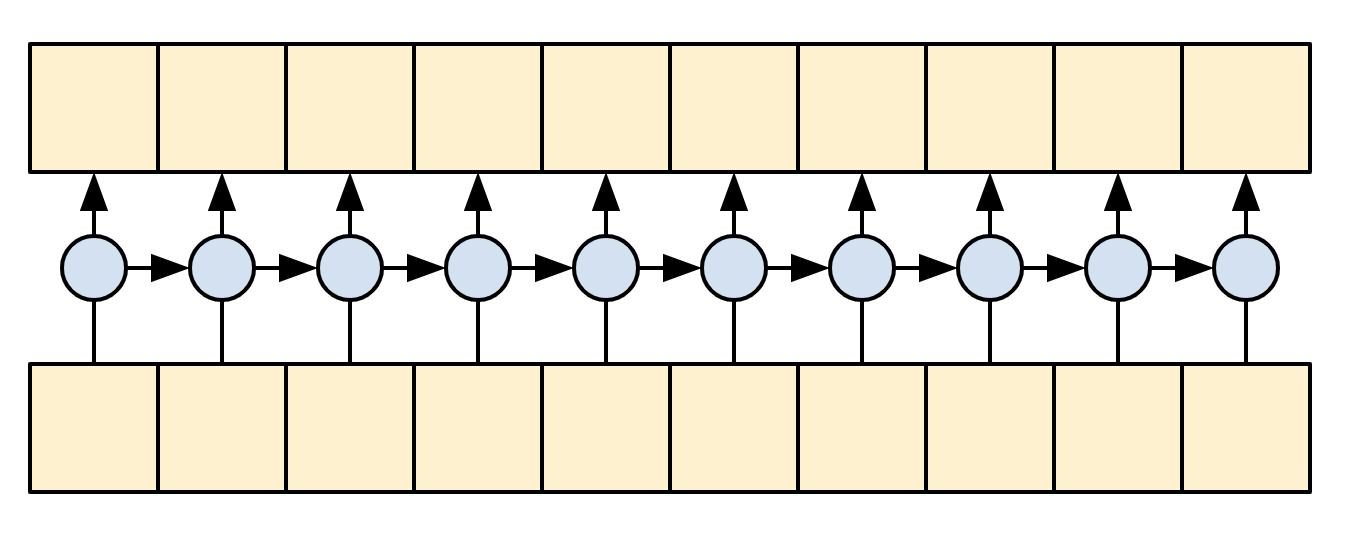
|
| 單向 RNN |
|---|
以下是 Decoder 類別的初始化程式。初始化程式會建立所有必要的層。
class Decoder(tf.keras.layers.Layer):
  @classmethod
  def add_method(cls, fun):
    setattr(cls, fun.__name__, fun)
    return fun

  def __init__(self, text_processor, units):
    super(Decoder, self).__init__()
    self.text_processor = text_processor
    self.vocab_size = text_processor.vocabulary_size()
    self.word_to_id = tf.keras.layers.StringLookup(
        vocabulary=text_processor.get_vocabulary(),
        mask_token='', oov_token='[UNK]')
    self.id_to_word = tf.keras.layers.StringLookup(
        vocabulary=text_processor.get_vocabulary(),
        mask_token='', oov_token='[UNK]',
        invert=True)
    self.start_token = self.word_to_id('[START]')
    self.end_token = self.word_to_id('[END]')

    self.units = units


    # 1. The embedding layer converts token IDs to vectors
    self.embedding = tf.keras.layers.Embedding(self.vocab_size,
                                               units, mask_zero=True)

    # 2. The RNN keeps track of what's been generated so far.
    self.rnn = tf.keras.layers.GRU(units,
                                   return_sequences=True,
                                   return_state=True,
                                   recurrent_initializer='glorot_uniform')

    # 3. The RNN output will be the query for the attention layer.
    self.attention = CrossAttention(units)

    # 4. This fully connected layer produces the logits for each
    # output token.
    self.output_layer = tf.keras.layers.Dense(self.vocab_size)
訓練
接下來,call 方法會接受 3 個引數
inputs-context, x配對,其中context- 是來自編碼器輸出的內容。x- 是目標序列輸入。
state- 選用,來自解碼器的先前state輸出 (解碼器 RNN 的內部狀態)。傳遞先前執行的狀態以繼續產生您上次停止的文字。return_state- [預設值:False] - 將此設定為True以傳回 RNN 狀態。
@Decoder.add_method
def call(self,
         context, x,
         state=None,
         return_state=False):
  shape_checker = ShapeChecker()
  shape_checker(x, 'batch t')
  shape_checker(context, 'batch s units')

  # 1. Lookup the embeddings
  x = self.embedding(x)
  shape_checker(x, 'batch t units')

  # 2. Process the target sequence.
  x, state = self.rnn(x, initial_state=state)
  shape_checker(x, 'batch t units')

  # 3. Use the RNN output as the query for the attention over the context.
  x = self.attention(x, context)
  self.last_attention_weights = self.attention.last_attention_weights
  shape_checker(x, 'batch t units')
  shape_checker(self.last_attention_weights, 'batch t s')

  # Step 4. Generate logit predictions for the next token.
  logits = self.output_layer(x)
  shape_checker(logits, 'batch t target_vocab_size')

  if return_state:
    return logits, state
  else:
    return logits
這足以進行訓練。建立解碼器的執行個體以測試看看
decoder = Decoder(target_text_processor, UNITS)
在訓練中,您將像這樣使用解碼器
給定內容和目標符記,針對每個目標符記,它會預測下一個目標符記。
logits = decoder(ex_context, ex_tar_in)

print(f'encoder output shape: (batch, s, units) {ex_context.shape}')
print(f'input target tokens shape: (batch, t) {ex_tar_in.shape}')
print(f'logits shape shape: (batch, target_vocabulary_size) {logits.shape}')
推論
若要將其用於推論,您需要更多方法
@Decoder.add_method
def get_initial_state(self, context):
  batch_size = tf.shape(context)[0]
  start_tokens = tf.fill([batch_size, 1], self.start_token)
  done = tf.zeros([batch_size, 1], dtype=tf.bool)
  embedded = self.embedding(start_tokens)
  return start_tokens, done, self.rnn.get_initial_state(embedded)[0]
@Decoder.add_method
def tokens_to_text(self, tokens):
  words = self.id_to_word(tokens)
  result = tf.strings.reduce_join(words, axis=-1, separator=' ')
  result = tf.strings.regex_replace(result, '^ *\[START\] *', '')
  result = tf.strings.regex_replace(result, ' *\[END\] *$', '')
  return result
@Decoder.add_method
def get_next_token(self, context, next_token, done, state, temperature = 0.0):
  logits, state = self(
    context, next_token,
    state = state,
    return_state=True)

  if temperature == 0.0:
    next_token = tf.argmax(logits, axis=-1)
  else:
    logits = logits[:, -1, :]/temperature
    next_token = tf.random.categorical(logits, num_samples=1)

  # If a sequence produces an `end_token`, set it `done`
  done = done | (next_token == self.end_token)
  # Once a sequence is done it only produces 0-padding.
  next_token = tf.where(done, tf.constant(0, dtype=tf.int64), next_token)

  return next_token, done, state
透過這些額外函式,您可以編寫產生迴圈
# Setup the loop variables.
next_token, done, state = decoder.get_initial_state(ex_context)
tokens = []

for n in range(10):
  # Run one step.
  next_token, done, state = decoder.get_next_token(
      ex_context, next_token, done, state, temperature=1.0)
  # Add the token to the output.
  tokens.append(next_token)

# Stack all the tokens together.
tokens = tf.concat(tokens, axis=-1) # (batch, t)

# Convert the tokens back to a a string
result = decoder.tokens_to_text(tokens)
result[:3].numpy()
由於模型未經訓練,因此它幾乎均勻地隨機輸出詞彙表中的項目。
模型
現在您已擁有所有模型元件,將它們組合起來以建構用於訓練的模型
class Translator(tf.keras.Model):
  @classmethod
  def add_method(cls, fun):
    setattr(cls, fun.__name__, fun)
    return fun

  def __init__(self, units,
               context_text_processor,
               target_text_processor):
    super().__init__()
    # Build the encoder and decoder
    encoder = Encoder(context_text_processor, units)
    decoder = Decoder(target_text_processor, units)

    self.encoder = encoder
    self.decoder = decoder

  def call(self, inputs):
    context, x = inputs
    context = self.encoder(context)
    logits = self.decoder(context, x)

    #TODO(b/250038731): remove this
    try:
      # Delete the keras mask, so keras doesn't scale the loss+accuracy.
      del logits._keras_mask
    except AttributeError:
      pass

    return logits
在訓練期間,模型將像這樣使用
model = Translator(UNITS, context_text_processor, target_text_processor)

logits = model((ex_context_tok, ex_tar_in))

print(f'Context tokens, shape: (batch, s, units) {ex_context_tok.shape}')
print(f'Target tokens, shape: (batch, t) {ex_tar_in.shape}')
print(f'logits, shape: (batch, t, target_vocabulary_size) {logits.shape}')
訓練
對於訓練,您會想要實作自己的遮罩損失和準確度函式
def masked_loss(y_true, y_pred):
    # Calculate the loss for each item in the batch.
    loss_fn = tf.keras.losses.SparseCategoricalCrossentropy(
        from_logits=True, reduction='none')
    loss = loss_fn(y_true, y_pred)

    # Mask off the losses on padding.
    mask = tf.cast(y_true != 0, loss.dtype)
    loss *= mask

    # Return the total.
    return tf.reduce_sum(loss)/tf.reduce_sum(mask)
def masked_acc(y_true, y_pred):
    # Calculate the loss for each item in the batch.
    y_pred = tf.argmax(y_pred, axis=-1)
    y_pred = tf.cast(y_pred, y_true.dtype)

    match = tf.cast(y_true == y_pred, tf.float32)
    mask = tf.cast(y_true != 0, tf.float32)

    return tf.reduce_sum(match)/tf.reduce_sum(mask)
設定模型以進行訓練
model.compile(optimizer='adam',
              loss=masked_loss,
              metrics=[masked_acc, masked_loss])
模型是隨機初始化的,並且應提供大致均勻的輸出機率。因此,很容易預測指標的初始值應該是多少
vocab_size = 1.0 * target_text_processor.vocabulary_size()

{"expected_loss": tf.math.log(vocab_size).numpy(),
 "expected_acc": 1/vocab_size}
這應該大致符合執行幾個評估步驟所傳回的值
model.evaluate(val_ds, steps=20, return_dict=True)
history = model.fit(
    train_ds.repeat(),
    epochs=100,
    steps_per_epoch = 100,
    validation_data=val_ds,
    validation_steps = 20,
    callbacks=[
        tf.keras.callbacks.EarlyStopping(patience=3)])
plt.plot(history.history['loss'], label='loss')
plt.plot(history.history['val_loss'], label='val_loss')
plt.ylim([0, max(plt.ylim())])
plt.xlabel('Epoch #')
plt.ylabel('CE/token')
plt.legend()
plt.plot(history.history['masked_acc'], label='accuracy')
plt.plot(history.history['val_masked_acc'], label='val_accuracy')
plt.ylim([0, max(plt.ylim())])
plt.xlabel('Epoch #')
plt.ylabel('CE/token')
plt.legend()
翻譯
現在模型已訓練完成,實作一個函式來執行完整的 text => text 翻譯。此程式碼基本上與推論範例中的解碼器章節相同,但此程式碼也會擷取注意力機制權重。
以下是上述兩個輔助方法,用於將符記轉換為文字,以及取得下一個符記
result = model.translate(['¿Todavía está en casa?']) # Are you still home
result[0].numpy().decode()
使用它來產生注意力機制圖
model.plot_attention('¿Todavía está en casa?') # Are you still home
翻譯更多句子並繪製它們
%%time
# This is my life.
model.plot_attention('Esta es mi vida.')
%%time
 # Try to find out.'
model.plot_attention('Tratar de descubrir.')
短句通常效果良好,但如果輸入太長,模型就會真正失去焦點,並停止提供合理的預測。造成此情況的主要原因有兩個
- 模型在教師強制下進行訓練,在每個步驟都饋送正確的符記,而不管模型的預測為何。如果模型有時饋送自己的預測,則模型可能會更穩健。
- 模型只能透過 RNN 狀態存取其先前的輸出。如果 RNN 狀態遺失了它在內容序列中的位置,模型就無法復原。Transformer 透過讓解碼器查看它目前輸出的內容來改進這一點。
原始資料依長度排序,因此請嘗試翻譯最長的序列
long_text = context_raw[-1]

import textwrap
print('Expected output:\n', '\n'.join(textwrap.wrap(target_raw[-1])))
model.plot_attention(long_text)
translate 函式適用於批次,因此如果您有多個文字要翻譯,您可以一次傳遞所有文字,這比一次翻譯一個文字有效率得多
inputs = [
    'Hace mucho frio aqui.', # "It's really cold here."
    'Esta es mi vida.', # "This is my life."
    'Su cuarto es un desastre.' # "His room is a mess"
]
%%time
for t in inputs:
  print(model.translate([t])[0].numpy().decode())

print()
%%time
result = model.translate(inputs)

print(result[0].numpy().decode())
print(result[1].numpy().decode())
print(result[2].numpy().decode())
print()
因此,總體而言,此文字產生函式大致完成了工作,但您只在 python 中使用它進行了立即執行。接下來讓我們嘗試匯出它
匯出
如果您想要匯出此模型,您需要將 translate 方法包裝在 tf.function 中。該實作將完成工作
class Export(tf.Module):
  def __init__(self, model):
    self.model = model

  @tf.function(input_signature=[tf.TensorSpec(dtype=tf.string, shape=[None])])
  def translate(self, inputs):
    return self.model.translate(inputs)
export = Export(model)
執行 tf.function 一次以編譯它
%%time
_ = export.translate(tf.constant(inputs))
%%time
result = export.translate(tf.constant(inputs))

print(result[0].numpy().decode())
print(result[1].numpy().decode())
print(result[2].numpy().decode())
print()
現在函式已被追蹤,可以使用 saved_model.save 匯出
%%time
tf.saved_model.save(export, 'translator',
                    signatures={'serving_default': export.translate})
%%time
reloaded = tf.saved_model.load('translator')
_ = reloaded.translate(tf.constant(inputs)) #warmup
%%time
result = reloaded.translate(tf.constant(inputs))

print(result[0].numpy().decode())
print(result[1].numpy().decode())
print(result[2].numpy().decode())
print()
[選用] 使用動態迴圈
值得注意的是,此初始實作並非最佳。它使用 python 迴圈
for _ in range(max_length):
  ...
  if tf.executing_eagerly() and tf.reduce_all(done):
    break
python 迴圈相對簡單,但當 tf.function 將其轉換為圖形時,它會靜態展開該迴圈。展開迴圈有兩個缺點
- 它會建立
max_length個迴圈主體的副本。因此,產生的圖形需要更長的時間才能建構、儲存和載入。 - 您必須為
max_length選擇固定值。 - 您無法從靜態展開的迴圈中
break。tf.function版本將在每次呼叫時執行完整的max_length迭代。這就是break僅適用於立即執行的原因。這仍然比立即執行稍微快一點,但不如它可能的速度快。
為了修正這些缺點,以下 translate_dynamic 方法使用 tensorflow 迴圈
for t in tf.range(max_length):
  ...
  if tf.reduce_all(done):
      break
它看起來像 python 迴圈,但是當您使用張量作為 for 迴圈的輸入 (或 while 迴圈的條件) 時,tf.function 會使用 tf.while_loop 等運算將其轉換為動態迴圈。
這裡不需要 max_length,只是以防模型卡在產生類似以下的迴圈:the united states of the united states of the united states...。
不利的一面是,若要從此動態迴圈累積符記,您不能只是將它們附加到 python list,您需要使用 tf.TensorArray
tokens = tf.TensorArray(tf.int64, size=1, dynamic_size=True)
...
for t in tf.range(max_length):
    ...
    tokens = tokens.write(t, next_token) # next_token shape is (batch, 1)
  ...
  tokens = tokens.stack()
  tokens = einops.rearrange(tokens, 't batch 1 -> batch t')
此版本的程式碼可能效率更高
使用立即執行時,此實作的效能與原始實作相當
%%time
result = model.translate(inputs)

print(result[0].numpy().decode())
print(result[1].numpy().decode())
print(result[2].numpy().decode())
print()
但是當您將其包裝在 tf.function 中時,您會注意到兩個差異。
class Export(tf.Module):
  def __init__(self, model):
    self.model = model

  @tf.function(input_signature=[tf.TensorSpec(dtype=tf.string, shape=[None])])
  def translate(self, inputs):
    return self.model.translate(inputs)
export = Export(model)
首先,追蹤速度快得多,因為它只建立一個迴圈主體的副本
%%time
_ = export.translate(inputs)
tf.function 比使用立即執行執行快得多,而且在小型輸入上,它通常比展開的版本快好幾倍,因為它可以跳出迴圈。
%%time
result = export.translate(inputs)

print(result[0].numpy().decode())
print(result[1].numpy().decode())
print(result[2].numpy().decode())
print()
因此也儲存此版本
%%time
tf.saved_model.save(export, 'dynamic_translator',
                    signatures={'serving_default': export.translate})
%%time
reloaded = tf.saved_model.load('dynamic_translator')
_ = reloaded.translate(tf.constant(inputs)) #warmup
%%time
result = reloaded.translate(tf.constant(inputs))

print(result[0].numpy().decode())
print(result[1].numpy().decode())
print(result[2].numpy().decode())
print()
後續步驟
- 下載不同的資料集以實驗翻譯,例如,英文到德文或英文到法文。
- 實驗在更大的資料集上訓練,或使用更多週期。
- 試用 transformer 教學課程,該教學課程實作了類似的翻譯工作,但使用 transformer 層而不是 RNN。此版本也使用
text.BertTokenizer來實作字詞片段符記化。 - 造訪
tensorflow_addons.seq2seq教學課程,該教學課程示範了更高層級的功能,用於實作此類序列到序列模型,例如seq2seq.BeamSearchDecoder。