
|
|
|
 在 GitHub 上檢視原始碼 在 GitHub 上檢視原始碼
|
|
本文字分類教學課程在 IMDB 大型電影評論資料集上訓練 recurrent neural network,以進行情感分析。
設定
import numpy as np

import tensorflow_datasets as tfds
import tensorflow as tf

tfds.disable_progress_bar()
匯入 matplotlib 並建立協助程式函數以繪製圖表
import matplotlib.pyplot as plt


def plot_graphs(history, metric):
  plt.plot(history.history[metric])
  plt.plot(history.history['val_'+metric], '')
  plt.xlabel("Epochs")
  plt.ylabel(metric)
  plt.legend([metric, 'val_'+metric])
設定輸入管線
IMDB 大型電影評論資料集是二元分類資料集——所有評論都有正面或負面情感。
使用 TFDS 下載資料集。如需如何手動載入這類資料的詳細資訊,請參閱載入文字教學課程。
dataset, info = tfds.load('imdb_reviews', with_info=True,
                          as_supervised=True)
train_dataset, test_dataset = dataset['train'], dataset['test']

train_dataset.element_spec
最初這會傳回 (文字、標籤組) 的資料集
for example, label in train_dataset.take(1):
  print('text: ', example.numpy())
  print('label: ', label.numpy())
接下來,隨機排序資料以進行訓練,並建立這些 (text, label) 組的批次
BUFFER_SIZE = 10000
BATCH_SIZE = 64
train_dataset = train_dataset.shuffle(BUFFER_SIZE).batch(BATCH_SIZE).prefetch(tf.data.AUTOTUNE)
test_dataset = test_dataset.batch(BATCH_SIZE).prefetch(tf.data.AUTOTUNE)
for example, label in train_dataset.take(1):
  print('texts: ', example.numpy()[:3])
  print()
  print('labels: ', label.numpy()[:3])
建立文字編碼器
由 tfds 載入的原始文字需要先經過處理,才能在模型中使用。處理文字以進行訓練的最簡單方法是使用 TextVectorization 層。此層具有許多功能,但本教學課程僅限於預設行為。
建立層,並將資料集的文字傳遞至層的 .adapt 方法
VOCAB_SIZE = 1000
encoder = tf.keras.layers.TextVectorization(
    max_tokens=VOCAB_SIZE)
encoder.adapt(train_dataset.map(lambda text, label: text))
.adapt 方法設定層的詞彙。以下是前 20 個符記。在填充和未知符記之後,它們會依頻率排序
vocab = np.array(encoder.get_vocabulary())
vocab[:20]
設定詞彙後,層可以將文字編碼為索引。索引張量會以 0 填充至批次中最長的序列(除非您設定固定的 output_sequence_length)
encoded_example = encoder(example)[:3].numpy()
encoded_example
使用預設設定時,此程序並非完全可逆。主要有三個原因
preprocessing.TextVectorization的standardize引數的預設值為"lower_and_strip_punctuation"。- 有限的詞彙大小和缺少字元型後備會導致某些未知符記。
for n in range(3):
  print("Original: ", example[n].numpy())
  print("Round-trip: ", " ".join(vocab[encoded_example[n]]))
  print()
建立模型
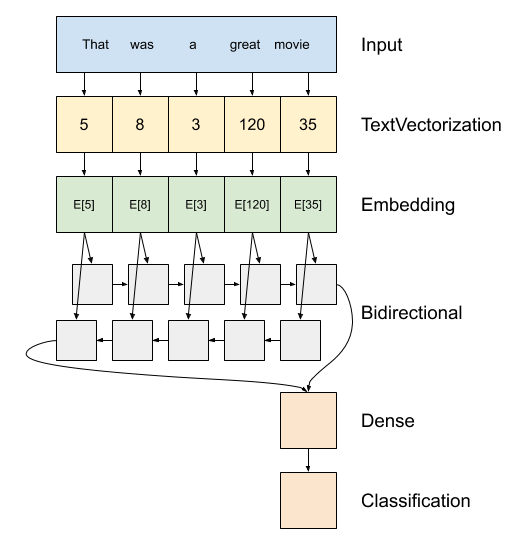
上方是模型的圖表。
此模型可以建構為
tf.keras.Sequential。第一層是編碼器,它將文字轉換為符記索引序列。
編碼器之後是嵌入層。嵌入層為每個字詞儲存一個向量。呼叫時,它會將字詞索引序列轉換為向量序列。這些向量是可訓練的。經過訓練(在足夠的資料上)後,含義相似的字詞通常具有相似的向量。
此索引查閱比透過
tf.keras.layers.Dense層傳遞 one-hot 編碼向量的等效運算有效率得多。recurrent neural network (RNN) 透過迭代元素來處理序列輸入。RNN 會將一個時間步的輸出傳遞到下一個時間步的輸入。
tf.keras.layers.Bidirectional包裝函式也可以與 RNN 層搭配使用。這會透過 RNN 層向前和向後傳播輸入,然後串連最終輸出。雙向 RNN 的主要優點是來自輸入開頭的訊號不需要完全處理每個時間步才能影響輸出。
雙向 RNN 的主要缺點是當字詞新增到結尾時,您無法有效率地串流預測。
在 RNN 將序列轉換為單一向量後,兩個
layers.Dense會執行一些最終處理,並從此向量表示轉換為單一邏輯值作為分類輸出。
實作此功能的程式碼如下
model = tf.keras.Sequential([
    encoder,
    tf.keras.layers.Embedding(
        input_dim=len(encoder.get_vocabulary()),
        output_dim=64,
        # Use masking to handle the variable sequence lengths
        mask_zero=True),
    tf.keras.layers.Bidirectional(tf.keras.layers.LSTM(64)),
    tf.keras.layers.Dense(64, activation='relu'),
    tf.keras.layers.Dense(1)
])
請注意,此處使用 Keras sequential 模型,因為模型中的所有層都只有單一輸入並產生單一輸出。如果您想要使用具狀態的 RNN 層,您可能會想要使用 Keras functional API 或模型子類別化來建構模型,以便您可以擷取和重複使用 RNN 層狀態。如需更多詳細資訊,請查看Keras RNN 指南。
嵌入層使用遮罩來處理不同的序列長度。Embedding 之後的所有層都支援遮罩
print([layer.supports_masking for layer in model.layers])
為了確認這項功能如預期般運作,請評估句子兩次。首先,單獨評估,因此沒有要遮罩的填充
# predict on a sample text without padding.

sample_text = ('The movie was cool. The animation and the graphics '
               'were out of this world. I would recommend this movie.')
predictions = model.predict(np.array([sample_text]))
print(predictions[0])
現在,在批次中再次以較長的句子評估它。結果應該相同
# predict on a sample text with padding

padding = "the " * 2000
predictions = model.predict(np.array([sample_text, padding]))
print(predictions[0])
編譯 Keras 模型以設定訓練程序
model.compile(loss=tf.keras.losses.BinaryCrossentropy(from_logits=True),
              optimizer=tf.keras.optimizers.Adam(1e-4),
              metrics=['accuracy'])
訓練模型
history = model.fit(train_dataset, epochs=10,
                    validation_data=test_dataset,
                    validation_steps=30)
test_loss, test_acc = model.evaluate(test_dataset)

print('Test Loss:', test_loss)
print('Test Accuracy:', test_acc)
plt.figure(figsize=(16, 8))
plt.subplot(1, 2, 1)
plot_graphs(history, 'accuracy')
plt.ylim(None, 1)
plt.subplot(1, 2, 2)
plot_graphs(history, 'loss')
plt.ylim(0, None)
對新句子執行預測
如果預測 >= 0.0,則為正面,否則為負面。
sample_text = ('The movie was cool. The animation and the graphics '
               'were out of this world. I would recommend this movie.')
predictions = model.predict(np.array([sample_text]))
堆疊兩個或更多 LSTM 層
Keras 循環層有兩種可用模式,由 return_sequences 建構函式引數控制
如果
False,則只會傳回每個輸入序列的最後一個輸出(形狀為 (batch_size, output_features) 的 2D 張量)。這是預設值,用於先前的模型中。如果
True,則會傳回每個時間步的連續輸出的完整序列(形狀為(batch_size, timesteps, output_features)的 3D 張量)。
以下是 return_sequences=True 時的資訊流動方式
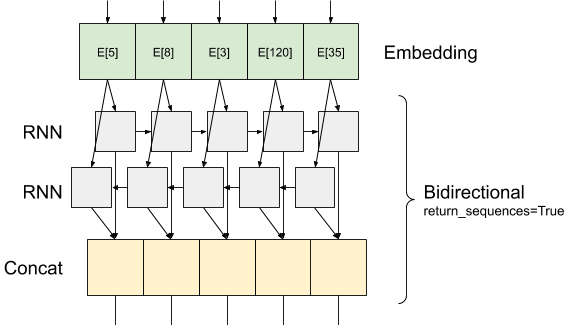
使用 return_sequences=True 的 RNN 的有趣之處在於,輸出仍然具有 3 個軸,就像輸入一樣,因此可以傳遞到另一個 RNN 層,就像這樣
model = tf.keras.Sequential([
    encoder,
    tf.keras.layers.Embedding(len(encoder.get_vocabulary()), 64, mask_zero=True),
    tf.keras.layers.Bidirectional(tf.keras.layers.LSTM(64,  return_sequences=True)),
    tf.keras.layers.Bidirectional(tf.keras.layers.LSTM(32)),
    tf.keras.layers.Dense(64, activation='relu'),
    tf.keras.layers.Dropout(0.5),
    tf.keras.layers.Dense(1)
])
model.compile(loss=tf.keras.losses.BinaryCrossentropy(from_logits=True),
              optimizer=tf.keras.optimizers.Adam(1e-4),
              metrics=['accuracy'])
history = model.fit(train_dataset, epochs=10,
                    validation_data=test_dataset,
                    validation_steps=30)
test_loss, test_acc = model.evaluate(test_dataset)

print('Test Loss:', test_loss)
print('Test Accuracy:', test_acc)
# predict on a sample text without padding.

sample_text = ('The movie was not good. The animation and the graphics '
               'were terrible. I would not recommend this movie.')
predictions = model.predict(np.array([sample_text]))
print(predictions)
plt.figure(figsize=(16, 6))
plt.subplot(1, 2, 1)
plot_graphs(history, 'accuracy')
plt.subplot(1, 2, 2)
plot_graphs(history, 'loss')
查看其他現有的循環層,例如 GRU 層。
如果您有興趣建構自訂 RNN,請參閱 Keras RNN 指南。