
|
|
|
 在 GitHub 上檢視 在 GitHub 上檢視
|
|
|
BERT 可用於解決自然語言處理中的許多問題。您將學習如何針對 GLUE 基準中的多項任務微調 BERT
CoLA (語言可接受性語料庫):句子在文法上是否正確?
SST-2 (史丹佛情感樹庫):任務是預測指定句子的情感。
MRPC (Microsoft Research Paraphrase Corpus):判斷一對句子在語意上是否等價。
QQP (Quora Question Pairs2):判斷一對問題在語意上是否等價。
MNLI (多類型自然語言推論):給定前提句子和假設句子,任務是預測前提是否蘊含假設 (蘊含)、與假設矛盾 (矛盾),或是兩者皆非 (中立)。
QNLI(問答自然語言推論):任務是判斷上下文句子是否包含問題的答案。
RTE(辨識文字蘊含):判斷句子是否蘊含給定的假設。
WNLI(Winograd 自然語言推論):任務是預測以代名詞替換的句子是否由原始句子蘊含。
本教學課程包含完整的端對端程式碼,可在 TPU 上訓練這些模型。您也可以在 GPU 上執行此筆記本,只需變更一行程式碼 (如下所述)。
在本筆記本中,您將會:
- 從 TensorFlow Hub 載入 BERT 模型
- 選擇其中一個 GLUE 任務並下載資料集
- 預先處理文字
- 微調 BERT (提供單一句子和多個句子資料集的範例)
- 儲存已訓練的模型並加以使用
設定
您將使用個別模型來預先處理文字,然後再使用它來微調 BERT。此模型取決於 tensorflow/text,您將在下方安裝。
pip install -q -U "tensorflow-text==2.8.*"
您將使用 tensorflow/models 中的 AdamW 最佳化工具來微調 BERT,您也將安裝該工具。
pip install -q -U tf-models-official==2.7.0
pip install -U tfds-nightly
import os
import tensorflow as tf
import tensorflow_hub as hub
import tensorflow_datasets as tfds
import tensorflow_text as text  # A dependency of the preprocessing model
import tensorflow_addons as tfa
from official.nlp import optimization
import numpy as np

tf.get_logger().setLevel('ERROR')
/tmpfs/src/tf_docs_env/lib/python3.9/site-packages/tensorflow_addons/utils/ensure_tf_install.py:53: UserWarning: Tensorflow Addons supports using Python ops for all Tensorflow versions above or equal to 2.9.0 and strictly below 2.12.0 (nightly versions are not supported).
 The versions of TensorFlow you are currently using is 2.8.4 and is not supported.
Some things might work, some things might not.
If you were to encounter a bug, do not file an issue.
If you want to make sure you're using a tested and supported configuration, either change the TensorFlow version or the TensorFlow Addons's version.
You can find the compatibility matrix in TensorFlow Addon's readme:
https://github.com/tensorflow/addons
  warnings.warn(
接下來,設定 TFHub 直接從 TFHub 的 Cloud Storage 值區讀取檢查點。僅建議在 TPU 上執行 TFHub 模型時才這樣做。
若沒有此設定,TFHub 會下載壓縮檔並在本機解壓縮檢查點。嘗試從這些本機檔案載入將會失敗,並出現以下錯誤:
InvalidArgumentError: Unimplemented: File system scheme '[local]' not implemented
這是因為 TPU 只能直接從 Cloud Storage 值區讀取。
os.environ["TFHUB_MODEL_LOAD_FORMAT"]="UNCOMPRESSED"
連線至 TPU 工作站
以下程式碼會連線至 TPU 工作站,並將 TensorFlow 的預設裝置變更為 TPU 工作站上的 CPU 裝置。它也會定義 TPU 分散式策略,您將使用該策略將模型訓練分散到此 TPU 工作站上可用的 8 個獨立 TPU 核心。如需更多資訊,請參閱 TensorFlow 的 TPU 指南。
import os

if os.environ['COLAB_TPU_ADDR']:
  cluster_resolver = tf.distribute.cluster_resolver.TPUClusterResolver(tpu='')
  tf.config.experimental_connect_to_cluster(cluster_resolver)
  tf.tpu.experimental.initialize_tpu_system(cluster_resolver)
  strategy = tf.distribute.TPUStrategy(cluster_resolver)
  print('Using TPU')
elif tf.config.list_physical_devices('GPU'):
  strategy = tf.distribute.MirroredStrategy()
  print('Using GPU')
else:
  raise ValueError('Running on CPU is not recommended.')
2022-12-15 12:12:12.050007: E tensorflow/stream_executor/cuda/cuda_driver.cc:271] failed call to cuInit: CUDA_ERROR_NO_DEVICE: no CUDA-capable device is detected
Using TPU
從 TensorFlow Hub 載入模型
您可以在此處選擇要從 TensorFlow Hub 載入和微調的 BERT 模型。有多個 BERT 模型可供選擇。
- BERT-Base、Uncased 和 另外七個模型,這些模型具有原始 BERT 作者發佈的已訓練權重。
- 小型 BERT 具有相同的通用架構,但 Transformer 區塊較少和/或較小,這可讓您探索速度、大小和品質之間的取捨。
- ALBERT:四種不同大小的「A Lite BERT」,透過在層之間共用參數來縮減模型大小 (但不縮減運算時間)。
- BERT Experts:八個模型,全部都具有 BERT-base 架構,但提供不同預先訓練網域之間的選擇,以更緊密地與目標任務對齊。
- Electra 具有與 BERT 相同的架構 (三種不同大小),但在類似生成對抗網路 (GAN) 的設定中,預先訓練為鑑別器。
- 具有 Talking-Heads Attention 和 Gated GELU 的 BERT [base、large] 對 Transformer 架構的核心進行了兩項改進。
如需更多詳細資料,請參閱上面連結的模型文件。
在本教學課程中,您將從 BERT-base 開始。您可以使用較大和較新的模型來提高準確性,或使用較小的模型來加快訓練時間。若要變更模型,您只需要切換一行程式碼 (如下所示)。所有差異都封裝在您將從 TensorFlow Hub 下載的 SavedModel 中。
選擇要微調的 BERT 模型
BERT model selected           : https://tfhub.dev/tensorflow/bert_en_uncased_L-12_H-768_A-12/3
Preprocessing model auto-selected: https://tfhub.dev/tensorflow/bert_en_uncased_preprocess/3
預先處理文字
在 使用 BERT Colab 分類文字 中,預先處理模型會與 BERT 編碼器直接嵌入使用。
本教學課程示範如何將預先處理作為輸入管線的一部分來進行訓練 (使用 Dataset.map),然後將其合併到匯出以進行推論的模型中。這樣一來,訓練和推論都可以從原始文字輸入運作,儘管 TPU 本身需要數值輸入。
除了 TPU 需求之外,將預先處理在輸入管線中非同步完成有助於提升效能 (您可以在 tf.data 效能指南中瞭解更多資訊)。
本教學課程也示範如何建構多輸入模型,以及如何調整 BERT 輸入的序列長度。
讓我們示範預先處理模型。
bert_preprocess = hub.load(tfhub_handle_preprocess)
tok = bert_preprocess.tokenize(tf.constant(['Hello TensorFlow!']))
print(tok)
<tf.RaggedTensor [[[7592], [23435, 12314], [999]]]>
每個預先處理模型也提供一種方法 .bert_pack_inputs(tensors, seq_length),它會採用權杖清單 (例如上面的 tok) 和序列長度引數。這會封裝輸入,以建立 BERT 模型預期的張量字典格式。
text_preprocessed = bert_preprocess.bert_pack_inputs([tok, tok], tf.constant(20))

print('Shape Word Ids : ', text_preprocessed['input_word_ids'].shape)
print('Word Ids       : ', text_preprocessed['input_word_ids'][0, :16])
print('Shape Mask     : ', text_preprocessed['input_mask'].shape)
print('Input Mask     : ', text_preprocessed['input_mask'][0, :16])
print('Shape Type Ids : ', text_preprocessed['input_type_ids'].shape)
print('Type Ids       : ', text_preprocessed['input_type_ids'][0, :16])
Shape Word Ids :  (1, 20)
Word Ids       :  tf.Tensor(
[  101  7592 23435 12314   999   102  7592 23435 12314   999   102     0
     0     0     0     0], shape=(16,), dtype=int32)
Shape Mask     :  (1, 20)
Input Mask     :  tf.Tensor([1 1 1 1 1 1 1 1 1 1 1 0 0 0 0 0], shape=(16,), dtype=int32)
Shape Type Ids :  (1, 20)
Type Ids       :  tf.Tensor([0 0 0 0 0 0 1 1 1 1 1 0 0 0 0 0], shape=(16,), dtype=int32)
以下是一些需要注意的細節
input_mask遮罩允許模型清楚地區分內容和填補。遮罩的形狀與input_word_ids相同,並且在input_word_ids不是填補的任何位置都包含 1。input_type_ids的形狀與input_mask相同,但在非填補區域內,包含 0 或 1,表示權杖屬於哪個句子。
接下來,您將建立一個預先處理模型,將所有這些邏輯封裝起來。您的模型將採用字串作為輸入,並傳回可傳遞至 BERT 的適當格式化物件。
每個 BERT 模型都有特定的預先處理模型,請務必使用 BERT 模型文件中描述的正確模型。
def make_bert_preprocess_model(sentence_features, seq_length=128):
  """Returns Model mapping string features to BERT inputs.

  Args:
    sentence_features: a list with the names of string-valued features.
    seq_length: an integer that defines the sequence length of BERT inputs.

  Returns:
    A Keras Model that can be called on a list or dict of string Tensors
    (with the order or names, resp., given by sentence_features) and
    returns a dict of tensors for input to BERT.
  """

  input_segments = [
      tf.keras.layers.Input(shape=(), dtype=tf.string, name=ft)
      for ft in sentence_features]

  # Tokenize the text to word pieces.
  bert_preprocess = hub.load(tfhub_handle_preprocess)
  tokenizer = hub.KerasLayer(bert_preprocess.tokenize, name='tokenizer')
  segments = [tokenizer(s) for s in input_segments]

  # Optional: Trim segments in a smart way to fit seq_length.
  # Simple cases (like this example) can skip this step and let
  # the next step apply a default truncation to approximately equal lengths.
  truncated_segments = segments

  # Pack inputs. The details (start/end token ids, dict of output tensors)
  # are model-dependent, so this gets loaded from the SavedModel.
  packer = hub.KerasLayer(bert_preprocess.bert_pack_inputs,
                          arguments=dict(seq_length=seq_length),
                          name='packer')
  model_inputs = packer(truncated_segments)
  return tf.keras.Model(input_segments, model_inputs)
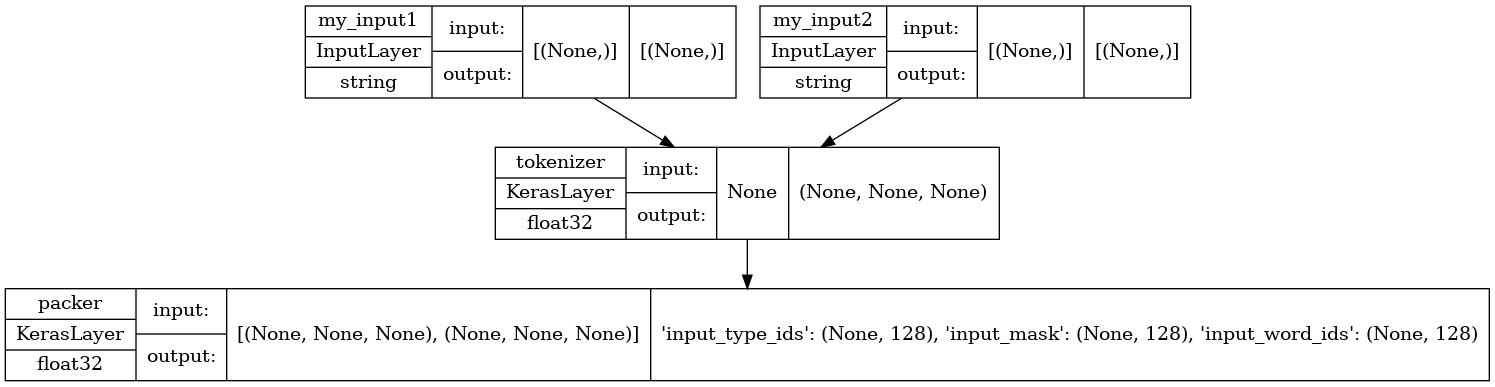
讓我們示範預先處理模型。您將建立一個測試,其中包含兩個句子輸入 (input1 和 input2)。輸出是 BERT 模型預期的輸入:input_word_ids、input_masks 和 input_type_ids。
test_preprocess_model = make_bert_preprocess_model(['my_input1', 'my_input2'])
test_text = [np.array(['some random test sentence']),
             np.array(['another sentence'])]
text_preprocessed = test_preprocess_model(test_text)

print('Keys           : ', list(text_preprocessed.keys()))
print('Shape Word Ids : ', text_preprocessed['input_word_ids'].shape)
print('Word Ids       : ', text_preprocessed['input_word_ids'][0, :16])
print('Shape Mask     : ', text_preprocessed['input_mask'].shape)
print('Input Mask     : ', text_preprocessed['input_mask'][0, :16])
print('Shape Type Ids : ', text_preprocessed['input_type_ids'].shape)
print('Type Ids       : ', text_preprocessed['input_type_ids'][0, :16])
Keys           :  ['input_type_ids', 'input_mask', 'input_word_ids']
Shape Word Ids :  (1, 128)
Word Ids       :  tf.Tensor(
[ 101 2070 6721 3231 6251  102 2178 6251  102    0    0    0    0    0
    0    0], shape=(16,), dtype=int32)
Shape Mask     :  (1, 128)
Input Mask     :  tf.Tensor([1 1 1 1 1 1 1 1 1 0 0 0 0 0 0 0], shape=(16,), dtype=int32)
Shape Type Ids :  (1, 128)
Type Ids       :  tf.Tensor([0 0 0 0 0 0 1 1 1 0 0 0 0 0 0 0], shape=(16,), dtype=int32)
讓我們看看模型的結構,注意您剛才定義的兩個輸入。
tf.keras.utils.plot_model(test_preprocess_model, show_shapes=True, show_dtype=True)
若要將預先處理套用至資料集中的所有輸入,您將使用資料集的 map 函式。然後,快取結果以提高效能。
AUTOTUNE = tf.data.AUTOTUNE


def load_dataset_from_tfds(in_memory_ds, info, split, batch_size,
                           bert_preprocess_model):
  is_training = split.startswith('train')
  dataset = tf.data.Dataset.from_tensor_slices(in_memory_ds[split])
  num_examples = info.splits[split].num_examples

  if is_training:
    dataset = dataset.shuffle(num_examples)
    dataset = dataset.repeat()
  dataset = dataset.batch(batch_size)
  dataset = dataset.map(lambda ex: (bert_preprocess_model(ex), ex['label']))
  dataset = dataset.cache().prefetch(buffer_size=AUTOTUNE)
  return dataset, num_examples
定義您的模型
您現在可以透過 BERT 編碼器饋送預先處理的輸入,並在頂端放置線性分類器 (或您偏好的其他層排列方式),並使用 dropout 進行正規化,來定義句子或句子對分類模型。
def build_classifier_model(num_classes):

  class Classifier(tf.keras.Model):
    def __init__(self, num_classes):
      super(Classifier, self).__init__(name="prediction")
      self.encoder = hub.KerasLayer(tfhub_handle_encoder, trainable=True)
      self.dropout = tf.keras.layers.Dropout(0.1)
      self.dense = tf.keras.layers.Dense(num_classes)

    def call(self, preprocessed_text):
      encoder_outputs = self.encoder(preprocessed_text)
      pooled_output = encoder_outputs["pooled_output"]
      x = self.dropout(pooled_output)
      x = self.dense(x)
      return x

  model = Classifier(num_classes)
  return model
讓我們嘗試在一些預先處理的輸入上執行模型。
test_classifier_model = build_classifier_model(2)
bert_raw_result = test_classifier_model(text_preprocessed)
print(tf.sigmoid(bert_raw_result))
tf.Tensor([[0.65279955 0.30029675]], shape=(1, 2), dtype=float32)
從 GLUE 中選擇任務
您將使用來自 GLUE 基準套件的 TensorFlow DataSet。
Colab 可讓您將這些小型資料集下載到本機檔案系統,而以下程式碼會將它們完整讀取到記憶體中,因為個別的 TPU 工作站主機無法存取 Colab 執行階段的本機檔案系統。
對於較大的資料集,您需要建立自己的 Google Cloud Storage 值區,並讓 TPU 工作站從該處讀取資料。您可以在 TPU 指南中瞭解更多資訊。
建議從 CoLa 資料集 (適用於單一句子) 或 MRPC (適用於多個句子) 開始,因為這些資料集很小,且微調時間不長。
Using glue/cola from TFDS
This dataset has 10657 examples
Number of classes: 2
Features ['sentence']
Splits ['train', 'validation', 'test']
Here are some sample rows from glue/cola dataset
['unacceptable', 'acceptable']

sample row 1
b'It is this hat that it is certain that he was wearing.'
label: 1 (acceptable)

sample row 2
b'Her efficient looking up of the answer pleased the boss.'
label: 1 (acceptable)

sample row 3
b'Both the workers will wear carnations.'
label: 1 (acceptable)

sample row 4
b'John enjoyed drawing trees for his syntax homework.'
label: 1 (acceptable)

sample row 5
b'We consider Leslie rather foolish, and Lou a complete idiot.'
label: 1 (acceptable)
資料集也決定問題類型 (分類或迴歸) 和適用於訓練的損失函數。
def get_configuration(glue_task):

  loss = tf.keras.losses.SparseCategoricalCrossentropy(from_logits=True)

  if glue_task == 'glue/cola':
    metrics = tfa.metrics.MatthewsCorrelationCoefficient(num_classes=2)
  else:
    metrics = tf.keras.metrics.SparseCategoricalAccuracy(
        'accuracy', dtype=tf.float32)

  return metrics, loss
訓練您的模型
最後,您可以針對您選擇的資料集端對端訓練模型。
分散式處理
回想一下頂端的設定程式碼,它已將 Colab 執行階段連線至具有多個 TPU 裝置的 TPU 工作站。若要將訓練分散到這些裝置上,您將在 TPU 分散式策略的範圍內建立並編譯您的主要 Keras 模型。(如需詳細資料,請參閱使用 Keras 進行分散式訓練。)
另一方面,預先處理在工作站主機的 CPU 上執行,而不是在 TPU 上執行,因此預先處理的 Keras 模型以及使用它對應的訓練和驗證資料集是在分散式策略範圍外建構的。呼叫 Model.fit() 將會負責將傳入的資料集分散到模型複本。
最佳化工具
微調遵循 BERT 預先訓練中的最佳化工具設定 (如 使用 BERT 分類文字 中所示):它使用 AdamW 最佳化工具,並以名義初始學習率進行線性衰減,並在最初 10% 的訓練步驟 (num_warmup_steps) 上加上線性暖機階段。與 BERT 論文一致,初始學習率對於微調而言較小 (最佳為 5e-5、3e-5、2e-5)。
epochs = 3
batch_size = 32
init_lr = 2e-5

print(f'Fine tuning {tfhub_handle_encoder} model')
bert_preprocess_model = make_bert_preprocess_model(sentence_features)

with strategy.scope():

  # metric have to be created inside the strategy scope
  metrics, loss = get_configuration(tfds_name)

  train_dataset, train_data_size = load_dataset_from_tfds(
      in_memory_ds, tfds_info, train_split, batch_size, bert_preprocess_model)
  steps_per_epoch = train_data_size // batch_size
  num_train_steps = steps_per_epoch * epochs
  num_warmup_steps = num_train_steps // 10

  validation_dataset, validation_data_size = load_dataset_from_tfds(
      in_memory_ds, tfds_info, validation_split, batch_size,
      bert_preprocess_model)
  validation_steps = validation_data_size // batch_size

  classifier_model = build_classifier_model(num_classes)

  optimizer = optimization.create_optimizer(
      init_lr=init_lr,
      num_train_steps=num_train_steps,
      num_warmup_steps=num_warmup_steps,
      optimizer_type='adamw')

  classifier_model.compile(optimizer=optimizer, loss=loss, metrics=[metrics])

  classifier_model.fit(
      x=train_dataset,
      validation_data=validation_dataset,
      steps_per_epoch=steps_per_epoch,
      epochs=epochs,
      validation_steps=validation_steps)
Fine tuning https://tfhub.dev/tensorflow/bert_en_uncased_L-12_H-768_A-12/3 model
/tmpfs/src/tf_docs_env/lib/python3.9/site-packages/keras/engine/functional.py:559: UserWarning: Input dict contained keys ['idx', 'label'] which did not match any model input. They will be ignored by the model.
  inputs = self._flatten_to_reference_inputs(inputs)
Epoch 1/3
/tmpfs/src/tf_docs_env/lib/python3.9/site-packages/tensorflow/python/framework/indexed_slices.py:444: UserWarning: Converting sparse IndexedSlices(IndexedSlices(indices=Tensor("AdamWeightDecay/gradients/StatefulPartitionedCall:1", shape=(None,), dtype=int32), values=Tensor("clip_by_global_norm/clip_by_global_norm/_0:0", dtype=float32), dense_shape=Tensor("AdamWeightDecay/gradients/StatefulPartitionedCall:2", shape=(None,), dtype=int32))) to a dense Tensor of unknown shape. This may consume a large amount of memory.
  warnings.warn(
267/267 [==============================] - 76s 78ms/step - loss: 0.5383 - MatthewsCorrelationCoefficient: 0.0000e+00 - val_loss: 0.4666 - val_MatthewsCorrelationCoefficient: 0.0000e+00
Epoch 2/3
267/267 [==============================] - 15s 56ms/step - loss: 0.3595 - MatthewsCorrelationCoefficient: 0.0000e+00 - val_loss: 0.5112 - val_MatthewsCorrelationCoefficient: 0.0000e+00
Epoch 3/3
267/267 [==============================] - 15s 56ms/step - loss: 0.2482 - MatthewsCorrelationCoefficient: 0.0000e+00 - val_loss: 0.6271 - val_MatthewsCorrelationCoefficient: 0.0000e+00
匯出以進行推論
您將建立一個最終模型,其中包含預先處理部分和我們剛才建立的微調 BERT。
在推論時,預先處理需要成為模型的一部分 (因為不再有像訓練資料那樣執行預先處理的個別輸入佇列)。預先處理不僅僅是運算;它有自己的資源 (詞彙表),這些資源必須附加到儲存以供匯出的 Keras 模型。
您將在 Colab 上儲存模型,稍後您可以下載以供日後使用 (檢視 -> 目錄 -> 檔案)。
main_save_path = './my_models'
bert_type = tfhub_handle_encoder.split('/')[-2]
saved_model_name = f'{tfds_name.replace("/", "_")}_{bert_type}'

saved_model_path = os.path.join(main_save_path, saved_model_name)

preprocess_inputs = bert_preprocess_model.inputs
bert_encoder_inputs = bert_preprocess_model(preprocess_inputs)
bert_outputs = classifier_model(bert_encoder_inputs)
model_for_export = tf.keras.Model(preprocess_inputs, bert_outputs)

print('Saving', saved_model_path)

# Save everything on the Colab host (even the variables from TPU memory)
save_options = tf.saved_model.SaveOptions(experimental_io_device='/job:localhost')
model_for_export.save(saved_model_path, include_optimizer=False,
                      options=save_options)
Saving ./my_models/glue_cola_bert_en_uncased_L-12_H-768_A-12
2022-12-15 12:14:54.576109: W tensorflow/python/util/util.cc:368] Sets are not currently considered sequences, but this may change in the future, so consider avoiding using them.
WARNING:absl:Found untraced functions such as restored_function_body, restored_function_body, restored_function_body, restored_function_body, restored_function_body while saving (showing 5 of 364). These functions will not be directly callable after loading.
測試模型
最後一步是測試匯出模型的結果。
為了進行一些比較,讓我們重新載入模型,並使用來自資料集測試分割的一些輸入來測試它。
with tf.device('/job:localhost'):
  reloaded_model = tf.saved_model.load(saved_model_path)
實用方法
測試
with tf.device('/job:localhost'):
  test_dataset = tf.data.Dataset.from_tensor_slices(in_memory_ds[test_split])
  for test_row in test_dataset.shuffle(1000).map(prepare).take(5):
    if len(sentence_features) == 1:
      result = reloaded_model(test_row[0])
    else:
      result = reloaded_model(list(test_row))

    print_bert_results(test_row, result, tfds_name)
sentence: [b'Susan thinks that nobody likes her.']
This sentence is acceptable
BERT raw results: tf.Tensor([-1.8933294  3.5275488], shape=(2,), dtype=float32)

sentence: [b'Once Janet left, Fred became a lot crazier.']
This sentence is acceptable
BERT raw results: tf.Tensor([-1.7920495  2.6326442], shape=(2,), dtype=float32)

sentence: [b'What we donated a chopper to was the new hospital']
This sentence is unacceptable
BERT raw results: tf.Tensor([ 1.3995948  -0.19624823], shape=(2,), dtype=float32)

sentence: [b'I was told that by a little bird.']
This sentence is acceptable
BERT raw results: tf.Tensor([-1.386563  3.435152], shape=(2,), dtype=float32)

sentence: [b'For to do that would be a mistake.']
This sentence is unacceptable
BERT raw results: tf.Tensor([ 2.3502376 -1.3375548], shape=(2,), dtype=float32)
如果您想在 TF Serving 上使用您的模型,請記住它會透過其具名簽章之一呼叫您的 SavedModel。請注意,輸入中存在一些細微差異。在 Python 中,您可以按如下方式測試它們:
with tf.device('/job:localhost'):
  serving_model = reloaded_model.signatures['serving_default']
  for test_row in test_dataset.shuffle(1000).map(prepare_serving).take(5):
    result = serving_model(**test_row)
    # The 'prediction' key is the classifier's defined model name.
    print_bert_results(list(test_row.values()), result['prediction'], tfds_name)
sentence: b'They said that they would all work on that, and all work on that they did.'
This sentence is unacceptable
BERT raw results: tf.Tensor([ 0.71320724 -0.01210704], shape=(2,), dtype=float32)

sentence: b'All of his conversation was reported to me.'
This sentence is acceptable
BERT raw results: tf.Tensor([-1.7974513  2.5984342], shape=(2,), dtype=float32)

sentence: b'Mickey looked it up.'
This sentence is acceptable
BERT raw results: tf.Tensor([-2.4198797  3.6533701], shape=(2,), dtype=float32)

sentence: b'A unicorn is in the garden.'
This sentence is acceptable
BERT raw results: tf.Tensor([-2.2405655  3.7187355], shape=(2,), dtype=float32)

sentence: b'Chris handed Bo a ticket.'
This sentence is acceptable
BERT raw results: tf.Tensor([-2.416213  3.539216], shape=(2,), dtype=float32)
您成功了!您儲存的模型可用於服務或程序中的簡單推論,並具有更簡單的 API,程式碼更少且更易於維護。
後續步驟
現在您已嘗試其中一個基本 BERT 模型,您可以嘗試其他模型以獲得更高的準確性,或者使用較小的模型版本。
您也可以在其他資料集中嘗試。