
|
|
|
 在 GitHub 上檢視 在 GitHub 上檢視
|
|
|
本教學課程包含完整的程式碼,可微調 BERT 以對純文字 IMDB 電影評論資料集執行情感分析。除了訓練模型外,您還將學習如何將文字預處理為適當的格式。
在本筆記本中,您將
- 載入 IMDB 資料集
- 從 TensorFlow Hub 載入 BERT 模型
- 透過結合 BERT 和分類器來建構您自己的模型
- 訓練您自己的模型,並將 BERT 微調作為其中的一部分
- 儲存您的模型並使用它來分類句子
如果您是 IMDB 資料集的新手,請參閱基本文字分類以了解更多詳細資訊。
關於 BERT
BERT 和其他 Transformer 編碼器架構在 NLP(自然語言處理)中的各種任務上都非常成功。它們計算自然語言的向量空間表示,適用於深度學習模型。BERT 模型系列使用 Transformer 編碼器架構來處理輸入文字的每個 token,並考量前後所有 token 的完整上下文,因此得名:Bidirectional Encoder Representations from Transformers。
BERT 模型通常在大型文字語料庫上進行預先訓練,然後針對特定任務進行微調。
設定
# A dependency of the preprocessing for BERT inputspip install -U "tensorflow-text==2.13.*"
您將使用來自 tensorflow/models 的 AdamW 優化器。
pip install "tf-models-official==2.13.*"
import os
import shutil

import tensorflow as tf
import tensorflow_hub as hub
import tensorflow_text as text
from official.nlp import optimization  # to create AdamW optimizer

import matplotlib.pyplot as plt

tf.get_logger().setLevel('ERROR')
情感分析
本筆記本訓練一個情感分析模型,根據評論文字將電影評論分類為正面或負面。
您將使用大型電影評論資料集,其中包含來自網際網路電影資料庫的 50,000 篇電影評論文字。
下載 IMDB 資料集
讓我們下載並解壓縮資料集,然後探索目錄結構。
url = 'https://ai.stanford.edu/~amaas/data/sentiment/aclImdb_v1.tar.gz'

dataset = tf.keras.utils.get_file('aclImdb_v1.tar.gz', url,
                                  untar=True, cache_dir='.',
                                  cache_subdir='')

dataset_dir = os.path.join(os.path.dirname(dataset), 'aclImdb')

train_dir = os.path.join(dataset_dir, 'train')

# remove unused folders to make it easier to load the data
remove_dir = os.path.join(train_dir, 'unsup')
shutil.rmtree(remove_dir)
Downloading data from https://ai.stanford.edu/~amaas/data/sentiment/aclImdb_v1.tar.gz
84125825/84125825 [==============================] - 6s 0us/step
接下來,您將使用 text_dataset_from_directory 公用程式來建立標記的 tf.data.Dataset。
IMDB 資料集已經分為訓練集和測試集,但缺少驗證集。讓我們使用訓練資料的 80:20 拆分,透過使用下面的 validation_split 參數來建立驗證集。
AUTOTUNE = tf.data.AUTOTUNE
batch_size = 32
seed = 42

raw_train_ds = tf.keras.utils.text_dataset_from_directory(
    'aclImdb/train',
    batch_size=batch_size,
    validation_split=0.2,
    subset='training',
    seed=seed)

class_names = raw_train_ds.class_names
train_ds = raw_train_ds.cache().prefetch(buffer_size=AUTOTUNE)

val_ds = tf.keras.utils.text_dataset_from_directory(
    'aclImdb/train',
    batch_size=batch_size,
    validation_split=0.2,
    subset='validation',
    seed=seed)

val_ds = val_ds.cache().prefetch(buffer_size=AUTOTUNE)

test_ds = tf.keras.utils.text_dataset_from_directory(
    'aclImdb/test',
    batch_size=batch_size)

test_ds = test_ds.cache().prefetch(buffer_size=AUTOTUNE)
Found 25000 files belonging to 2 classes.
Using 20000 files for training.
2023-11-17 13:38:17.555894: W tensorflow/core/common_runtime/gpu/gpu_device.cc:1960] Cannot dlopen some GPU libraries. Please make sure the missing libraries mentioned above are installed properly if you would like to use GPU. Follow the guide at https://tensorflow.dev.org.tw/install/gpu for how to download and setup the required libraries for your platform.
Skipping registering GPU devices...
Found 25000 files belonging to 2 classes.
Using 5000 files for validation.
Found 25000 files belonging to 2 classes.
讓我們看看一些評論。
for text_batch, label_batch in train_ds.take(1):
  for i in range(3):
    print(f'Review: {text_batch.numpy()[i]}')
    label = label_batch.numpy()[i]
    print(f'Label : {label} ({class_names[label]})')
Review: b'"Pandemonium" is a horror movie spoof that comes off more stupid than funny. Believe me when I tell you, I love comedies. Especially comedy spoofs. "Airplane", "The Naked Gun" trilogy, "Blazing Saddles", "High Anxiety", and "Spaceballs" are some of my favorite comedies that spoof a particular genre. "Pandemonium" is not up there with those films. Most of the scenes in this movie had me sitting there in stunned silence because the movie wasn\'t all that funny. There are a few laughs in the film, but when you watch a comedy, you expect to laugh a lot more than a few times and that\'s all this film has going for it. Geez, "Scream" had more laughs than this film and that was more of a horror film. How bizarre is that?<br /><br />*1/2 (out of four)'
Label : 0 (neg)
Review: b"David Mamet is a very interesting and a very un-equal director. His first movie 'House of Games' was the one I liked best, and it set a series of films with characters whose perspective of life changes as they get into complicated situations, and so does the perspective of the viewer.<br /><br />So is 'Homicide' which from the title tries to set the mind of the viewer to the usual crime drama. The principal characters are two cops, one Jewish and one Irish who deal with a racially charged area. The murder of an old Jewish shop owner who proves to be an ancient veteran of the Israeli Independence war triggers the Jewish identity in the mind and heart of the Jewish detective.<br /><br />This is were the flaws of the film are the more obvious. The process of awakening is theatrical and hard to believe, the group of Jewish militants is operatic, and the way the detective eventually walks to the final violent confrontation is pathetic. The end of the film itself is Mamet-like smart, but disappoints from a human emotional perspective.<br /><br />Joe Mantegna and William Macy give strong performances, but the flaws of the story are too evident to be easily compensated."
Label : 0 (neg)
Review: b'Great documentary about the lives of NY firefighters during the worst terrorist attack of all time.. That reason alone is why this should be a must see collectors item.. What shocked me was not only the attacks, but the"High Fat Diet" and physical appearance of some of these firefighters. I think a lot of Doctors would agree with me that,in the physical shape they were in, some of these firefighters would NOT of made it to the 79th floor carrying over 60 lbs of gear. Having said that i now have a greater respect for firefighters and i realize becoming a firefighter is a life altering job. The French have a history of making great documentary\'s and that is what this is, a Great Documentary.....'
Label : 1 (pos)
2023-11-17 13:38:20.000995: W tensorflow/core/kernels/data/cache_dataset_ops.cc:854] The calling iterator did not fully read the dataset being cached. In order to avoid unexpected truncation of the dataset, the partially cached contents of the dataset  will be discarded. This can happen if you have an input pipeline similar to `dataset.cache().take(k).repeat()`. You should use `dataset.take(k).cache().repeat()` instead.
從 TensorFlow Hub 載入模型
在此您可以選擇要從 TensorFlow Hub 載入和微調的 BERT 模型。有多個 BERT 模型可用。
- BERT-Base、Uncased 以及由原始 BERT 作者發布的另外七個具有已訓練權重的模型。
- Small BERTs 具有相同的通用架構,但 Transformer 區塊更少和/或更小,這讓您可以探索速度、大小和品質之間的權衡。
- ALBERT:「A Lite BERT」的四種不同大小版本,透過在層之間共享參數來縮減模型大小(但不縮短計算時間)。
- BERT Experts:八個模型都具有 BERT-base 架構,但提供不同預先訓練網域之間的選擇,以更緊密地與目標任務對齊。
- Electra 具有與 BERT 相同的架構(三種不同大小),但作為生成對抗網路 (GAN) 中類似鑑別器的設定進行預先訓練。
- 具有 Talking-Heads Attention 和 Gated GELU 的 BERT [base、large] 對 Transformer 架構的核心進行了兩項改進。
TensorFlow Hub 上的模型文件有更多詳細資訊和研究文獻的參考資料。請按照上面的連結,或點擊下一個儲存格執行後列印的 tfhub.dev URL。
建議從 Small BERT(參數較少)開始,因為它們微調速度更快。如果您喜歡小型模型但具有更高的準確性,ALBERT 可能是您的下一個選擇。如果您想要更高的準確性,請選擇經典的 BERT 大小之一或其最新的改進版本,如 Electra、Talking Heads 或 BERT Expert。
除了下面可用的模型外,還有多個版本的模型更大,可以產生更好的準確性,但它們太大而無法在單個 GPU 上進行微調。您將可以在在 TPU colab 上使用 BERT 解決 GLUE 任務中執行此操作。
您將在下面的程式碼中看到,切換 tfhub.dev URL 就足以嘗試任何這些模型,因為它們之間的所有差異都封裝在來自 TF Hub 的 SavedModels 中。
選擇要微調的 BERT 模型
BERT model selected           : https://tfhub.dev/tensorflow/small_bert/bert_en_uncased_L-4_H-512_A-8/1
Preprocess model auto-selected: https://tfhub.dev/tensorflow/bert_en_uncased_preprocess/3
預處理模型
文字輸入需要轉換為數字 token ID 並排列在多個 Tensor 中,然後才能輸入到 BERT。TensorFlow Hub 為上面討論的每個 BERT 模型提供了一個匹配的預處理模型,該模型使用來自 TF.text 程式庫的 TF ops 實作此轉換。無需在 TensorFlow 模型之外執行純 Python 程式碼來預處理文字。
預處理模型必須是 BERT 模型文件參考的模型,您可以在上面列印的 URL 中閱讀。對於來自上面下拉式選單的 BERT 模型,預處理模型會自動選取。
bert_preprocess_model = hub.KerasLayer(tfhub_handle_preprocess)
讓我們在一些文字上試用預處理模型,看看輸出。
text_test = ['this is such an amazing movie!']
text_preprocessed = bert_preprocess_model(text_test)

print(f'Keys       : {list(text_preprocessed.keys())}')
print(f'Shape      : {text_preprocessed["input_word_ids"].shape}')
print(f'Word Ids   : {text_preprocessed["input_word_ids"][0, :12]}')
print(f'Input Mask : {text_preprocessed["input_mask"][0, :12]}')
print(f'Type Ids   : {text_preprocessed["input_type_ids"][0, :12]}')
Keys       : ['input_mask', 'input_word_ids', 'input_type_ids']
Shape      : (1, 128)
Word Ids   : [ 101 2023 2003 2107 2019 6429 3185  999  102    0    0    0]
Input Mask : [1 1 1 1 1 1 1 1 1 0 0 0]
Type Ids   : [0 0 0 0 0 0 0 0 0 0 0 0]
如您所見,現在您有了 BERT 模型將使用的預處理的 3 個輸出 (input_words_id、input_mask 和 input_type_ids)。
其他一些重點
- 輸入被截斷為 128 個 token。token 數量可以自訂,您可以在在 TPU colab 上使用 BERT 解決 GLUE 任務中查看更多詳細資訊。
input_type_ids只有一個值 (0),因為這是單一句子輸入。對於多個句子輸入,每個輸入都會有一個數字。
由於此文字預處理器是 TensorFlow 模型,因此可以直接包含在您的模型中。
使用 BERT 模型
在將 BERT 放入您自己的模型之前,讓我們看看它的輸出。您將從 TF Hub 載入它並查看傳回的值。
bert_model = hub.KerasLayer(tfhub_handle_encoder)
bert_results = bert_model(text_preprocessed)

print(f'Loaded BERT: {tfhub_handle_encoder}')
print(f'Pooled Outputs Shape:{bert_results["pooled_output"].shape}')
print(f'Pooled Outputs Values:{bert_results["pooled_output"][0, :12]}')
print(f'Sequence Outputs Shape:{bert_results["sequence_output"].shape}')
print(f'Sequence Outputs Values:{bert_results["sequence_output"][0, :12]}')
Loaded BERT: https://tfhub.dev/tensorflow/small_bert/bert_en_uncased_L-4_H-512_A-8/1
Pooled Outputs Shape:(1, 512)
Pooled Outputs Values:[ 0.762629    0.99280983 -0.18611868  0.36673862  0.15233733  0.6550447
  0.9681154  -0.9486271   0.00216128 -0.9877732   0.06842692 -0.97630584]
Sequence Outputs Shape:(1, 128, 512)
Sequence Outputs Values:[[-0.28946346  0.3432128   0.33231518 ...  0.21300825  0.7102068
  -0.05771117]
 [-0.28742072  0.31981036 -0.23018576 ...  0.58455    -0.21329743
   0.72692114]
 [-0.66157067  0.68876773 -0.8743301  ...  0.1087725  -0.26173177
   0.47855407]
 ...
 [-0.2256118  -0.2892561  -0.0706445  ...  0.47566038  0.83277136
   0.40025333]
 [-0.2982428  -0.27473134 -0.05450517 ...  0.48849747  1.0955354
   0.18163396]
 [-0.44378242  0.00930811  0.07223688 ...  0.1729009   1.1833243
   0.07898017]]
BERT 模型傳回一個包含 3 個重要鍵的 map:pooled_output、sequence_output、encoder_outputs
pooled_output將每個輸入序列表示為一個整體。形狀為[batch_size, H]。您可以將其視為整個電影評論的嵌入。sequence_output表示上下文中的每個輸入 token。形狀為[batch_size, seq_length, H]。您可以將其視為電影評論中每個 token 的上下文嵌入。encoder_outputs是 L 個 Transformer 區塊的中間激活。outputs["encoder_outputs"][i]是一個形狀為[batch_size, seq_length, 1024]的 Tensor,其中包含第 i 個 Transformer 區塊的輸出,其中0 <= i < L。列表的最後一個值等於sequence_output。
對於微調,您將使用 pooled_output 陣列。
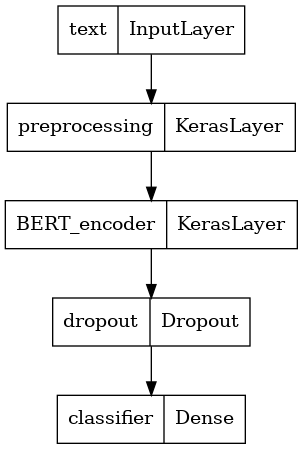
定義您的模型
您將建立一個非常簡單的微調模型,其中包含預處理模型、選定的 BERT 模型、一個 Dense 層和一個 Dropout 層。
def build_classifier_model():
  text_input = tf.keras.layers.Input(shape=(), dtype=tf.string, name='text')
  preprocessing_layer = hub.KerasLayer(tfhub_handle_preprocess, name='preprocessing')
  encoder_inputs = preprocessing_layer(text_input)
  encoder = hub.KerasLayer(tfhub_handle_encoder, trainable=True, name='BERT_encoder')
  outputs = encoder(encoder_inputs)
  net = outputs['pooled_output']
  net = tf.keras.layers.Dropout(0.1)(net)
  net = tf.keras.layers.Dense(1, activation=None, name='classifier')(net)
  return tf.keras.Model(text_input, net)
讓我們檢查模型是否使用預處理模型的輸出執行。
classifier_model = build_classifier_model()
bert_raw_result = classifier_model(tf.constant(text_test))
print(tf.sigmoid(bert_raw_result))
tf.Tensor([[0.21878408]], shape=(1, 1), dtype=float32)
輸出當然是沒有意義的,因為模型尚未經過訓練。
讓我們看看模型的結構。
tf.keras.utils.plot_model(classifier_model)
模型訓練
您現在擁有訓練模型的所有組件,包括預處理模組、BERT 編碼器、資料和分類器。
損失函數
由於這是一個二元分類問題,並且模型輸出一個機率(單元層),您將使用 losses.BinaryCrossentropy 損失函數。
loss = tf.keras.losses.BinaryCrossentropy(from_logits=True)
metrics = tf.metrics.BinaryAccuracy()
優化器
對於微調,讓我們使用 BERT 最初訓練時使用的相同優化器:「Adaptive Moments」(Adam)。此優化器透過權重衰減(不使用動量)來最小化預測損失並進行正規化,這也稱為 AdamW。
對於學習率 (init_lr),您將使用與 BERT 預先訓練相同的排程:名義初始學習率的線性衰減,前綴為訓練步驟前 10% 的線性預熱階段 (num_warmup_steps)。根據 BERT 論文,微調的初始學習率較小(最佳值為 5e-5、3e-5、2e-5)。
epochs = 5
steps_per_epoch = tf.data.experimental.cardinality(train_ds).numpy()
num_train_steps = steps_per_epoch * epochs
num_warmup_steps = int(0.1*num_train_steps)

init_lr = 3e-5
optimizer = optimization.create_optimizer(init_lr=init_lr,
                                          num_train_steps=num_train_steps,
                                          num_warmup_steps=num_warmup_steps,
                                          optimizer_type='adamw')
載入 BERT 模型和訓練
使用您先前建立的 classifier_model,您可以使用損失、指標和優化器編譯模型。
classifier_model.compile(optimizer=optimizer,
                         loss=loss,
                         metrics=metrics)
print(f'Training model with {tfhub_handle_encoder}')
history = classifier_model.fit(x=train_ds,
                               validation_data=val_ds,
                               epochs=epochs)
Training model with https://tfhub.dev/tensorflow/small_bert/bert_en_uncased_L-4_H-512_A-8/1
Epoch 1/5
625/625 [==============================] - 703s 1s/step - loss: 0.4885 - binary_accuracy: 0.7435 - val_loss: 0.3795 - val_binary_accuracy: 0.8350
Epoch 2/5
625/625 [==============================] - 688s 1s/step - loss: 0.3300 - binary_accuracy: 0.8536 - val_loss: 0.3708 - val_binary_accuracy: 0.8424
Epoch 3/5
625/625 [==============================] - 687s 1s/step - loss: 0.2522 - binary_accuracy: 0.8935 - val_loss: 0.3942 - val_binary_accuracy: 0.8434
Epoch 4/5
625/625 [==============================] - 687s 1s/step - loss: 0.1991 - binary_accuracy: 0.9208 - val_loss: 0.4291 - val_binary_accuracy: 0.8514
Epoch 5/5
625/625 [==============================] - 686s 1s/step - loss: 0.1573 - binary_accuracy: 0.9410 - val_loss: 0.4724 - val_binary_accuracy: 0.8536
評估模型
讓我們看看模型的效能如何。將傳回兩個值。損失(代表誤差的數字,數值越低越好)和準確性。
loss, accuracy = classifier_model.evaluate(test_ds)

print(f'Loss: {loss}')
print(f'Accuracy: {accuracy}')
782/782 [==============================] - 221s 282ms/step - loss: 0.4534 - binary_accuracy: 0.8548
Loss: 0.4534495174884796
Accuracy: 0.8547999858856201
繪製準確性和損失隨時間變化的圖表
根據 model.fit() 傳回的 History 物件。您可以繪製訓練和驗證損失以進行比較,以及訓練和驗證準確性
history_dict = history.history
print(history_dict.keys())

acc = history_dict['binary_accuracy']
val_acc = history_dict['val_binary_accuracy']
loss = history_dict['loss']
val_loss = history_dict['val_loss']

epochs = range(1, len(acc) + 1)
fig = plt.figure(figsize=(10, 6))
fig.tight_layout()

plt.subplot(2, 1, 1)
# r is for "solid red line"
plt.plot(epochs, loss, 'r', label='Training loss')
# b is for "solid blue line"
plt.plot(epochs, val_loss, 'b', label='Validation loss')
plt.title('Training and validation loss')
# plt.xlabel('Epochs')
plt.ylabel('Loss')
plt.legend()

plt.subplot(2, 1, 2)
plt.plot(epochs, acc, 'r', label='Training acc')
plt.plot(epochs, val_acc, 'b', label='Validation acc')
plt.title('Training and validation accuracy')
plt.xlabel('Epochs')
plt.ylabel('Accuracy')
plt.legend(loc='lower right')
dict_keys(['loss', 'binary_accuracy', 'val_loss', 'val_binary_accuracy'])
<matplotlib.legend.Legend at 0x7fa410141c10>
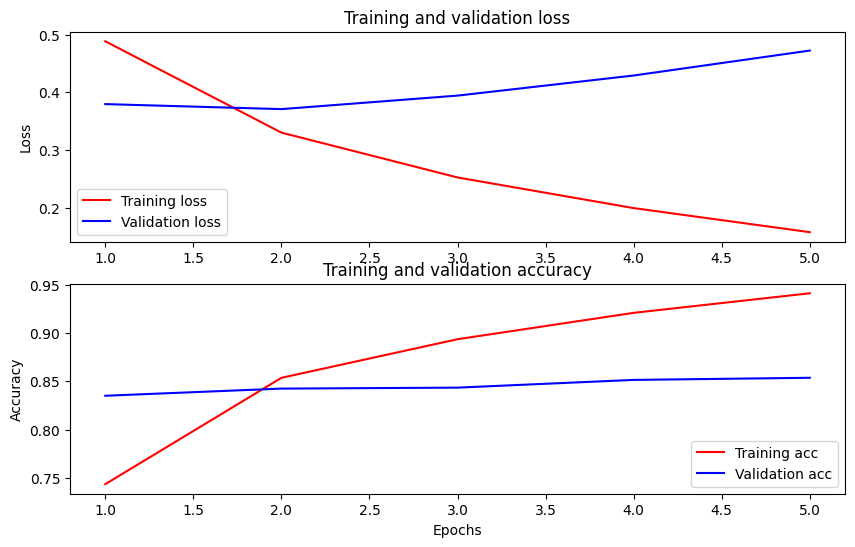
在此圖表中,紅線代表訓練損失和準確性,藍線代表驗證損失和準確性。
匯出以進行推論
現在您只需儲存您微調的模型以供日後使用。
dataset_name = 'imdb'
saved_model_path = './{}_bert'.format(dataset_name.replace('/', '_'))

classifier_model.save(saved_model_path, include_optimizer=False)
讓我們重新載入模型,以便您可以與仍在記憶體中的模型並排試用。
reloaded_model = tf.saved_model.load(saved_model_path)
在此您可以測試您模型在任何您想要的句子上,只需新增到下面的 examples 變數即可。
def print_my_examples(inputs, results):
  result_for_printing = \
    [f'input: {inputs[i]:<30} : score: {results[i][0]:.6f}'
                         for i in range(len(inputs))]
  print(*result_for_printing, sep='\n')
  print()


examples = [
    'this is such an amazing movie!',  # this is the same sentence tried earlier
    'The movie was great!',
    'The movie was meh.',
    'The movie was okish.',
    'The movie was terrible...'
]

reloaded_results = tf.sigmoid(reloaded_model(tf.constant(examples)))
original_results = tf.sigmoid(classifier_model(tf.constant(examples)))

print('Results from the saved model:')
print_my_examples(examples, reloaded_results)
print('Results from the model in memory:')
print_my_examples(examples, original_results)
Results from the saved model:
input: this is such an amazing movie! : score: 0.997565
input: The movie was great!           : score: 0.983252
input: The movie was meh.             : score: 0.986901
input: The movie was okish.           : score: 0.206568
input: The movie was terrible...      : score: 0.001724

Results from the model in memory:
input: this is such an amazing movie! : score: 0.997565
input: The movie was great!           : score: 0.983252
input: The movie was meh.             : score: 0.986901
input: The movie was okish.           : score: 0.206568
input: The movie was terrible...      : score: 0.001724
如果您想在 TF Serving 上使用您的模型,請記住它將透過其命名的簽章之一呼叫您的 SavedModel。在 Python 中,您可以按如下方式測試它們
serving_results = reloaded_model \
            .signatures['serving_default'](tf.constant(examples))

serving_results = tf.sigmoid(serving_results['classifier'])

print_my_examples(examples, serving_results)
input: this is such an amazing movie! : score: 0.997565
input: The movie was great!           : score: 0.983252
input: The movie was meh.             : score: 0.986901
input: The movie was okish.           : score: 0.206568
input: The movie was terrible...      : score: 0.001724
後續步驟
作為後續步驟,您可以嘗試在 TPU 上使用 BERT 解決 GLUE 任務教學課程,該課程在 TPU 上執行,並向您展示如何處理多個輸入。