
|
|
|
 在 GitHub 上檢視 在 GitHub 上檢視
|
|
|
這個 Colab 示範如何使用以生成對抗網路 (GAN) 為基礎的 TF Hub 模組。此模組會將 N 維向量 (稱為潛在空間) 對應至 RGB 圖片。
提供兩個範例
- 從潛在空間對應至圖片,以及
- 在指定目標圖片的情況下,使用梯度下降法尋找可產生類似目標圖片的潛在向量。
選用先決條件
- 熟悉低階 Tensorflow 概念。
- 維基百科上的生成對抗網路。
- 關於 Progressive GAN 的論文:Progressive Growing of GANs for Improved Quality, Stability, and Variation。
更多模型
這裡您可以找到目前在 tfhub.dev 上託管的所有可產生圖片的模型。
設定
# Install imageio for creating animations.pip -q install imageiopip -q install scikit-imagepip install git+https://github.com/tensorflow/docs
匯入和函式定義
潛在空間內插
隨機向量
在兩個隨機初始化的向量之間進行潛在空間內插。我們將使用 TF Hub 模組 progan-128,其中包含預先訓練的 Progressive GAN。
progan = hub.load("https://tfhub.dev/google/progan-128/1").signatures['default']
2024-03-09 13:17:20.450855: E external/local_xla/xla/stream_executor/cuda/cuda_driver.cc:282] failed call to cuInit: CUDA_ERROR_NO_DEVICE: no CUDA-capable device is detected
def interpolate_between_vectors():
  v1 = tf.random.normal([latent_dim])
  v2 = tf.random.normal([latent_dim])

  # Creates a tensor with 25 steps of interpolation between v1 and v2.
  vectors = interpolate_hypersphere(v1, v2, 50)

  # Uses module to generate images from the latent space.
  interpolated_images = progan(vectors)['default']

  return interpolated_images

interpolated_images = interpolate_between_vectors()
animate(interpolated_images)
在潛在空間中尋找最接近的向量
修正目標圖片。例如,使用從模組產生的圖片,或上傳您自己的圖片。
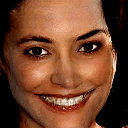
image_from_module_space = True  # @param { isTemplate:true, type:"boolean" }

def get_module_space_image():
  vector = tf.random.normal([1, latent_dim])
  images = progan(vector)['default'][0]
  return images

def upload_image():
  uploaded = files.upload()
  image = imageio.imread(uploaded[list(uploaded.keys())[0]])
  return transform.resize(image, [128, 128])

if image_from_module_space:
  target_image = get_module_space_image()
else:
  target_image = upload_image()

display_image(target_image)

在定義目標圖片與潛在空間變數產生的圖片之間的損失函數之後,我們可以使用梯度下降法來尋找可將損失降至最低的變數值。
tf.random.set_seed(42)
initial_vector = tf.random.normal([1, latent_dim])
display_image(progan(initial_vector)['default'][0])

def find_closest_latent_vector(initial_vector, num_optimization_steps,
steps_per_image):
images = []
losses = []
vector = tf.Variable(initial_vector)
optimizer = tf.optimizers.Adam(learning_rate=0.01)
loss_fn = tf.losses.MeanAbsoluteError(reduction="sum")
for step in range(num_optimization_steps):
if (step % 100)==0:
print()
print('.', end='')
with tf.GradientTape() as tape:
image = progan(vector.read_value())['default'][0]
if (step % steps_per_image) == 0:
images.append(image.numpy())
target_image_difference = loss_fn(image, target_image[:,:,:3])
# The latent vectors were sampled from a normal distribution. We can get
# more realistic images if we regularize the length of the latent vector to
# the average length of vector from this distribution.
regularizer = tf.abs(tf.norm(vector) - np.sqrt(latent_dim))
loss = target_image_difference + regularizer
losses.append(loss.numpy())
grads = tape.gradient(loss, [vector])
optimizer.apply_gradients(zip(grads, [vector]))
return images, losses
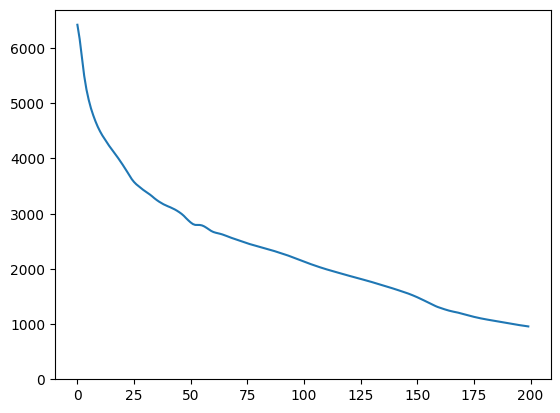
num_optimization_steps=200
steps_per_image=5
images, loss = find_closest_latent_vector(initial_vector, num_optimization_steps, steps_per_image)
....................................................................................................
....................................................................................................
plt.plot(loss)
plt.ylim([0,max(plt.ylim())])
(0.0, 6696.3041717529295)
animate(np.stack(images))

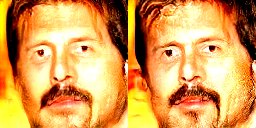
將結果與目標進行比較
display_image(np.concatenate([images[-1], target_image], axis=1))
試用上述範例
如果圖片來自模組空間,則下降速度很快,並會收斂到合理的範例。試著下降到非來自模組空間的圖片。只有當圖片與訓練圖片空間相當接近時,下降才會收斂。
如何讓下降速度更快,並產生更逼真的圖片?您可以嘗試
- 對圖片差異使用不同的損失,例如二次方、
- 對潛在向量使用不同的正規化器、
- 從多個執行中的隨機向量初始化、
- 等等。