
|
|
|
 在 GitHub 上檢視 在 GitHub 上檢視
|
|
這個 Colab 示範如何使用 Tensorflow Hub 進行非英文/本地語言的文字分類。這裡我們選擇 Bangla 作為本地語言,並使用預先訓練的詞組嵌入來解決多類別分類任務,我們將 Bangla 新聞文章分為 5 個類別。Bangla 的預先訓練嵌入來自 fastText,fastText 是 Facebook 的程式庫,發布了 157 種語言的預先訓練詞向量。
我們會先使用 TF-Hub 的預先訓練嵌入匯出工具將詞組嵌入轉換為文字嵌入模組,然後使用該模組透過 tf.keras (Tensorflow 的高階使用者友善 API) 來建構深度學習模型,以訓練分類器。即使我們在這裡使用 fastText 嵌入,也可以匯出從其他任務預先訓練的任何其他嵌入,並透過 Tensorflow Hub 快速獲得結果。
設定
# https://github.com/pypa/setuptools/issues/1694#issuecomment-466010982pip install gdown --no-use-pep517
sudo apt-get install -y unzip
Reading package lists...
Building dependency tree...
Reading state information...
unzip is already the newest version (6.0-25ubuntu1.1).
The following packages were automatically installed and are no longer required:
  libatasmart4 libblockdev-fs2 libblockdev-loop2 libblockdev-part-err2
  libblockdev-part2 libblockdev-swap2 libblockdev-utils2 libblockdev2
  libparted-fs-resize0 libxmlb2
Use 'sudo apt autoremove' to remove them.
0 upgraded, 0 newly installed, 0 to remove and 159 not upgraded.
import os

import tensorflow as tf
import tensorflow_hub as hub

import gdown
import numpy as np
from sklearn.metrics import classification_report
import matplotlib.pyplot as plt
import seaborn as sns
2024-02-02 12:29:03.681459: E external/local_xla/xla/stream_executor/cuda/cuda_dnn.cc:9261] Unable to register cuDNN factory: Attempting to register factory for plugin cuDNN when one has already been registered
2024-02-02 12:29:03.681511: E external/local_xla/xla/stream_executor/cuda/cuda_fft.cc:607] Unable to register cuFFT factory: Attempting to register factory for plugin cuFFT when one has already been registered
2024-02-02 12:29:03.683037: E external/local_xla/xla/stream_executor/cuda/cuda_blas.cc:1515] Unable to register cuBLAS factory: Attempting to register factory for plugin cuBLAS when one has already been registered
資料集
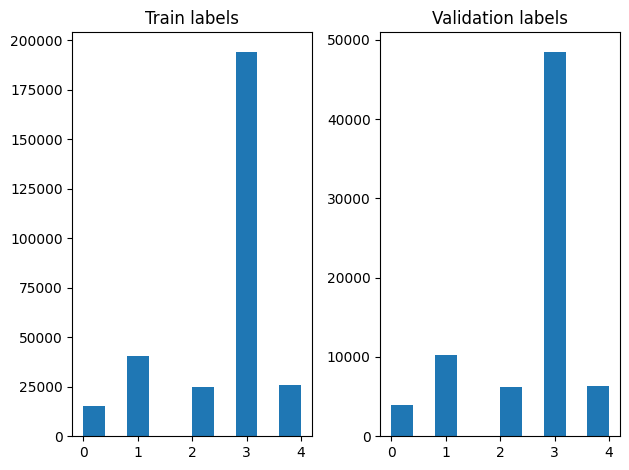
我們會使用 BARD (Bangla 文章資料集),其中包含約 376,226 篇文章,這些文章是從不同的 Bangla 新聞入口網站收集而來,並標記了 5 個類別:經濟、州、國際、體育和娛樂。我們會從 Google 雲端硬碟下載檔案,這個 (bit.ly/BARD_DATASET) 連結來自 這個 GitHub 存放庫。
gdown.download(
    url='https://drive.google.com/uc?id=1Ag0jd21oRwJhVFIBohmX_ogeojVtapLy',
    output='bard.zip',
    quiet=True
)
'bard.zip'
unzip -qo bard.zip
將預先訓練的詞向量匯出至 TF-Hub 模組
TF-Hub 提供一些實用的指令碼,可將詞組嵌入轉換為 TF-hub 文字嵌入模組 這裡。若要為 Bangla 或任何其他語言建立模組,我們只需將詞組嵌入 .txt 或 .vec 檔案下載到與 export_v2.py 相同的目錄,然後執行指令碼即可。
匯出工具會讀取嵌入向量,並將其匯出至 Tensorflow SavedModel。SavedModel 包含完整的 TensorFlow 程式,包括權重和圖表。TF-Hub 可以將 SavedModel 載入為 模組,我們將使用此模組來建構文字分類模型。由於我們使用 tf.keras 來建構模型,因此我們會使用 hub.KerasLayer,它為 TF-Hub 模組提供包裝函式,以用作 Keras 層。
首先,我們會從 fastText 取得詞組嵌入,並從 TF-Hub 存放庫 取得嵌入匯出工具。
curl -O https://dl.fbaipublicfiles.com/fasttext/vectors-crawl/cc.bn.300.vec.gzcurl -O https://raw.githubusercontent.com/tensorflow/hub/master/examples/text_embeddings_v2/export_v2.pygunzip -qf cc.bn.300.vec.gz --k
% Total    % Received % Xferd  Average Speed   Time    Time     Time  Current
                                 Dload  Upload   Total   Spent    Left  Speed
100  840M  100  840M    0     0  42.9M      0  0:00:19  0:00:19 --:--:-- 40.4M
  % Total    % Received % Xferd  Average Speed   Time    Time     Time  Current
                                 Dload  Upload   Total   Spent    Left  Speed
100  7500  100  7500    0     0  56818      0 --:--:-- --:--:-- --:--:-- 56818
然後,我們會對嵌入檔案執行匯出工具指令碼。由於 fastText 嵌入具有標頭行且相當大 (轉換為模組後,Bangla 約為 3.3 GB),因此我們忽略第一行,且僅將前 100,000 個符記匯出至文字嵌入模組。
python export_v2.py --embedding_file=cc.bn.300.vec --export_path=text_module --num_lines_to_ignore=1 --num_lines_to_use=100000
2024-02-02 12:30:25.110154: E external/local_xla/xla/stream_executor/cuda/cuda_dnn.cc:9261] Unable to register cuDNN factory: Attempting to register factory for plugin cuDNN when one has already been registered
2024-02-02 12:30:25.110207: E external/local_xla/xla/stream_executor/cuda/cuda_fft.cc:607] Unable to register cuFFT factory: Attempting to register factory for plugin cuFFT when one has already been registered
2024-02-02 12:30:25.111689: E external/local_xla/xla/stream_executor/cuda/cuda_blas.cc:1515] Unable to register cuBLAS factory: Attempting to register factory for plugin cuBLAS when one has already been registered
2024-02-02 12:30:27.321508: E external/local_xla/xla/stream_executor/cuda/cuda_driver.cc:274] failed call to cuInit: CUDA_ERROR_NO_DEVICE: no CUDA-capable device is detected
INFO:tensorflow:Assets written to: text_module/assets
I0202 12:30:40.352254 140300656232256 builder_impl.py:801] Assets written to: text_module/assets
I0202 12:30:40.356071 140300656232256 fingerprinting_utils.py:49] Writing fingerprint to text_module/fingerprint.pb
module_path = "text_module"
embedding_layer = hub.KerasLayer(module_path, trainable=False)
2024-02-02 12:30:41.057019: E external/local_xla/xla/stream_executor/cuda/cuda_driver.cc:274] failed call to cuInit: CUDA_ERROR_NO_DEVICE: no CUDA-capable device is detected
文字嵌入模組會將一批句子 (以字串的 1D 張量表示) 作為輸入,並輸出形狀為 (batch_size, embedding_dim) 的嵌入向量 (對應於句子)。它會透過依空格分割來預先處理輸入。詞組嵌入會與 sqrtn 組合器結合為句子嵌入 (請參閱這裡)。為了示範,我們會傳遞 Bangla 字詞的清單作為輸入,並取得對應的嵌入向量。
embedding_layer(['বাস', 'বসবাস', 'ট্রেন', 'যাত্রী', 'ট্রাক'])
<tf.Tensor: shape=(5, 300), dtype=float64, numpy=
array([[ 0.0462, -0.0355,  0.0129, ...,  0.0025, -0.0966,  0.0216],
       [-0.0631, -0.0051,  0.085 , ...,  0.0249, -0.0149,  0.0203],
       [ 0.1371, -0.069 , -0.1176, ...,  0.029 ,  0.0508, -0.026 ],
       [ 0.0532, -0.0465, -0.0504, ...,  0.02  , -0.0023,  0.0011],
       [ 0.0908, -0.0404, -0.0536, ..., -0.0275,  0.0528,  0.0253]])>
轉換為 Tensorflow 資料集
由於資料集非常龐大,我們不會將整個資料集載入記憶體,而是使用產生器來使用 Tensorflow 資料集 函數以批次形式在執行階段產生樣本。資料集也非常不平衡,因此,在使用產生器之前,我們會先隨機排列資料集。
dir_names = ['economy', 'sports', 'entertainment', 'state', 'international']

file_paths = []
labels = []
for i, dir in enumerate(dir_names):
  file_names = ["/".join([dir, name]) for name in os.listdir(dir)]
  file_paths += file_names
  labels += [i] * len(os.listdir(dir))

np.random.seed(42)
permutation = np.random.permutation(len(file_paths))

file_paths = np.array(file_paths)[permutation]
labels = np.array(labels)[permutation]
我們可以檢查隨機排列後訓練和驗證範例中標籤的分佈。
train_frac = 0.8
train_size = int(len(file_paths) * train_frac)
# plot training vs validation distribution
plt.subplot(1, 2, 1)
plt.hist(labels[0:train_size])
plt.title("Train labels")
plt.subplot(1, 2, 2)
plt.hist(labels[train_size:])
plt.title("Validation labels")
plt.tight_layout()
若要使用產生器建立 Dataset,我們先撰寫一個產生器函數,該函數會從 file_paths 讀取每篇文章,並從標籤陣列讀取標籤,然後在每個步驟產生一個訓練範例。我們會將這個產生器函數傳遞至 tf.data.Dataset.from_generator 方法,並指定輸出類型。每個訓練範例都是一個元組,其中包含 tf.string 資料類型的文章和單熱編碼標籤。我們會使用 tf.data.Dataset.skip 和 tf.data.Dataset.take 方法,以 80-20 的訓練驗證比例分割資料集。
def load_file(path, label):
    return tf.io.read_file(path), label
def make_datasets(train_size):
  batch_size = 256

  train_files = file_paths[:train_size]
  train_labels = labels[:train_size]
  train_ds = tf.data.Dataset.from_tensor_slices((train_files, train_labels))
  train_ds = train_ds.map(load_file).shuffle(5000)
  train_ds = train_ds.batch(batch_size).prefetch(tf.data.AUTOTUNE)

  test_files = file_paths[train_size:]
  test_labels = labels[train_size:]
  test_ds = tf.data.Dataset.from_tensor_slices((test_files, test_labels))
  test_ds = test_ds.map(load_file)
  test_ds = test_ds.batch(batch_size).prefetch(tf.data.AUTOTUNE)


  return train_ds, test_ds
train_data, validation_data = make_datasets(train_size)
模型訓練與評估
由於我們已在模組周圍新增包裝函式,使其可像 Keras 中的任何其他層一樣使用,因此我們可以建立一個小型的 Sequential 模型,它是層的線性堆疊。我們可以像新增任何其他層一樣,使用 model.add 新增文字嵌入模組。我們會透過指定損失和最佳化工具來編譯模型,並訓練 10 個週期。tf.keras API 可以處理 Tensorflow 資料集作為輸入,因此我們可以將 Dataset 執行個體傳遞至 fit 方法以進行模型訓練。由於我們使用產生器函數,tf.data 將處理產生樣本、批次處理樣本並將其饋送至模型。
模型
def create_model():
  model = tf.keras.Sequential([
    tf.keras.layers.Input(shape=[], dtype=tf.string),
    embedding_layer,
    tf.keras.layers.Dense(64, activation="relu"),
    tf.keras.layers.Dense(16, activation="relu"),
    tf.keras.layers.Dense(5),
  ])
  model.compile(loss=tf.losses.SparseCategoricalCrossentropy(from_logits=True),
      optimizer="adam", metrics=['accuracy'])
  return model
model = create_model()
# Create earlystopping callback
early_stopping_callback = tf.keras.callbacks.EarlyStopping(monitor='val_loss', min_delta=0, patience=3)
訓練
history = model.fit(train_data,
                    validation_data=validation_data,
                    epochs=5,
                    callbacks=[early_stopping_callback])
Epoch 1/5
1176/1176 [==============================] - 40s 33ms/step - loss: 0.2137 - accuracy: 0.9283 - val_loss: 0.1510 - val_accuracy: 0.9491
Epoch 2/5
1176/1176 [==============================] - 39s 33ms/step - loss: 0.1420 - accuracy: 0.9503 - val_loss: 0.1348 - val_accuracy: 0.9531
Epoch 3/5
1176/1176 [==============================] - 39s 33ms/step - loss: 0.1296 - accuracy: 0.9533 - val_loss: 0.1254 - val_accuracy: 0.9556
Epoch 4/5
1176/1176 [==============================] - 39s 33ms/step - loss: 0.1220 - accuracy: 0.9558 - val_loss: 0.1236 - val_accuracy: 0.9553
Epoch 5/5
1176/1176 [==============================] - 39s 33ms/step - loss: 0.1164 - accuracy: 0.9574 - val_loss: 0.1177 - val_accuracy: 0.9575
評估
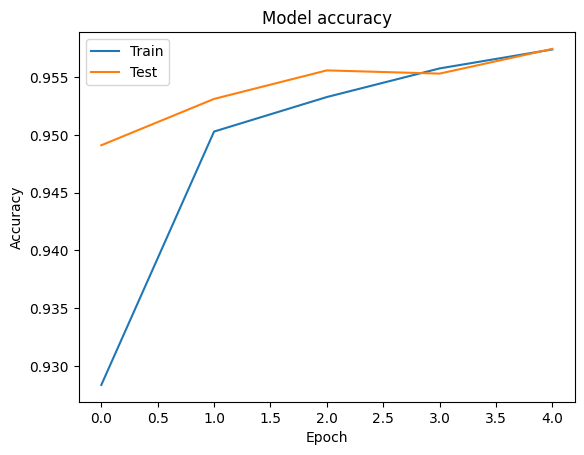
我們可以針對訓練和驗證資料,使用 tf.keras.callbacks.History 物件 (由 tf.keras.Model.fit 方法傳回) 來視覺化準確度和損失曲線,其中包含每個週期的損失和準確度值。
# Plot training & validation accuracy values
plt.plot(history.history['accuracy'])
plt.plot(history.history['val_accuracy'])
plt.title('Model accuracy')
plt.ylabel('Accuracy')
plt.xlabel('Epoch')
plt.legend(['Train', 'Test'], loc='upper left')
plt.show()
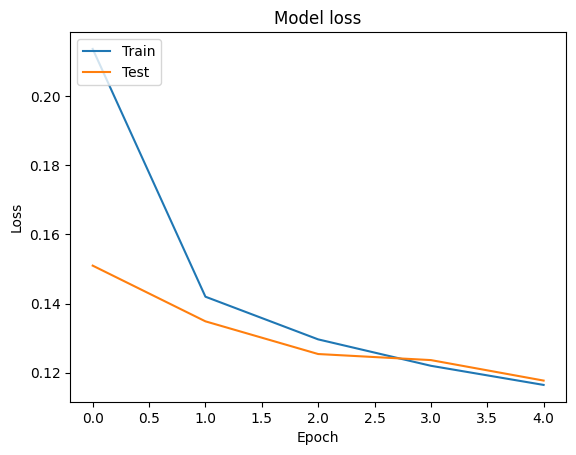
# Plot training & validation loss values
plt.plot(history.history['loss'])
plt.plot(history.history['val_loss'])
plt.title('Model loss')
plt.ylabel('Loss')
plt.xlabel('Epoch')
plt.legend(['Train', 'Test'], loc='upper left')
plt.show()
預測
我們可以取得驗證資料的預測,並檢查混淆矩陣,以查看模型在 5 個類別中的每個類別的效能。由於 tf.keras.Model.predict 方法會針對每個類別傳回機率的 n 維陣列,因此可以使用 np.argmax 將其轉換為類別標籤。
y_pred = model.predict(validation_data)
294/294 [==============================] - 8s 26ms/step
y_pred = np.argmax(y_pred, axis=1)
samples = file_paths[0:3]
for i, sample in enumerate(samples):
  f = open(sample)
  text = f.read()
  print(text[0:100])
  print("True Class: ", sample.split("/")[0])
  print("Predicted Class: ", dir_names[y_pred[i]])
  f.close()
বৃহস্পতিবার বিকেল। রাজধানীর তেজগাঁওয়ের কোক স্টুডিওর প্রধান ফটক পেরিয়ে ভেতরে ঢুকতেই দেখা গেল, পুলিশ
True Class:  entertainment
Predicted Class:  state

মানিকগঞ্জ পৌর এলাকার ছিদ্দিকনগরে আজ বুধবার থেকে তিন দিনব্যাপী ইজতেমা শুরু হচ্ছে। বাদ জোহর এর আনুষ্ঠ
True Class:  state
Predicted Class:  state

ফিল হিউজ অ্যাডিলেডে থাকবেন না। আবার থাকবেনও।সতীর্থর অকালমৃত্যুর শোকে এখনো আচ্ছন্ন অস্ট্রেলিয়ান খেল
True Class:  sports
Predicted Class:  state
比較效能
現在我們可以從 labels 取得驗證資料的正確標籤,並將其與我們的預測進行比較,以取得 classification_report。
y_true = np.array(labels[train_size:])
print(classification_report(y_true, y_pred, target_names=dir_names))
precision    recall  f1-score   support

      economy       0.83      0.77      0.80      3897
       sports       0.98      0.99      0.98     10204
entertainment       0.91      0.93      0.92      6256
        state       0.97      0.97      0.97     48512
international       0.92      0.94      0.93      6377

     accuracy                           0.96     75246
    macro avg       0.92      0.92      0.92     75246
 weighted avg       0.96      0.96      0.96     75246
我們也可以將模型的效能與原始 論文 中發布的結果進行比較,該論文的精確度為 0.96。原始作者描述了對資料集執行的許多預先處理步驟,例如捨棄標點符號和數字,以及移除前 25 個最常見的停用詞。正如我們在 classification_report 中所見,我們也成功在僅訓練 5 個週期且未進行任何預先處理的情況下,獲得 0.96 的精確度和準確度!
在這個範例中,當我們從嵌入模組建立 Keras 層時,我們將參數 trainable=False 設定為,這表示嵌入權重在訓練期間不會更新。嘗試將其設定為 True,以便在使用此資料集後,僅需 2 個週期即可達到約 97% 的準確度。