
本教學課程說明如何使用 TensorFlow Transform (tf.Transform 程式庫) 來實作機器學習 (ML) 的資料預先處理。tf.Transform TensorFlow 程式庫可讓您透過資料預先處理管線定義執行個體層級和完整傳遞資料轉換。這些管線會透過 Apache Beam 有效率地執行,並產生 TensorFlow 圖表作為副產品,以便在模型提供服務時,在預測期間套用相同的轉換。
本教學課程提供使用 Dataflow 作為 Apache Beam 執行器的端對端範例。本教學課程假設您熟悉 BigQuery、Dataflow、Vertex AI 和 TensorFlow Keras API。本教學課程也假設您有一些使用 Jupyter Notebook 的經驗,例如使用 Vertex AI Workbench。
本教學課程也假設您熟悉 Google Cloud 上預先處理類型、挑戰和選項的概念,如 ML 資料預先處理:選項與建議中所述。
目標
- 使用
tf.Transform程式庫實作 Apache Beam 管線。 - 在 Dataflow 中執行管線。
- 使用
tf.Transform程式庫實作 TensorFlow 模型。 - 訓練模型並將模型用於預測。
費用
本教學課程使用 Google Cloud 的下列計費元件
若要估算執行本教學課程的費用,假設您整天使用所有資源,請使用預先設定的定價計算機。
事前準備
在 Google Cloud 控制台中,在專案選取器頁面上,選取或建立 Google Cloud 專案。
確認您的 Cloud 專案已啟用計費功能。瞭解如何查看專案是否已啟用計費功能。
啟用 Dataflow、Vertex AI 和 Notebooks API。啟用 API
本解決方案的 Jupyter Notebook
下列 Jupyter Notebook 顯示了實作範例
- Notebook 1涵蓋資料預先處理。詳細資訊請參閱稍後的實作 Apache Beam 管線章節。
- Notebook 2涵蓋模型訓練。詳細資訊請參閱稍後的實作 TensorFlow 模型章節。
在以下章節中,您將複製這些 Notebook,然後執行 Notebook 以瞭解實作範例的運作方式。
啟動使用者管理的 Notebook 執行個體
在 Google Cloud 控制台中,前往 Vertex AI Workbench 頁面。
在 使用者管理的 Notebook 索引標籤中,按一下 +新增 Notebook。
針對執行個體類型,選取 TensorFlow Enterprise 2.8 (含 LTS) (不含 GPU)。
按一下 建立。
建立 Notebook 後,請等待 JupyterLab 的 Proxy 完成初始化。準備就緒時,Notebook 名稱旁邊會顯示 開啟 JupyterLab。
複製 Notebook
在 使用者管理的 Notebook 索引標籤中,在 Notebook 名稱旁邊,按一下 開啟 JupyterLab。JupyterLab 介面會在新的索引標籤中開啟。
如果 JupyterLab 顯示 建議建構 對話方塊,請按一下 取消 以拒絕建議的建構。
在 啟動器 索引標籤中,按一下 終端機。
在終端機視窗中,複製 Notebook
git clone https://github.com/GoogleCloudPlatform/training-data-analyst
實作 Apache Beam 管線
本節和下一節在 Dataflow 中執行管線提供了 Notebook 1 的總覽和背景資訊。Notebook 提供了一個實務範例,說明如何使用 tf.Transform 程式庫預先處理資料。此範例使用 Natality 資料集,該資料集用於根據各種輸入來預測嬰兒體重。資料儲存在 BigQuery 中的公開 natality 表格中。
執行 Notebook 1
在 JupyterLab 介面中,按一下 檔案 > 從路徑開啟,然後輸入下列路徑
training-data-analyst/blogs/babyweight_tft/babyweight_tft_keras_01.ipynb按一下 編輯 > 清除所有輸出。
在 安裝必要套件 區段中,執行第一個儲存格以執行
pip install apache-beam命令。輸出的最後一部分如下:
Successfully installed ...您可以忽略輸出中的依附元件錯誤。您還不需要重新啟動核心。
執行第二個儲存格以執行
pip install tensorflow-transform命令。輸出的最後一部分如下:Successfully installed ... Note: you may need to restart the kernel to use updated packages.您可以忽略輸出中的依附元件錯誤。
按一下 核心 > 重新啟動核心。
執行 確認已安裝的套件 和 建立 setup.py 以將套件安裝到 Dataflow 容器 區段中的儲存格。
在 設定全域標記 區段中,在
PROJECT和BUCKET旁邊,將your-project替換為您的 Cloud 專案 ID,然後執行儲存格。執行 Notebook 中最後一個儲存格之前的所有剩餘儲存格。如需每個儲存格中要執行的動作的相關資訊,請參閱 Notebook 中的操作說明。
管線總覽
在 Notebook 範例中,Dataflow 以大規模方式執行 tf.Transform 管線,以準備資料並產生轉換成品。本文檔稍後的章節將說明在管線中執行每個步驟的函式。整體管線步驟如下:
- 從 BigQuery 讀取訓練資料。
- 使用
tf.Transform程式庫分析和轉換訓練資料。 - 以 TFRecord 格式將轉換後的訓練資料寫入 Cloud Storage。
- 從 BigQuery 讀取評估資料。
- 使用步驟 2 產生的
transform_fn圖表轉換評估資料。 - 以 TFRecord 格式將轉換後的訓練資料寫入 Cloud Storage。
- 將轉換成品寫入 Cloud Storage,這些成品稍後將用於建立和匯出模型。
以下範例顯示了整體管線的 Python 程式碼。以下章節提供了每個步驟的說明和程式碼清單。
def run_transformation_pipeline(args):
pipeline_options = beam.pipeline.PipelineOptions(flags=[], **args)
runner = args['runner']
data_size = args['data_size']
transformed_data_location = args['transformed_data_location']
transform_artefact_location = args['transform_artefact_location']
temporary_dir = args['temporary_dir']
debug = args['debug']
# Instantiate the pipeline
with beam.Pipeline(runner, options=pipeline_options) as pipeline:
with impl.Context(temporary_dir):
# Preprocess train data
step = 'train'
# Read raw train data from BigQuery
raw_train_dataset = read_from_bq(pipeline, step, data_size)
# Analyze and transform raw_train_dataset
transformed_train_dataset, transform_fn = analyze_and_transform(raw_train_dataset, step)
# Write transformed train data to sink as tfrecords
write_tfrecords(transformed_train_dataset, transformed_data_location, step)
# Preprocess evaluation data
step = 'eval'
# Read raw eval data from BigQuery
raw_eval_dataset = read_from_bq(pipeline, step, data_size)
# Transform eval data based on produced transform_fn
transformed_eval_dataset = transform(raw_eval_dataset, transform_fn, step)
# Write transformed eval data to sink as tfrecords
write_tfrecords(transformed_eval_dataset, transformed_data_location, step)
# Write transformation artefacts
write_transform_artefacts(transform_fn, transform_artefact_location)
# (Optional) for debugging, write transformed data as text
step = 'debug'
# Write transformed train data as text if debug enabled
if debug == True:
write_text(transformed_train_dataset, transformed_data_location, step)
從 BigQuery 讀取原始訓練資料
第一步是使用 read_from_bq 函式從 BigQuery 讀取原始訓練資料。此函式傳回從 BigQuery 擷取的 raw_dataset 物件。您傳遞 data_size 值,並傳遞 step 值 train 或 eval。BigQuery 來源查詢是使用 get_source_query 函式建構的,如下列範例所示:
def read_from_bq(pipeline, step, data_size):
source_query = get_source_query(step, data_size)
raw_data = (
pipeline
| '{} - Read Data from BigQuery'.format(step) >> beam.io.Read(
beam.io.BigQuerySource(query=source_query, use_standard_sql=True))
| '{} - Clean up Data'.format(step) >> beam.Map(prep_bq_row)
)
raw_metadata = create_raw_metadata()
raw_dataset = (raw_data, raw_metadata)
return raw_dataset
在執行 tf.Transform 預先處理之前,您可能需要執行典型的 Apache Beam 型處理,包括 Map、Filter、Group 和 Window 處理。在本範例中,程式碼使用 beam.Map(prep_bq_row) 方法清除從 BigQuery 讀取的記錄,其中 prep_bq_row 是自訂函式。此自訂函式會將類別特徵的數字代碼轉換為人類可讀取的標籤。
此外,若要使用 tf.Transform 程式庫來分析和轉換從 BigQuery 擷取的 raw_data 物件,您需要建立 raw_dataset 物件,該物件是 raw_data 和 raw_metadata 物件的元組。raw_metadata 物件是使用 create_raw_metadata 函式建立的,如下所示:
CATEGORICAL_FEATURE_NAMES = ['is_male', 'mother_race']
NUMERIC_FEATURE_NAMES = ['mother_age', 'plurality', 'gestation_weeks']
TARGET_FEATURE_NAME = 'weight_pounds'
def create_raw_metadata():
feature_spec = dict(
[(name, tf.io.FixedLenFeature([], tf.string)) for name in CATEGORICAL_FEATURE_NAMES] +
[(name, tf.io.FixedLenFeature([], tf.float32)) for name in NUMERIC_FEATURE_NAMES] +
[(TARGET_FEATURE_NAME, tf.io.FixedLenFeature([], tf.float32))])
raw_metadata = dataset_metadata.DatasetMetadata(
schema_utils.schema_from_feature_spec(feature_spec))
return raw_metadata
當您執行緊接在定義此方法的儲存格之後的 Notebook 中的儲存格時,會顯示 raw_metadata.schema 物件的內容。它包含下列欄:
gestation_weeks(類型:FLOAT)is_male(類型:BYTES)mother_age(類型:FLOAT)mother_race(類型:BYTES)plurality(類型:FLOAT)weight_pounds(類型:FLOAT)
轉換原始訓練資料
假設您想要將典型的預先處理轉換套用至訓練資料的輸入原始特徵,以便為 ML 準備資料。這些轉換包括完整傳遞和執行個體層級作業,如下表所示:
| 輸入特徵 | 轉換 | 需要的統計資料 | 類型 | 輸出特徵 |
|---|---|---|---|---|
weight_pound |
無 | 無 | NA | weight_pound |
mother_age |
正規化 | 平均值、變異數 | 完整傳遞 | mother_age_normalized |
mother_age |
等大小分桶化 | 分位數 | 完整傳遞 | mother_age_bucketized |
mother_age |
計算對數 | 無 | 執行個體層級 |
mother_age_log
|
plurality |
指出是單一胎還是多胞胎 | 無 | 執行個體層級 | is_multiple |
is_multiple |
將名義值轉換為數字索引 | 詞彙 | 完整傳遞 | is_multiple_index |
gestation_weeks |
在 0 到 1 之間縮放 | 最小值、最大值 | 完整傳遞 | gestation_weeks_scaled |
mother_race |
將名義值轉換為數字索引 | 詞彙 | 完整傳遞 | mother_race_index |
is_male |
將名義值轉換為數字索引 | 詞彙 | 完整傳遞 | is_male_index |
這些轉換是在 preprocess_fn 函式中實作的,該函式預期張量字典 (input_features),並傳回已處理特徵字典 (output_features)。
以下程式碼顯示了 preprocess_fn 函式的實作,其中使用了 tf.Transform 完整傳遞轉換 API (字首為 tft.) 和 TensorFlow (字首為 tf.) 執行個體層級作業
def preprocess_fn(input_features):
output_features = {}
# target feature
output_features['weight_pounds'] = input_features['weight_pounds']
# normalization
output_features['mother_age_normalized'] = tft.scale_to_z_score(input_features['mother_age'])
# scaling
output_features['gestation_weeks_scaled'] = tft.scale_to_0_1(input_features['gestation_weeks'])
# bucketization based on quantiles
output_features['mother_age_bucketized'] = tft.bucketize(input_features['mother_age'], num_buckets=5)
# you can compute new features based on custom formulas
output_features['mother_age_log'] = tf.math.log(input_features['mother_age'])
# or create flags/indicators
is_multiple = tf.as_string(input_features['plurality'] > tf.constant(1.0))
# convert categorical features to indexed vocab
output_features['mother_race_index'] = tft.compute_and_apply_vocabulary(input_features['mother_race'], vocab_filename='mother_race')
output_features['is_male_index'] = tft.compute_and_apply_vocabulary(input_features['is_male'], vocab_filename='is_male')
output_features['is_multiple_index'] = tft.compute_and_apply_vocabulary(is_multiple, vocab_filename='is_multiple')
return output_features
tf.Transform 架構除了上述範例中的轉換之外,還有其他幾種轉換,包括下表列出的轉換:
| 轉換 | 適用於 | 說明 |
|---|---|---|
scale_by_min_max |
數值特徵 | 將數值欄縮放到範圍 [output_min, output_max] |
scale_to_0_1 |
數值特徵 | 傳回欄,該欄是縮放為範圍 [0,1] 的輸入欄 |
scale_to_z_score |
數值特徵 | 傳回平均值為 0 且變異數為 1 的標準化欄 |
tfidf |
文字特徵 | 將 x 中的詞彙對應到其詞彙頻率 * 反向文件頻率 |
compute_and_apply_vocabulary |
類別特徵 | 為類別特徵產生詞彙,並使用此詞彙將其對應到整數 |
ngrams |
文字特徵 | 建立 n 元語法的 SparseTensor |
hash_strings |
類別特徵 | 將字串雜湊到儲存桶中 |
pca |
數值特徵 | 使用有偏差的共變異數計算資料集上的 PCA |
bucketize |
數值特徵 | 傳回等大小 (基於分位數) 分桶欄,每個輸入都分配了一個儲存桶索引 |
為了將 preprocess_fn 函式中實作的轉換套用至管線前一步驟中產生的 raw_train_dataset 物件,您可以使用 AnalyzeAndTransformDataset 方法。此方法預期 raw_dataset 物件作為輸入,套用 preprocess_fn 函式,並產生 transformed_dataset 物件和 transform_fn 圖表。以下程式碼說明了此處理:
def analyze_and_transform(raw_dataset, step):
transformed_dataset, transform_fn = (
raw_dataset
| '{} - Analyze & Transform'.format(step) >> tft_beam.AnalyzeAndTransformDataset(
preprocess_fn, output_record_batches=True)
)
return transformed_dataset, transform_fn
轉換會在原始資料上分兩個階段套用:分析階段和轉換階段。本文檔稍後的圖 3 顯示了 AnalyzeAndTransformDataset 方法如何分解為 AnalyzeDataset 方法和 TransformDataset 方法。
分析階段
在分析階段中,原始訓練資料會在完整傳遞過程中進行分析,以計算轉換所需的統計資料。這包括計算平均值、變異數、最小值、最大值、分位數和詞彙。分析過程預期原始資料集 (原始資料加上原始中繼資料),並產生兩個輸出:
transform_fn:TensorFlow 圖表,其中包含分析階段計算的統計資料,以及轉換邏輯 (使用統計資料) 作為執行個體層級作業。如稍後在儲存圖表中所述,transform_fn圖表會儲存以附加到模型serving_fn函式。這使得可以將相同的轉換套用到線上預測資料點。transform_metadata:描述轉換後資料預期結構描述的物件。
圖 1 的下圖說明了分析階段:

tf.Transform 分析階段。tf.Transform 分析器包括 min、max、sum、size、mean、var、covariance、quantiles、vocabulary 和 pca。
轉換階段
在轉換階段中,由分析階段產生的 transform_fn 圖表用於以執行個體層級方式轉換原始訓練資料,以產生轉換後的訓練資料。轉換後的訓練資料與轉換後的中繼資料 (由分析階段產生) 配對,以產生 transformed_train_dataset 資料集。
圖 2 的下圖說明了轉換階段:

tf.Transform 轉換階段。若要預先處理特徵,請在 preprocess_fn 函式的實作中呼叫所需的 tensorflow_transform 轉換 (在程式碼中匯入為 tft)。例如,當您呼叫 tft.scale_to_z_score 作業時,tf.Transform 程式庫會將此函式呼叫轉譯為平均值和變異數分析器,在分析階段計算統計資料,然後套用這些統計資料以在轉換階段正規化數值特徵。這一切都會透過呼叫 AnalyzeAndTransformDataset(preprocess_fn) 方法自動完成。
此呼叫產生的 transformed_metadata.schema 實體包含下列欄:
gestation_weeks_scaled(類型:FLOAT)is_male_index(類型:INT,is_categorical:True)is_multiple_index(類型:INT,is_categorical:True)mother_age_bucketized(類型:INT,is_categorical:True)mother_age_log(類型:FLOAT)mother_age_normalized(類型:FLOAT)mother_race_index(類型:INT,is_categorical:True)weight_pounds(類型:FLOAT)
如本系列第一部分中的預先處理作業中所述,特徵轉換會將類別特徵轉換為數字表示法。轉換後,類別特徵由整數值表示。在 transformed_metadata.schema 實體中,INT 類型欄的 is_categorical 標記指出欄是否代表類別特徵或真實數值特徵。
寫入轉換後的訓練資料
在透過分析和轉換階段使用 preprocess_fn 函式預先處理訓練資料後,您可以將資料寫入接收器,以用於訓練 TensorFlow 模型。當您使用 Dataflow 執行 Apache Beam 管線時,接收器是 Cloud Storage。否則,接收器是本機磁碟。雖然您可以將資料寫入固定寬度格式檔案的 CSV 檔案,但 TensorFlow 資料集的建議檔案格式是 TFRecord 格式。這是一種簡單的記錄導向二進位格式,由 tf.train.Example 通訊協定緩衝區訊息組成。
每個 tf.train.Example 記錄都包含一或多個特徵。當它們饋送到模型進行訓練時,這些特徵會轉換為張量。以下程式碼會將轉換後的資料集寫入指定位置中的 TFRecord 檔案:
def write_tfrecords(transformed_dataset, location, step):
from tfx_bsl.coders import example_coder
transformed_data, transformed_metadata = transformed_dataset
(
transformed_data
| '{} - Encode Transformed Data'.format(step) >> beam.FlatMapTuple(
lambda batch, _: example_coder.RecordBatchToExamples(batch))
| '{} - Write Transformed Data'.format(step) >> beam.io.WriteToTFRecord(
file_path_prefix=os.path.join(location,'{}'.format(step)),
file_name_suffix='.tfrecords')
)
讀取、轉換和寫入評估資料
在轉換訓練資料並產生 transform_fn 圖表後,您可以使用它來轉換評估資料。首先,您使用 從 BigQuery 讀取原始訓練資料中先前說明的 read_from_bq 函式,並為 step 參數傳遞值 eval,從 BigQuery 讀取和清除評估資料。然後,您可以使用下列程式碼將原始評估資料集 (raw_dataset) 轉換為預期的轉換後格式 (transformed_dataset):
def transform(raw_dataset, transform_fn, step):
transformed_dataset = (
(raw_dataset, transform_fn)
| '{} - Transform'.format(step) >> tft_beam.TransformDataset(output_record_batches=True)
)
return transformed_dataset
當您轉換評估資料時,只會套用執行個體層級作業,同時使用 transform_fn 圖表中的邏輯,以及從訓練資料中的分析階段計算的統計資料。換句話說,您不會以完整傳遞方式分析評估資料來計算新的統計資料,例如評估資料中數值特徵的 Z 分數正規化的平均值和變異數。相反地,您會使用從訓練資料計算的統計資料,以執行個體層級方式轉換評估資料。
因此,您會在訓練資料的環境中使用 AnalyzeAndTransform 方法來計算統計資料並轉換資料。同時,您會在轉換評估資料的環境中使用 TransformDataset 方法,僅使用在訓練資料上計算的統計資料來轉換資料。
接著,您可以將資料寫入接收器 (Cloud Storage 或本機磁碟,取決於執行器),格式為 TFRecord,以便在訓練過程中評估 TensorFlow 模型。若要執行這項操作,您可以使用 write_tfrecords 函式,此函式在寫入轉換後的訓練資料中討論過。下圖 (圖 3) 顯示如何在訓練資料的分析階段產生的 transform_fn 圖表用於轉換評估資料。

transform_fn 圖表轉換評估資料。儲存圖表
tf.Transform 預先處理管線的最後一個步驟是儲存成品,其中包括在訓練資料的分析階段產生的 transform_fn 圖表。下列 write_transform_artefacts 函式中顯示了用於儲存成品的程式碼
def write_transform_artefacts(transform_fn, location):
(
transform_fn
| 'Write Transform Artifacts' >> transform_fn_io.WriteTransformFn(location)
)
這些成品稍後將用於模型訓練和匯出以進行服務。接下來的章節也會顯示產生的下列成品
saved_model.pb:代表包含轉換邏輯 (transform_fn圖表) 的 TensorFlow 圖表,此圖表將附加至模型服務介面,以將原始資料點轉換為轉換後的格式。variables:包含在訓練資料的分析階段計算的統計資料,並用於saved_model.pb成品的轉換邏輯中。assets:包含詞彙檔案,每個詞彙檔案對應一個透過compute_and_apply_vocabulary方法處理的類別特徵,將在服務期間用於將輸入的原始名義值轉換為數值索引。transformed_metadata:包含schema.json檔案的目錄,該檔案描述轉換後資料的結構定義。
在 Dataflow 中執行管線
定義 tf.Transform 管線後,您可以使用 Dataflow 執行管線。下圖 (圖 4) 顯示範例中描述的 tf.Transform 管線的 Dataflow 執行圖表。
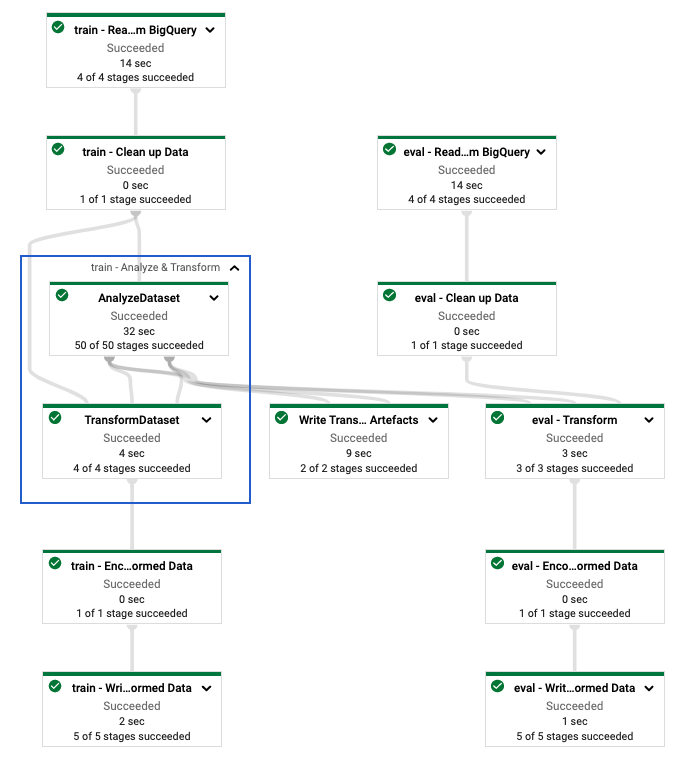
tf.Transform 管線的 Dataflow 執行圖表。執行 Dataflow 管線以預先處理訓練和評估資料後,您可以透過執行筆記本中的最後一個儲存格來探索 Cloud Storage 中產生的物件。本節中的程式碼片段顯示結果,其中 YOUR_BUCKET_NAME 是您的 Cloud Storage 值區名稱。
TFRecord 格式的轉換後訓練和評估資料儲存在下列位置
gs://YOUR_BUCKET_NAME/babyweight_tft/transformed
轉換成品產生於下列位置
gs://YOUR_BUCKET_NAME/babyweight_tft/transform
以下清單是管線的輸出,顯示產生的資料物件和成品
transformed data:
gs://YOUR_BUCKET_NAME/babyweight_tft/transformed/eval-00000-of-00001.tfrecords
gs://YOUR_BUCKET_NAME/babyweight_tft/transformed/train-00000-of-00002.tfrecords
gs://YOUR_BUCKET_NAME/babyweight_tft/transformed/train-00001-of-00002.tfrecords
transformed metadata:
gs://YOUR_BUCKET_NAME/babyweight_tft/transform/transformed_metadata/
gs://YOUR_BUCKET_NAME/babyweight_tft/transform/transformed_metadata/asset_map
gs://YOUR_BUCKET_NAME/babyweight_tft/transform/transformed_metadata/schema.pbtxt
transform artefact:
gs://YOUR_BUCKET_NAME/babyweight_tft/transform/transform_fn/
gs://YOUR_BUCKET_NAME/babyweight_tft/transform/transform_fn/saved_model.pb
gs://YOUR_BUCKET_NAME/babyweight_tft/transform/transform_fn/assets/
gs://YOUR_BUCKET_NAME/babyweight_tft/transform/transform_fn/variables/
transform assets:
gs://YOUR_BUCKET_NAME/babyweight_tft/transform/transform_fn/assets/
gs://YOUR_BUCKET_NAME/babyweight_tft/transform/transform_fn/assets/is_male
gs://YOUR_BUCKET_NAME/babyweight_tft/transform/transform_fn/assets/is_multiple
gs://YOUR_BUCKET_NAME/babyweight_tft/transform/transform_fn/assets/mother_race
實作 TensorFlow 模型
本節和下一節訓練及使用模型進行預測,提供筆記本 2 的概觀和背景資訊。此筆記本提供範例 ML 模型來預測嬰兒體重。在此範例中,TensorFlow 模型是使用 Keras API 實作的。模型使用 tf.Transform 預先處理管線 (先前已說明) 產生的資料和成品。
執行筆記本 2
在 JupyterLab 介面中,按一下 檔案 > 從路徑開啟,然後輸入下列路徑
training-data-analyst/blogs/babyweight_tft/babyweight_tft_keras_02.ipynb按一下 編輯 > 清除所有輸出。
在「安裝必要套件」章節中,執行第一個儲存格以執行
pip install tensorflow-transform指令。輸出的最後一部分如下:
Successfully installed ...
Note: you may need to restart the kernel to use updated packages.
您可以忽略輸出中的依附元件錯誤。
在「Kernel」選單中,選取「Restart Kernel」。
執行 確認已安裝的套件 和 建立 setup.py 以將套件安裝到 Dataflow 容器 區段中的儲存格。
在「設定全域旗標」章節中,在
PROJECT和BUCKET旁邊,將your-project替換成您的 Cloud 專案 ID,然後執行儲存格。執行 Notebook 中最後一個儲存格之前的所有剩餘儲存格。如需每個儲存格中要執行的動作的相關資訊,請參閱 Notebook 中的操作說明。
模型建立概觀
建立模型的步驟如下
- 使用儲存在
transformed_metadata目錄中的結構定義資訊,建立特徵資料欄。 - 使用 Keras API 建立寬度和深度模型,並使用特徵資料欄作為模型的輸入。
- 建立
tfrecords_input_fn函式,以使用轉換成品讀取及剖析訓練和評估資料。 - 訓練及評估模型。
- 匯出已訓練的模型,方法是定義附加了
transform_fn圖表的serving_fn函式。 - 使用
saved_model_cli工具檢查匯出的模型。 - 使用匯出的模型進行預測。
本文件未說明如何建構模型,因此未詳細討論模型的建構或訓練方式。但是,以下章節說明如何使用儲存在 transform_metadata 目錄 (由 tf.Transform 處理程序產生) 中的資訊,來建立模型的特徵資料欄。文件也說明如何在模型匯出以進行服務時,於 serving_fn 函式中使用 transform_fn 圖表 (同樣由 tf.Transform 處理程序產生)。
在模型訓練中使用產生的轉換成品
訓練 TensorFlow 模型時,您會使用先前資料處理步驟中產生的轉換後 train 和 eval 物件。這些物件以分片檔案的形式儲存在 TFRecord 格式中。先前步驟中產生的 transformed_metadata 目錄中的結構定義資訊,可用於剖析資料 (tf.train.Example 物件),以饋送至模型進行訓練和評估。
剖析資料
由於您讀取 TFRecord 格式的檔案,以將訓練和評估資料饋送至模型,因此您需要剖析檔案中的每個 tf.train.Example 物件,以建立特徵 (張量) 字典。這可確保特徵使用特徵資料欄對應至模型輸入層,而特徵資料欄則作為模型訓練和評估介面。若要剖析資料,您可以使用從先前步驟中產生的成品建立的 TFTransformOutput 物件
從先前預先處理步驟中產生並儲存的成品建立
TFTransformOutput物件,如儲存圖表章節中所述tf_transform_output = tft.TFTransformOutput(TRANSFORM_ARTEFACTS_DIR)從
TFTransformOutput物件擷取feature_spec物件tf_transform_output.transformed_feature_spec()使用
feature_spec物件指定tf.train.Example物件中包含的特徵,如tfrecords_input_fn函式所示def tfrecords_input_fn(files_name_pattern, batch_size=512): tf_transform_output = tft.TFTransformOutput(TRANSFORM_ARTEFACTS_DIR) TARGET_FEATURE_NAME = 'weight_pounds' batched_dataset = tf.data.experimental.make_batched_features_dataset( file_pattern=files_name_pattern, batch_size=batch_size, features=tf_transform_output.transformed_feature_spec(), reader=tf.data.TFRecordDataset, label_key=TARGET_FEATURE_NAME, shuffle=True).prefetch(tf.data.experimental.AUTOTUNE) return batched_dataset
建立特徵資料欄
管線會在 transformed_metadata 目錄中產生結構定義資訊,描述模型預期用於訓練和評估的轉換後資料的結構定義。結構定義包含特徵名稱和資料類型,例如以下內容
gestation_weeks_scaled(類型:FLOAT)is_male_index(類型:INT,is_categorical:True)is_multiple_index(類型:INT,is_categorical:True)mother_age_bucketized(類型:INT,is_categorical:True)mother_age_log(類型:FLOAT)mother_age_normalized(類型:FLOAT)mother_race_index(類型:INT,is_categorical:True)weight_pounds(類型:FLOAT)
若要查看此資訊,請使用下列指令
transformed_metadata = tft.TFTransformOutput(TRANSFORM_ARTEFACTS_DIR).transformed_metadata
transformed_metadata.schema
下列程式碼顯示如何使用特徵名稱來建立特徵資料欄
def create_wide_and_deep_feature_columns():

    deep_feature_columns = []
    wide_feature_columns = []
    inputs = {}
    categorical_columns = {}

    # Select features you've checked from the metadata
    # Categorical features are associated with the vocabulary size (starting from 0)
    numeric_features = ['mother_age_log', 'mother_age_normalized', 'gestation_weeks_scaled']
    categorical_features = [('is_male_index', 1), ('is_multiple_index', 1),
                            ('mother_age_bucketized', 4), ('mother_race_index', 10)]

    for feature in numeric_features:
        deep_feature_columns.append(tf.feature_column.numeric_column(feature))
        inputs[feature] = layers.Input(shape=(), name=feature, dtype='float32')

    for feature, vocab_size in categorical_features:
        categorical_columns[feature] = (
            tf.feature_column.categorical_column_with_identity(feature, num_buckets=vocab_size+1))
        wide_feature_columns.append(tf.feature_column.indicator_column(categorical_columns[feature]))
        inputs[feature] = layers.Input(shape=(), name=feature, dtype='int64')

    mother_race_X_mother_age_bucketized = tf.feature_column.crossed_column(
        [categorical_columns['mother_age_bucketized'],
         categorical_columns['mother_race_index']],  55)
    wide_feature_columns.append(tf.feature_column.indicator_column(mother_race_X_mother_age_bucketized))

    mother_race_X_mother_age_bucketized_embedded = tf.feature_column.embedding_column(
        mother_race_X_mother_age_bucketized, 5)
    deep_feature_columns.append(mother_race_X_mother_age_bucketized_embedded)

    return wide_feature_columns, deep_feature_columns, inputs
程式碼會為數值特徵建立 tf.feature_column.numeric_column 資料欄,並為類別特徵建立 tf.feature_column.categorical_column_with_identity 資料欄。
您也可以建立擴充的特徵資料欄,如本系列第一部分中的選項 C:TensorFlow中所述。在本系列範例中,透過使用 tf.feature_column.crossed_column 特徵資料欄交叉比對 mother_race 和 mother_age_bucketized 特徵,建立新的特徵 mother_race_X_mother_age_bucketized。此交叉特徵的低維度密集表示法是使用 tf.feature_column.embedding_column 特徵資料欄建立的。
下圖 (圖 5) 顯示轉換後的資料,以及如何使用轉換後的中繼資料來定義和訓練 TensorFlow 模型

匯出模型以進行服務預測
使用 Keras API 訓練 TensorFlow 模型後,您可以將已訓練的模型匯出為 SavedModel 物件,以便它可以為新的資料點提供預測服務。匯出模型時,您必須定義其介面,也就是服務期間預期的輸入特徵結構定義。此輸入特徵結構定義在 serving_fn 函式中定義,如下列程式碼所示
def export_serving_model(model, output_dir):

    tf_transform_output = tft.TFTransformOutput(TRANSFORM_ARTEFACTS_DIR)
    # The layer has to be saved to the model for Keras tracking purposes.
    model.tft_layer = tf_transform_output.transform_features_layer()

    @tf.function
    def serveing_fn(uid, is_male, mother_race, mother_age, plurality, gestation_weeks):
        features = {
            'is_male': is_male,
            'mother_race': mother_race,
            'mother_age': mother_age,
            'plurality': plurality,
            'gestation_weeks': gestation_weeks
        }
        transformed_features = model.tft_layer(features)
        outputs = model(transformed_features)
        # The prediction results have multiple elements in general.
        # But we need only the first element in our case.
        outputs = tf.map_fn(lambda item: item[0], outputs)

        return {'uid': uid, 'weight': outputs}

    concrete_serving_fn = serveing_fn.get_concrete_function(
        tf.TensorSpec(shape=[None], dtype=tf.string, name='uid'),
        tf.TensorSpec(shape=[None], dtype=tf.string, name='is_male'),
        tf.TensorSpec(shape=[None], dtype=tf.string, name='mother_race'),
        tf.TensorSpec(shape=[None], dtype=tf.float32, name='mother_age'),
        tf.TensorSpec(shape=[None], dtype=tf.float32, name='plurality'),
        tf.TensorSpec(shape=[None], dtype=tf.float32, name='gestation_weeks')
    )
    signatures = {'serving_default': concrete_serving_fn}

    model.save(output_dir, save_format='tf', signatures=signatures)
在服務期間,模型會預期原始格式的資料點 (也就是轉換前的原始特徵)。因此,serving_fn 函式會接收原始特徵,並將其儲存在 features 物件中作為 Python 字典。但是,如先前所述,已訓練的模型會預期轉換後結構定義中的資料點。若要將原始特徵轉換為模型介面預期的 transformed_features 物件,請使用下列步驟將儲存的 transform_fn 圖表套用至 features 物件
從先前預先處理步驟中產生並儲存的成品建立
TFTransformOutput物件tf_transform_output = tft.TFTransformOutput(TRANSFORM_ARTEFACTS_DIR)從
TFTransformOutput物件建立TransformFeaturesLayer物件model.tft_layer = tf_transform_output.transform_features_layer()使用
TransformFeaturesLayer物件套用transform_fn圖表transformed_features = model.tft_layer(features)
下圖 (圖 6) 說明匯出模型以進行服務的最後一個步驟

transform_fn 圖表。訓練及使用模型進行預測
您可以透過執行筆記本的儲存格在本機訓練模型。如需如何封裝程式碼並使用 Vertex AI Training 大規模訓練模型的範例,請參閱 Google Cloud cloudml-samples GitHub 存放區中的範例和指南。
使用 saved_model_cli 工具檢查匯出的 SavedModel 物件時,您會看到簽名定義 signature_def 的 inputs 元素包含原始特徵,如下列範例所示
signature_def['serving_default']:
  The given SavedModel SignatureDef contains the following input(s):
    inputs['gestation_weeks'] tensor_info:
        dtype: DT_FLOAT
        shape: (-1)
        name: serving_default_gestation_weeks:0
    inputs['is_male'] tensor_info:
        dtype: DT_STRING
        shape: (-1)
        name: serving_default_is_male:0
    inputs['mother_age'] tensor_info:
        dtype: DT_FLOAT
        shape: (-1)
        name: serving_default_mother_age:0
    inputs['mother_race'] tensor_info:
        dtype: DT_STRING
        shape: (-1)
        name: serving_default_mother_race:0
    inputs['plurality'] tensor_info:
        dtype: DT_FLOAT
        shape: (-1)
        name: serving_default_plurality:0
    inputs['uid'] tensor_info:
        dtype: DT_STRING
        shape: (-1)
        name: serving_default_uid:0
  The given SavedModel SignatureDef contains the following output(s):
    outputs['uid'] tensor_info:
        dtype: DT_STRING
        shape: (-1)
        name: StatefulPartitionedCall_6:0
    outputs['weight'] tensor_info:
        dtype: DT_FLOAT
        shape: (-1)
        name: StatefulPartitionedCall_6:1
  Method name is: tensorflow/serving/predict
筆記本的其餘儲存格會顯示如何使用匯出的模型進行本機預測,以及如何使用 Vertex AI Prediction 將模型部署為微服務。務必強調的是,在這兩種情況下,輸入 (範例) 資料點都採用原始結構定義。
清除
為避免因本教學課程中使用的資源而產生額外 Google Cloud 帳戶費用,請刪除包含資源的專案。
刪除專案
在 Google Cloud 控制台中,前往「管理資源」頁面。
在專案清單中,選取您要刪除的專案,然後按一下「刪除」。
在對話方塊中,輸入專案 ID,然後按一下「關閉」以刪除專案。
後續步驟
- 如要瞭解 Google Cloud 上機器學習資料預先處理的概念、挑戰和選項,請參閱本系列的第一篇文章:ML 資料預先處理:選項和建議。
- 如要進一步瞭解如何在 Dataflow 上實作、封裝及執行 tf.Transform 管線,請參閱使用人口普查資料集預測收入範例。
- 修習 Coursera 關於 Google Cloud 上 TensorFlow 的專業課程:Google Cloud 上的 TensorFlow。
- 瞭解 ML 工程的最佳做法:ML 規則。
- 如需更多參考架構、圖表和最佳做法,請探索雲端架構中心。