
|
|
|
 在 GitHub 上檢視原始碼 在 GitHub 上檢視原始碼
|
|
|
近期深度學習領域最令人振奮的發展之一是藝術風格轉換,或稱風格遷移,亦即根據兩張輸入圖片 (一張代表藝術風格,另一張代表內容) 建立新圖片 (稱為混合風格作品) 的能力。
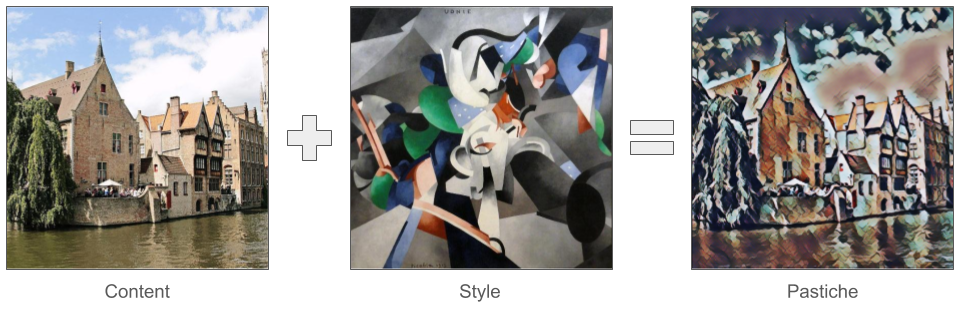
運用這項技術,我們可以產生各種風格的精美新藝術作品。
如果您是 TensorFlow Lite 新手,且使用 Android 系統,建議您瀏覽下列範例應用程式,以協助您入門。
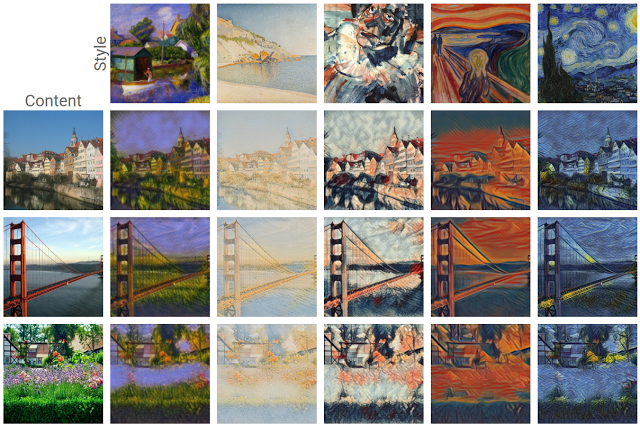
如果您使用的平台不是 Android 或 iOS,或者您已熟悉 TensorFlow Lite API,可以依照本教學課程學習如何使用預先訓練的 TensorFlow Lite 模型,將風格轉換套用至任何一對內容和風格圖片。您可以使用此模型將風格轉換功能新增至自己的行動應用程式。
此模型已在 GitHub 上開放原始碼。您可以使用不同的參數重新訓練模型 (例如,增加內容層的權重,讓輸出圖片看起來更像內容圖片)。
瞭解模型架構
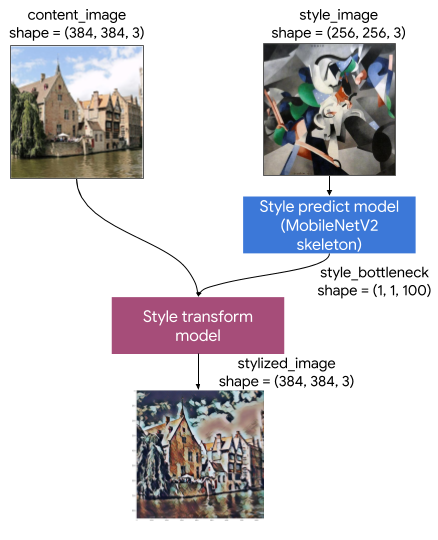
這個藝術風格轉換模型包含兩個子模型
- 風格預測模型:以 MobilenetV2 為基礎的神經網路,可將輸入風格圖片轉換為 100 維的風格瓶頸向量。
- 風格轉換模型:神經網路,可將風格瓶頸向量套用至內容圖片,並建立風格化圖片。
如果您的應用程式只需要支援一組固定的風格圖片,您可以預先計算其風格瓶頸向量,並從應用程式的二進位檔中排除風格預測模型。
設定
匯入依附元件。
import tensorflow as tf
print(tf.__version__)
import IPython.display as display

import matplotlib.pyplot as plt
import matplotlib as mpl
mpl.rcParams['figure.figsize'] = (12,12)
mpl.rcParams['axes.grid'] = False

import numpy as np
import time
import functools
下載內容和風格圖片,以及預先訓練的 TensorFlow Lite 模型。
content_path = tf.keras.utils.get_file('belfry.jpg','https://storage.googleapis.com/khanhlvg-public.appspot.com/arbitrary-style-transfer/belfry-2611573_1280.jpg')
style_path = tf.keras.utils.get_file('style23.jpg','https://storage.googleapis.com/khanhlvg-public.appspot.com/arbitrary-style-transfer/style23.jpg')

style_predict_path = tf.keras.utils.get_file('style_predict.tflite', 'https://tfhub.dev/google/lite-model/magenta/arbitrary-image-stylization-v1-256/int8/prediction/1?lite-format=tflite')
style_transform_path = tf.keras.utils.get_file('style_transform.tflite', 'https://tfhub.dev/google/lite-model/magenta/arbitrary-image-stylization-v1-256/int8/transfer/1?lite-format=tflite')
預先處理輸入內容
- 內容圖片和風格圖片必須是 RGB 圖片,像素值必須是介於 [0..1] 之間的 float32 數字。
- 風格圖片大小必須為 (1, 256, 256, 3)。我們會中央裁剪圖片並調整大小。
- 內容圖片大小必須為 (1, 384, 384, 3)。我們會中央裁剪圖片並調整大小。
# Function to load an image from a file, and add a batch dimension.
def load_img(path_to_img):
  img = tf.io.read_file(path_to_img)
  img = tf.io.decode_image(img, channels=3)
  img = tf.image.convert_image_dtype(img, tf.float32)
  img = img[tf.newaxis, :]

  return img

# Function to pre-process by resizing an central cropping it.
def preprocess_image(image, target_dim):
  # Resize the image so that the shorter dimension becomes 256px.
  shape = tf.cast(tf.shape(image)[1:-1], tf.float32)
  short_dim = min(shape)
  scale = target_dim / short_dim
  new_shape = tf.cast(shape * scale, tf.int32)
  image = tf.image.resize(image, new_shape)

  # Central crop the image.
  image = tf.image.resize_with_crop_or_pad(image, target_dim, target_dim)

  return image

# Load the input images.
content_image = load_img(content_path)
style_image = load_img(style_path)

# Preprocess the input images.
preprocessed_content_image = preprocess_image(content_image, 384)
preprocessed_style_image = preprocess_image(style_image, 256)

print('Style Image Shape:', preprocessed_style_image.shape)
print('Content Image Shape:', preprocessed_content_image.shape)
視覺化輸入內容
def imshow(image, title=None):
  if len(image.shape) > 3:
    image = tf.squeeze(image, axis=0)

  plt.imshow(image)
  if title:
    plt.title(title)

plt.subplot(1, 2, 1)
imshow(preprocessed_content_image, 'Content Image')

plt.subplot(1, 2, 2)
imshow(preprocessed_style_image, 'Style Image')
使用 TensorFlow Lite 執行風格轉換
風格預測
# Function to run style prediction on preprocessed style image.
def run_style_predict(preprocessed_style_image):
  # Load the model.
  interpreter = tf.lite.Interpreter(model_path=style_predict_path)

  # Set model input.
  interpreter.allocate_tensors()
  input_details = interpreter.get_input_details()
  interpreter.set_tensor(input_details[0]["index"], preprocessed_style_image)

  # Calculate style bottleneck.
  interpreter.invoke()
  style_bottleneck = interpreter.tensor(
      interpreter.get_output_details()[0]["index"]
      )()

  return style_bottleneck

# Calculate style bottleneck for the preprocessed style image.
style_bottleneck = run_style_predict(preprocessed_style_image)
print('Style Bottleneck Shape:', style_bottleneck.shape)
風格轉換
# Run style transform on preprocessed style image
def run_style_transform(style_bottleneck, preprocessed_content_image):
  # Load the model.
  interpreter = tf.lite.Interpreter(model_path=style_transform_path)

  # Set model input.
  input_details = interpreter.get_input_details()
  interpreter.allocate_tensors()

  # Set model inputs.
  interpreter.set_tensor(input_details[0]["index"], preprocessed_content_image)
  interpreter.set_tensor(input_details[1]["index"], style_bottleneck)
  interpreter.invoke()

  # Transform content image.
  stylized_image = interpreter.tensor(
      interpreter.get_output_details()[0]["index"]
      )()

  return stylized_image

# Stylize the content image using the style bottleneck.
stylized_image = run_style_transform(style_bottleneck, preprocessed_content_image)

# Visualize the output.
imshow(stylized_image, 'Stylized Image')
風格混合
我們可以將內容圖片的風格混合到風格化輸出中,進而使輸出看起來更像內容圖片。
# Calculate style bottleneck of the content image.
style_bottleneck_content = run_style_predict(
    preprocess_image(content_image, 256)
    )
# Define content blending ratio between [0..1].
# 0.0: 0% style extracts from content image.
# 1.0: 100% style extracted from content image.
content_blending_ratio = 0.5

# Blend the style bottleneck of style image and content image
style_bottleneck_blended = content_blending_ratio * style_bottleneck_content \
                           + (1 - content_blending_ratio) * style_bottleneck

# Stylize the content image using the style bottleneck.
stylized_image_blended = run_style_transform(style_bottleneck_blended,
                                             preprocessed_content_image)

# Visualize the output.
imshow(stylized_image_blended, 'Blended Stylized Image')
效能基準評測
效能基準評測數字是使用 此處說明 的工具產生。
| 模型名稱 | 模型大小 | 裝置 | NNAPI | CPU | GPU |
|---|---|---|---|---|---|
| 風格預測模型 (int8) | 2.8 Mb | Pixel 3 (Android 10) | 142 毫秒 | 14 毫秒 | |
| Pixel 4 (Android 10) | 5.2 毫秒 | 6.7 毫秒 | |||
| iPhone XS (iOS 12.4.1) | 10.7 毫秒 | ||||
| 風格轉換模型 (int8) | 0.2 Mb | Pixel 3 (Android 10) | 540 毫秒 | ||
| Pixel 4 (Android 10) | 405 毫秒 | ||||
| iPhone XS (iOS 12.4.1) | 251 毫秒 | ||||
| 風格預測模型 (float16) | 4.7 Mb | Pixel 3 (Android 10) | 86 毫秒 | 28 毫秒 | 9.1 毫秒 |
| Pixel 4 (Android 10) | 32 毫秒 | 12 毫秒 | 10 毫秒 | ||
| 風格轉換模型 (float16) | 0.4 Mb | Pixel 3 (Android 10) | 1095 毫秒 | 545 毫秒 | 42 毫秒 |
| Pixel 4 (Android 10) | 603 毫秒 | 377 毫秒 | 42 毫秒 |
* 使用 4 個執行緒。
** iPhone 上使用 2 個執行緒可獲得最佳效能。