
|
|
|
 在 GitHub 上檢視原始碼 在 GitHub 上檢視原始碼
|
|
將 TensorFlow Lite 機器學習模型部署到裝置或行動應用程式時,您可能會希望根據裝置或最終使用者的輸入來改善模型或進行個人化調整。使用裝置端訓練技術可讓您在資料不離開使用者裝置的情況下更新模型,進而提升使用者隱私,且無需使用者更新裝置軟體。
舉例來說,您的行動應用程式中可能有一個可辨識時尚單品的模型,但您希望使用者隨著時間推移,根據自己的興趣獲得更佳的辨識效能。啟用裝置端訓練後,對鞋子感興趣的使用者在使用您的應用程式時,就能更準確地辨識特定款式的鞋子或鞋子品牌。
本教學課程將說明如何建構 TensorFlow Lite 模型,以便在已安裝的 Android 應用程式中逐步訓練和改進。
設定
本教學課程使用 Python 來訓練和轉換 TensorFlow 模型,然後將其納入 Android 應用程式中。首先安裝並匯入下列套件。
import matplotlib.pyplot as plt
import numpy as np
import tensorflow as tf

print("TensorFlow version:", tf.__version__)
TensorFlow version: 2.8.0
分類服裝圖片
這個範例程式碼使用 Fashion MNIST 資料集來訓練神經網路模型,以分類服裝圖片。這個資料集包含 60,000 張小型 (28 x 28 像素) 灰階圖片,其中包含 10 種不同的時尚配件類別,包括洋裝、襯衫和涼鞋。
您可以在 Keras 分類教學課程中更深入地探索這個資料集。
為裝置端訓練建構模型
TensorFlow Lite 模型通常只有一個公開的函式方法 (或簽名),可讓您呼叫模型以執行推論。若要讓模型在裝置上進行訓練和使用,您必須能夠執行多個不同的操作,包括模型的訓練、推論、儲存和還原函式。您可以先擴充 TensorFlow 模型以包含多個函式,然後在將模型轉換為 TensorFlow Lite 模型格式時,將這些函式公開為簽名,藉此啟用這項功能。
以下程式碼範例說明如何將下列函式新增至 TensorFlow 模型
train函式使用訓練資料訓練模型。infer函式會叫用推論。save函式會將可訓練權重儲存到檔案系統中。restore函式會從檔案系統載入可訓練權重。
IMG_SIZE = 28

class Model(tf.Module):

  def __init__(self):
    self.model = tf.keras.Sequential([
        tf.keras.layers.Flatten(input_shape=(IMG_SIZE, IMG_SIZE), name='flatten'),
        tf.keras.layers.Dense(128, activation='relu', name='dense_1'),
        tf.keras.layers.Dense(10, name='dense_2')
    ])

    self.model.compile(
        optimizer='sgd',
        loss=tf.keras.losses.CategoricalCrossentropy(from_logits=True))

  # The `train` function takes a batch of input images and labels.
  @tf.function(input_signature=[
      tf.TensorSpec([None, IMG_SIZE, IMG_SIZE], tf.float32),
      tf.TensorSpec([None, 10], tf.float32),
  ])
  def train(self, x, y):
    with tf.GradientTape() as tape:
      prediction = self.model(x)
      loss = self.model.loss(y, prediction)
    gradients = tape.gradient(loss, self.model.trainable_variables)
    self.model.optimizer.apply_gradients(
        zip(gradients, self.model.trainable_variables))
    result = {"loss": loss}
    return result

  @tf.function(input_signature=[
      tf.TensorSpec([None, IMG_SIZE, IMG_SIZE], tf.float32),
  ])
  def infer(self, x):
    logits = self.model(x)
    probabilities = tf.nn.softmax(logits, axis=-1)
    return {
        "output": probabilities,
        "logits": logits
    }

  @tf.function(input_signature=[tf.TensorSpec(shape=[], dtype=tf.string)])
  def save(self, checkpoint_path):
    tensor_names = [weight.name for weight in self.model.weights]
    tensors_to_save = [weight.read_value() for weight in self.model.weights]
    tf.raw_ops.Save(
        filename=checkpoint_path, tensor_names=tensor_names,
        data=tensors_to_save, name='save')
    return {
        "checkpoint_path": checkpoint_path
    }

  @tf.function(input_signature=[tf.TensorSpec(shape=[], dtype=tf.string)])
  def restore(self, checkpoint_path):
    restored_tensors = {}
    for var in self.model.weights:
      restored = tf.raw_ops.Restore(
          file_pattern=checkpoint_path, tensor_name=var.name, dt=var.dtype,
          name='restore')
      var.assign(restored)
      restored_tensors[var.name] = restored
    return restored_tensors
上述程式碼中的 train 函式使用 GradientTape 類別來記錄自動微分的操作。如需如何使用這個類別的詳細資訊,請參閱梯度與自動微分簡介。
您可以在這裡使用 keras 模型的 Model.train_step 方法,而不是從頭開始實作。請注意,Model.train_step 傳回的損失 (和指標) 是執行平均值,應定期重設 (通常每個週期一次)。詳情請參閱自訂 Model.fit。
準備資料
取得 Fashion MNIST 資料集以訓練模型。
fashion_mnist = tf.keras.datasets.fashion_mnist
(train_images, train_labels), (test_images, test_labels) = fashion_mnist.load_data()
預先處理資料集
這個資料集中的像素值介於 0 到 255 之間,而且必須正規化為介於 0 到 1 之間的值,才能讓模型處理。將值除以 255 即可進行此調整。
train_images = (train_images / 255.0).astype(np.float32)
test_images = (test_images / 255.0).astype(np.float32)
透過執行單熱編碼,將資料標籤轉換為類別值。
train_labels = tf.keras.utils.to_categorical(train_labels)
test_labels = tf.keras.utils.to_categorical(test_labels)
訓練模型
在轉換和設定 TensorFlow Lite 模型之前,請使用預先處理的資料集和 train 簽名方法完成模型的初始訓練。下列程式碼會執行模型訓練 100 個週期,一次處理 100 張圖片的批次,並在每 10 個週期後顯示損失值。由於這個訓練執行會處理相當多的資料,因此可能需要幾分鐘才能完成。
NUM_EPOCHS = 100
BATCH_SIZE = 100
epochs = np.arange(1, NUM_EPOCHS + 1, 1)
losses = np.zeros([NUM_EPOCHS])
m = Model()

train_ds = tf.data.Dataset.from_tensor_slices((train_images, train_labels))
train_ds = train_ds.batch(BATCH_SIZE)

for i in range(NUM_EPOCHS):
  for x,y in train_ds:
    result = m.train(x, y)

  losses[i] = result['loss']
  if (i + 1) % 10 == 0:
    print(f"Finished {i+1} epochs")
    print(f"  loss: {losses[i]:.3f}")

# Save the trained weights to a checkpoint.
m.save('/tmp/model.ckpt')
Finished 10 epochs
  loss: 0.428
Finished 20 epochs
  loss: 0.378
Finished 30 epochs
  loss: 0.344
Finished 40 epochs
  loss: 0.317
Finished 50 epochs
  loss: 0.299
Finished 60 epochs
  loss: 0.283
Finished 70 epochs
  loss: 0.266
Finished 80 epochs
  loss: 0.252
Finished 90 epochs
  loss: 0.240
Finished 100 epochs
  loss: 0.230
{'checkpoint_path': <tf.Tensor: shape=(), dtype=string, numpy=b'/tmp/model.ckpt'>}
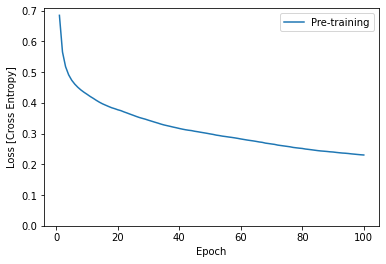
plt.plot(epochs, losses, label='Pre-training')
plt.ylim([0, max(plt.ylim())])
plt.xlabel('Epoch')
plt.ylabel('Loss [Cross Entropy]')
plt.legend();
將模型轉換為 TensorFlow Lite 格式
在您擴充 TensorFlow 模型以啟用裝置端訓練的其他函式,並完成模型的初始訓練後,您可以將其轉換為 TensorFlow Lite 格式。下列程式碼會轉換模型並將其儲存為該格式,包括您在裝置上的 TensorFlow Lite 模型中使用的簽名集:train、infer、save、restore。
SAVED_MODEL_DIR = "saved_model"

tf.saved_model.save(
    m,
    SAVED_MODEL_DIR,
    signatures={
        'train':
            m.train.get_concrete_function(),
        'infer':
            m.infer.get_concrete_function(),
        'save':
            m.save.get_concrete_function(),
        'restore':
            m.restore.get_concrete_function(),
    })

# Convert the model
converter = tf.lite.TFLiteConverter.from_saved_model(SAVED_MODEL_DIR)
converter.target_spec.supported_ops = [
    tf.lite.OpsSet.TFLITE_BUILTINS,  # enable TensorFlow Lite ops.
    tf.lite.OpsSet.SELECT_TF_OPS  # enable TensorFlow ops.
]
converter.experimental_enable_resource_variables = True
tflite_model = converter.convert()
設定 TensorFlow Lite 簽名
您在上一個步驟中儲存的 TensorFlow Lite 模型包含數個函式簽名。您可以透過 tf.lite.Interpreter 類別存取這些簽名,並分別叫用每個 restore、train、save 和 infer 簽名。
interpreter = tf.lite.Interpreter(model_content=tflite_model)
interpreter.allocate_tensors()

infer = interpreter.get_signature_runner("infer")
比較原始模型與轉換後的 Lite 模型的輸出
logits_original = m.infer(x=train_images[:1])['logits'][0]
logits_lite = infer(x=train_images[:1])['logits'][0]
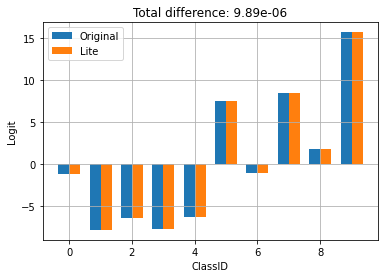
在上方,您可以看到模型的行為並未因轉換為 TFLite 而改變。
在裝置上重新訓練模型
將模型轉換為 TensorFlow Lite 並使用您的應用程式部署後,您可以使用新資料和模型的 train 簽名方法在裝置上重新訓練模型。每個訓練執行都會產生一組新的權重,您可以儲存這些權重以供重複使用,並進一步改進模型,如下一節所示。
在 Android 上,您可以使用 Java 或 C++ API 透過 TensorFlow Lite 執行裝置端訓練。在 Java 中,使用 Interpreter 類別載入模型並驅動模型訓練工作。以下範例說明如何使用 runSignature 方法執行訓練程序
try (Interpreter interpreter = new Interpreter(modelBuffer)) {
    int NUM_EPOCHS = 100;
    int BATCH_SIZE = 100;
    int IMG_HEIGHT = 28;
    int IMG_WIDTH = 28;
    int NUM_TRAININGS = 60000;
    int NUM_BATCHES = NUM_TRAININGS / BATCH_SIZE;

    List<FloatBuffer> trainImageBatches = new ArrayList<>(NUM_BATCHES);
    List<FloatBuffer> trainLabelBatches = new ArrayList<>(NUM_BATCHES);

    // Prepare training batches.
    for (int i = 0; i < NUM_BATCHES; ++i) {
        FloatBuffer trainImages = FloatBuffer.allocateDirect(BATCH_SIZE * IMG_HEIGHT * IMG_WIDTH).order(ByteOrder.nativeOrder());
        FloatBuffer trainLabels = FloatBuffer.allocateDirect(BATCH_SIZE * 10).order(ByteOrder.nativeOrder());

        // Fill the data values...
        trainImageBatches.add(trainImages.rewind());
        trainImageLabels.add(trainLabels.rewind());
    }

    // Run training for a few steps.
    float[] losses = new float[NUM_EPOCHS];
    for (int epoch = 0; epoch < NUM_EPOCHS; ++epoch) {
        for (int batchIdx = 0; batchIdx < NUM_BATCHES; ++batchIdx) {
            Map<String, Object> inputs = new HashMap<>();
            inputs.put("x", trainImageBatches.get(batchIdx));
            inputs.put("y", trainLabelBatches.get(batchIdx));

            Map<String, Object> outputs = new HashMap<>();
            FloatBuffer loss = FloatBuffer.allocate(1);
            outputs.put("loss", loss);

            interpreter.runSignature(inputs, outputs, "train");

            // Record the last loss.
            if (batchIdx == NUM_BATCHES - 1) losses[epoch] = loss.get(0);
        }

        // Print the loss output for every 10 epochs.
        if ((epoch + 1) % 10 == 0) {
            System.out.println(
              "Finished " + (epoch + 1) + " epochs, current loss: " + loss.get(0));
        }
    }

    // ...
}
您可以在 模型個人化示範應用程式中查看 Android 應用程式內模型重新訓練的完整程式碼範例。
執行幾個週期的訓練,以改善模型或進行個人化調整。實際上,您會使用在裝置上收集的資料執行這項額外訓練。為了簡化,這個範例使用與上一個訓練步驟相同的訓練資料。
train = interpreter.get_signature_runner("train")

NUM_EPOCHS = 50
BATCH_SIZE = 100
more_epochs = np.arange(epochs[-1]+1, epochs[-1] + NUM_EPOCHS + 1, 1)
more_losses = np.zeros([NUM_EPOCHS])


for i in range(NUM_EPOCHS):
  for x,y in train_ds:
    result = train(x=x, y=y)
  more_losses[i] = result['loss']
  if (i + 1) % 10 == 0:
    print(f"Finished {i+1} epochs")
    print(f"  loss: {more_losses[i]:.3f}")
Finished 10 epochs
  loss: 0.223
Finished 20 epochs
  loss: 0.216
Finished 30 epochs
  loss: 0.210
Finished 40 epochs
  loss: 0.204
Finished 50 epochs
  loss: 0.198
plt.plot(epochs, losses, label='Pre-training')
plt.plot(more_epochs, more_losses, label='On device')
plt.ylim([0, max(plt.ylim())])
plt.xlabel('Epoch')
plt.ylabel('Loss [Cross Entropy]')
plt.legend();
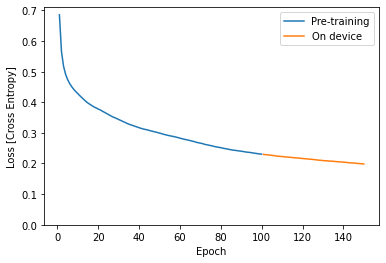
在上方,您可以看到裝置端訓練會從預先訓練停止的地方繼續執行。
儲存已訓練的權重
當您在裝置上完成訓練執行時,模型會更新其在記憶體中使用的權重集。使用您在 TensorFlow Lite 模型中建立的 save 簽名方法,您可以將這些權重儲存到檢查點檔案中,以供日後重複使用並改進您的模型。
save = interpreter.get_signature_runner("save")

save(checkpoint_path=np.array("/tmp/model.ckpt", dtype=np.string_))
{'checkpoint_path': array(b'/tmp/model.ckpt', dtype=object)}
在您的 Android 應用程式中,您可以將產生的權重儲存為配置給您應用程式的內部儲存空間中的檢查點檔案。
try (Interpreter interpreter = new Interpreter(modelBuffer)) {
    // Conduct the training jobs.

    // Export the trained weights as a checkpoint file.
    File outputFile = new File(getFilesDir(), "checkpoint.ckpt");
    Map<String, Object> inputs = new HashMap<>();
    inputs.put("checkpoint_path", outputFile.getAbsolutePath());
    Map<String, Object> outputs = new HashMap<>();
    interpreter.runSignature(inputs, outputs, "save");
}
還原已訓練的權重
每當您從 TFLite 模型建立解譯器時,解譯器最初都會載入原始模型權重。
因此,在您完成一些訓練並儲存檢查點檔案後,您需要執行 restore 簽名方法來載入檢查點。
一個好的規則是「每當您為模型建立解譯器時,如果檢查點存在,請載入它」。如果您需要將模型重設為基準行為,只需刪除檢查點並建立新的解譯器即可。
another_interpreter = tf.lite.Interpreter(model_content=tflite_model)
another_interpreter.allocate_tensors()

infer = another_interpreter.get_signature_runner("infer")
restore = another_interpreter.get_signature_runner("restore")
logits_before = infer(x=train_images[:1])['logits'][0]

# Restore the trained weights from /tmp/model.ckpt
restore(checkpoint_path=np.array("/tmp/model.ckpt", dtype=np.string_))

logits_after = infer(x=train_images[:1])['logits'][0]

compare_logits({'Before': logits_before, 'After': logits_after})
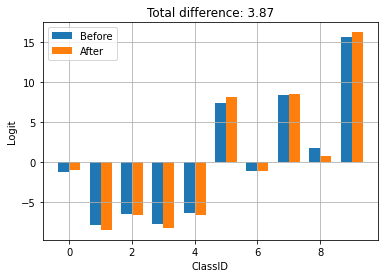
檢查點是透過使用 TFLite 進行訓練和儲存而產生。在上方,您可以看到套用檢查點會更新模型的行為。
在您的 Android 應用程式中,您可以從您先前儲存的檢查點檔案還原序列化的已訓練權重。
try (Interpreter anotherInterpreter = new Interpreter(modelBuffer)) {
    // Load the trained weights from the checkpoint file.
    File outputFile = new File(getFilesDir(), "checkpoint.ckpt");
    Map<String, Object> inputs = new HashMap<>();
    inputs.put("checkpoint_path", outputFile.getAbsolutePath());
    Map<String, Object> outputs = new HashMap<>();
    anotherInterpreter.runSignature(inputs, outputs, "restore");
}
使用已訓練的權重執行推論
載入先前從檢查點檔案儲存的權重後,執行 infer 方法會將這些權重與您的原始模型搭配使用,以改善預測。載入儲存的權重後,您可以使用 infer 簽名方法,如下所示。
infer = another_interpreter.get_signature_runner("infer")
result = infer(x=test_images)
predictions = np.argmax(result["output"], axis=1)

true_labels = np.argmax(test_labels, axis=1)
result['output'].shape
(10000, 10)
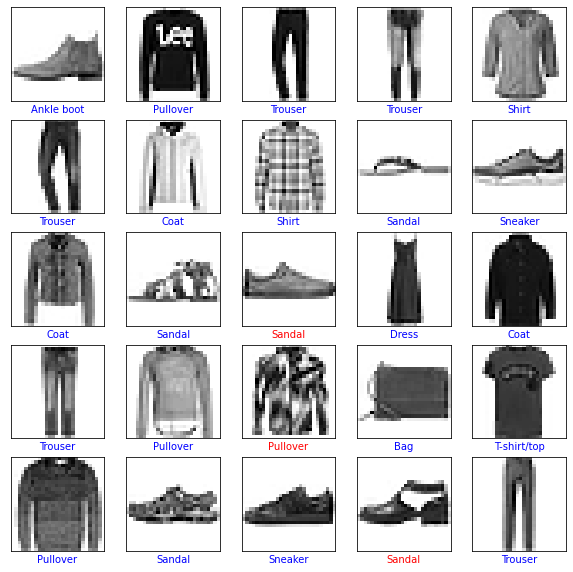
繪製預測標籤。
class_names = ['T-shirt/top', 'Trouser', 'Pullover', 'Dress', 'Coat',
               'Sandal', 'Shirt', 'Sneaker', 'Bag', 'Ankle boot']

def plot(images, predictions, true_labels):
  plt.figure(figsize=(10,10))
  for i in range(25):
      plt.subplot(5,5,i+1)
      plt.xticks([])
      plt.yticks([])
      plt.grid(False)
      plt.imshow(images[i], cmap=plt.cm.binary)
      color = 'b' if predictions[i] == true_labels[i] else 'r'
      plt.xlabel(class_names[predictions[i]], color=color)
  plt.show()

plot(test_images, predictions, true_labels)
predictions.shape
(10000,)
在您的 Android 應用程式中,還原已訓練的權重後,根據載入的資料執行推論。
try (Interpreter anotherInterpreter = new Interpreter(modelBuffer)) {
    // Restore the weights from the checkpoint file.

    int NUM_TESTS = 10;
    FloatBuffer testImages = FloatBuffer.allocateDirect(NUM_TESTS * 28 * 28).order(ByteOrder.nativeOrder());
    FloatBuffer output = FloatBuffer.allocateDirect(NUM_TESTS * 10).order(ByteOrder.nativeOrder());

    // Fill the test data.

    // Run the inference.
    Map<String, Object> inputs = new HashMap<>();
    inputs.put("x", testImages.rewind());
    Map<String, Object> outputs = new HashMap<>();
    outputs.put("output", output);
    anotherInterpreter.runSignature(inputs, outputs, "infer");
    output.rewind();

    // Process the result to get the final category values.
    int[] testLabels = new int[NUM_TESTS];
    for (int i = 0; i < NUM_TESTS; ++i) {
        int index = 0;
        for (int j = 1; j < 10; ++j) {
            if (output.get(i * 10 + index) < output.get(i * 10 + j)) index = testLabels[j];
        }
        testLabels[i] = index;
    }
}
恭喜!您現在已建構支援裝置端訓練的 TensorFlow Lite 模型。如需更多程式碼詳細資訊,請查看模型個人化示範應用程式中的範例實作項目。
如果您有興趣瞭解更多關於圖片分類的資訊,請查看 TensorFlow 官方指南頁面中的Keras 分類教學課程。本教學課程以該練習為基礎,並提供關於分類主題的更深入資訊。