|
|
|
 在 GitHub 上檢視原始碼 在 GitHub 上檢視原始碼
|
|
總覽
自動語音辨識中最大的挑戰之一是音訊資料的準備和擴增。音訊資料分析可能在時域或頻域中進行,這與影像等其他資料來源相比,增加了額外的複雜性。
作為 TensorFlow 生態系統的一部分,tensorflow-io 套件提供了許多有用的音訊相關 API,有助於簡化音訊資料的準備和擴增。
設定
安裝必要的套件,並重新啟動執行階段
pip install tensorflow-io
用法
讀取音訊檔案
在 TensorFlow IO 中,類別 tfio.audio.AudioIOTensor 可讓您將音訊檔案讀取到延遲載入的 IOTensor 中
import tensorflow as tf
import tensorflow_io as tfio

audio = tfio.audio.AudioIOTensor('gs://cloud-samples-tests/speech/brooklyn.flac')

print(audio)
<AudioIOTensor: shape=[28979 1], dtype=<dtype: 'int16'>, rate=16000>
在以上範例中,Flac 檔案 brooklyn.flac 來自 Google Cloud 中的公開存取音訊片段。
GCS 位址 gs://cloud-samples-tests/speech/brooklyn.flac 直接使用,因為 GCS 是 TensorFlow 中支援的檔案系統。除了 Flac 格式之外,WAV、Ogg、MP3 和 MP4A 也受到 AudioIOTensor 的支援,並具有自動檔案格式偵測功能。
AudioIOTensor 是延遲載入的,因此最初只顯示形狀、dtype 和取樣率。AudioIOTensor 的形狀表示為 [samples, channels],這表示您載入的音訊片段是單聲道,在 int16 中具有 28979 個樣本。
音訊片段的內容只會在需要時讀取,可以透過 to_tensor() 將 AudioIOTensor 轉換為 Tensor,或透過切片。當只需要大型音訊片段的一小部分時,切片特別有用
audio_slice = audio[100:]

# remove last dimension
audio_tensor = tf.squeeze(audio_slice, axis=[-1])

print(audio_tensor)
tf.Tensor([16 39 66 ... 56 81 83], shape=(28879,), dtype=int16)
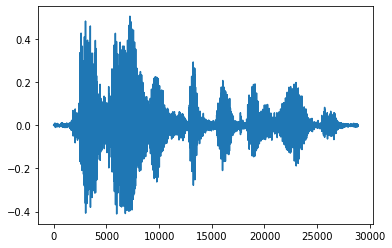
音訊可以透過以下方式播放
from IPython.display import Audio

Audio(audio_tensor.numpy(), rate=audio.rate.numpy())
將張量轉換為浮點數並在圖表中顯示音訊片段會更方便
import matplotlib.pyplot as plt


tensor = tf.cast(audio_tensor, tf.float32) / 32768.0

plt.figure()
plt.plot(tensor.numpy())
[<matplotlib.lines.Line2D at 0x7fbdd3eb72d0>]
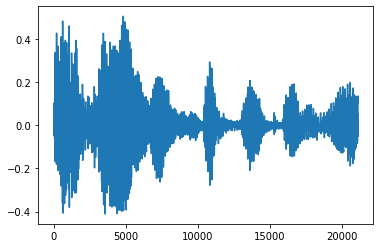
修剪雜訊
有時從音訊中修剪雜訊是有意義的,這可以透過 API tfio.audio.trim 完成。從 API 傳回的是片段的 [start, stop] 位置對
position = tfio.audio.trim(tensor, axis=0, epsilon=0.1)
print(position)

start = position[0]
stop = position[1]
print(start, stop)

processed = tensor[start:stop]

plt.figure()
plt.plot(processed.numpy())
tf.Tensor([ 2398 23546], shape=(2,), dtype=int64)
tf.Tensor(2398, shape=(), dtype=int64) tf.Tensor(23546, shape=(), dtype=int64)
[<matplotlib.lines.Line2D at 0x7fbdd3dce9d0>]
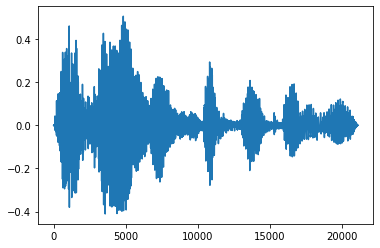
淡入和淡出
一種有用的音訊工程技術是淡化,它可以逐漸增加或減少音訊訊號。這可以透過 tfio.audio.fade 完成。tfio.audio.fade 支援不同形狀的淡化,例如 linear、logarithmic 或 exponential
fade = tfio.audio.fade(
    processed, fade_in=1000, fade_out=2000, mode="logarithmic")

plt.figure()
plt.plot(fade.numpy())
[<matplotlib.lines.Line2D at 0x7fbdd00d9b10>]
頻譜圖
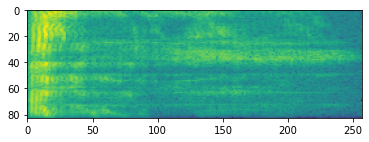
進階音訊處理通常處理頻率隨時間的變化。在 tensorflow-io 中,波形可以透過 tfio.audio.spectrogram 轉換為頻譜圖
# Convert to spectrogram
spectrogram = tfio.audio.spectrogram(
    fade, nfft=512, window=512, stride=256)

plt.figure()
plt.imshow(tf.math.log(spectrogram).numpy())
<matplotlib.image.AxesImage at 0x7fbdd005add0>
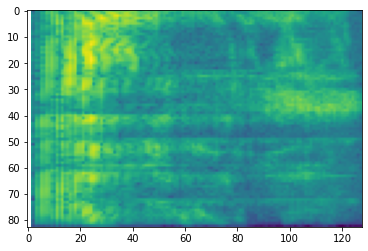
也可以對不同尺度進行額外轉換
# Convert to mel-spectrogram
mel_spectrogram = tfio.audio.melscale(
spectrogram, rate=16000, mels=128, fmin=0, fmax=8000)
plt.figure()
plt.imshow(tf.math.log(mel_spectrogram).numpy())
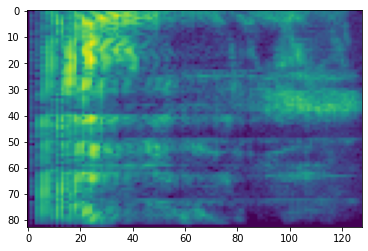
# Convert to db scale mel-spectrogram
dbscale_mel_spectrogram = tfio.audio.dbscale(
mel_spectrogram, top_db=80)
plt.figure()
plt.imshow(dbscale_mel_spectrogram.numpy())
<matplotlib.image.AxesImage at 0x7fbcfb20bd10>
SpecAugment
除了上述資料準備和擴增 API 之外,tensorflow-io 套件還提供進階頻譜圖擴增,最值得注意的是 SpecAugment:自動語音辨識的簡單資料擴增方法 (Park et al., 2019) 中討論的頻率和時間遮罩。
頻率遮罩
在頻率遮罩中,頻率通道 [f0, f0 + f) 會被遮罩,其中 f 從 0 到頻率遮罩參數 F 的均勻分佈中選擇,而 f0 從 (0, ν − f) 中選擇,其中 ν 是頻率通道的數量。
# Freq masking
freq_mask = tfio.audio.freq_mask(dbscale_mel_spectrogram, param=10)

plt.figure()
plt.imshow(freq_mask.numpy())
<matplotlib.image.AxesImage at 0x7fbcfb155cd0>
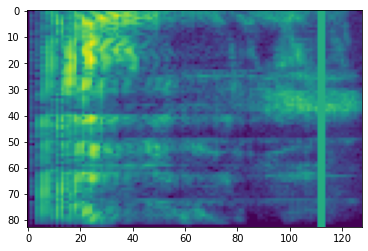
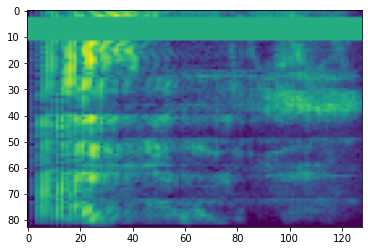
時間遮罩
在時間遮罩中,t 個連續時間步長 [t0, t0 + t) 會被遮罩,其中 t 從 0 到時間遮罩參數 T 的均勻分佈中選擇,而 t0 從 [0, τ − t) 中選擇,其中 τ 是時間步長。
# Time masking
time_mask = tfio.audio.time_mask(dbscale_mel_spectrogram, param=10)

plt.figure()
plt.imshow(time_mask.numpy())
<matplotlib.image.AxesImage at 0x7fbcfb0d9bd0>